블로그 이미지

카테고리

데꾸벅 (194)
Publisher (39)
Scripter (97)
Programmer (1)
Designer (30)
Integrator (18)
Pattern Searcher (4)
News (2)
강좌 및 번역 (3)

최근에 올라온 글

최근에 달린 댓글


기존 100% 레이아웃잡을때 중간에 들어가는 컨텐츠를 항상 height:100% 로 표시하여 header와 footer의 높이만큼 margin-top, margin-bottom 처리하는곳에서 착안하여 Flexible한 100% layout 을 표준모드로 구현해 보았다.

지원하는 Doctype
표준모드와 비표준모드에서 모두 테스트해본 결과 잘나온다.. ^^;

<!DOCTYPE HTML PUBLIC "-//W3C//DTD HTML 4.01 Transitional//EN" "http://www.w3.org/TR/html4/loose.dtd">
<!DOCTYPE HTML PUBLIC "-//W3C//DTD HTML 4.01//EN" "http://www.w3.org/TR/html4/strict.dtd">
<!DOCTYPE html PUBLIC "-//W3C//DTD XHTML 1.0 Transitional//EN" "http://www.w3.org/TR/xhtml1/DTD/xhtml1-transitional.dtd">
<!DOCTYPE html PUBLIC "-//W3C//DTD XHTML 1.0 Strict//EN" "http://www.w3.org/TR/xhtml1/DTD/xhtml1-strict.dtd">
<!DOCTYPE html PUBLIC "-//W3C//DTD XHTML 1.0 Transitional//EN" "http://www.w3.org/TR/xhtml1/DTD/xhtml1-transitional.dtd">
<!DOCTYPE html>


지원 브라우저
IE 5.5, 6,7,8,9  사파리 5.0 , 오페라 10.60, 파폭3.6 , 크롬5.0 에서 테스트 해본결과 잘나온다
01234567


2단 소스

<!DOCTYPE html PUBLIC "-//W3C//DTD XHTML 1.0 Transitional//EN" "http://www.w3.org/TR/xhtml1/DTD/xhtml1-transitional.dtd">
<html xml:lang="ko" xmlns="http://www.w3.org/1999/xhtml">
<head>
<title>데꾸벅 테스트</title>
<meta http-equiv="Content-Type" content="text/html; charset=euc-kr" />
<style type="text/css">

* {
    padding:0;
    margin:0
}

html,body{
height:100%;
}


#header{
position:absolute;
top:0;left:0;
width:100%;
height:70px;
background:gray;
overflow:hidden;
}

#footer {
position:relative;
clear:both;
height:50px;
background:green;
}


#container{
min-height:100%;
margin-left:200px;  /*왼쪽 영역 만큼 뛰기*/
background:blue;
margin-bottom:-50px;    /*푸터height만큼 마진값*/
}

* html #container{height:100%;} /* IE7 hack*/


    /*왼쪽 영역 백그라운드 처리는 body부분에서 처리*/
    body {
        background:yellow;
    }
    #left {
     position:relative;
     width:200px;
     float:left;
     margin-left:-200px;
    }

    #headHeight{height:70px;}   /*컨텐츠영역 상단 보정(header height만큼 고정*/
    #footerHeight{clear:both;height:50px;width:100%;}   /*컨텐츠영역 하단 보정(footer height만큼 고정*/


    #content {
        position:relative;
        z-index:1;
    }

    /* IE3pixel 버그를 위한것 */
    * html #content {
        height:1%;
    }

</style>


</head>
<body>
<!-- header s -->
<div id="header">헤더영역</div>
<!-- header e -->


<!-- 메인 컨텐츠 영역 래퍼 s -->
<div id="container">
    <div id="headHeight"><!-- 상단고정영역 --></div>

    <!-- 왼쪽 s -->
    <div id="left">
        왼쪽<br />
        왼쪽<br />
        왼쪽<br />
    </div>
    <!-- 왼쪽 e -->

    <!-- 중앙 컨텐츠 s -->
    <div id="content">
        중앙 컨텐츠<br />
        중앙 컨텐츠<br />
        중앙 컨텐츠<br />
        중앙 컨텐츠<br />
    </div>
    <!-- 중앙 컨텐츠 e -->


    <div id="footerHeight"><!-- 하단고정영역 --></div>
</div>
<!-- 메인 컨텐츠 영역 래퍼 s -->


<!-- footer s -->
<div id="footer">푸터영역</div>
<!-- footer e -->

</body>
</html>


3단소스
<!DOCTYPE html PUBLIC "-//W3C//DTD XHTML 1.0 Transitional//EN" "http://www.w3.org/TR/xhtml1/DTD/xhtml1-transitional.dtd">
<html xml:lang="ko" xmlns="http://www.w3.org/1999/xhtml">
<head>
<title>데꾸벅 테스트</title>
<meta http-equiv="Content-Type" content="text/html; charset=euc-kr" />
<style type="text/css">

* {
    padding:0;
    margin:0
}

html,body{
color: #000;
height:100%;
}


#header{
position:absolute;
top:0;left:0;
width:100%;
height:70px;
background:gray;
overflow:hidden;
}

#footer {
position:relative;
clear:both;
height:50px;
background:green;
}


#container{
min-height:100%;
margin-left:200px;  /*왼쪽 영역 만큼 뛰기*/
margin-right:100px;
background:blue;
margin-bottom:-50px;    /*푸터height만큼 마진값*/
}

* html #container{height:100%;} /* IE7 hack*/

    /*왼쪽 영역 백그라운드 처리는 body부분에서 처리*/
    body {
        background:yellow;
    }
    #left {
     position:relative;
     width:200px;
     float:left;
     margin-left:-200px;
    }
    * html #left {margin-right:-3px;padding-bottom:50px}
    * > html #left {padding-bottom:0}


    #right {
     position:relative;
     width:100px;
     float:right;
     margin-right:-100px;
    }


    #headHeight{height:70px;}   /*컨텐츠영역 상단 보정(header height만큼 고정*/
    #footerHeight{clear:both;height:50px;width:100%;}   /*컨텐츠영역 하단 보정(footer height만큼 고정*/


    #content {
        position:relative;
        z-index:1;
    }

    /* IE3pixel 버그를 위한것 */
    * html #content {
        height:1%;
    }


</style>


</head>
<body>
<!-- header s -->
<div id="header">헤더영역</div>
<!-- header e -->


<!-- 메인 컨텐츠 영역 래퍼 s -->
<div id="container">
    <div id="headHeight"><!-- 상단고정영역 --></div>

    <!-- 왼쪽 s -->
    <div id="left">
        왼쪽<br />
        왼쪽<br />
        왼쪽<br />
    </div>
    <!-- 왼쪽 e -->

    <!-- 오른쪽 s -->
    <div id="right">
        오른쪽<br />
        오른쪽<br />
        오른쪽<br />
    </div>
    <!-- 오른쪽 e -->

    <!-- 중앙 컨텐츠 s -->
    <div id="content">
        중앙 컨텐츠<br />
        중앙 컨텐츠<br />
        중앙 컨텐츠<br />
        중앙 컨텐츠<br />
    </div>
    <!-- 중앙 컨텐츠 e -->


    <div id="footerHeight"><!-- 하단고정영역 --></div>
</div>
<!-- 메인 컨텐츠 영역 래퍼 s -->


<!-- footer s -->
<div id="footer">푸터영역</div>
<!-- footer e -->

</body>
</html>


소스다운로드


참고적으로 위 방법은 쓸데없는 마크업이 많이 들어가는 이유로 개인적으로는 잘 쓰지 않는 방법입니다.
좀더 깔끔한 소스를 원하신다면..   신현석님의 "CSS절대 위치를 사용한 프레임효과" 를 참조하세요..


'Publisher > CSS' 카테고리의 다른 글

CSS3의 구조적인 가상선택자  (1) 2013.03.21
보석같은 CSS3 함수 calc()  (3) 2013.03.11
간단한 CSS Reset  (4) 2010.05.24
CSS 최적화 기법  (7) 2010.03.08
지금 바로 쓸수 있는 CSS3  (0) 2010.03.07
Post by 넥스트리소프트 데꾸벅(techbug)
, |

간단한 CSS Reset

Publisher/CSS / 2010. 5. 24. 11:49


모든 브라우저마다 CSS가 동일하게 적용되는것은 아니다.
CSS Reset 기능은 이러한 각 브라우저마다 동일한 효과를 주기위해 가장 기본이 되는 CSS를 말한다.
보통 구축하는 웹페이지마다 최초 base.css 나  reset.css 를 두어 전체 웹페이지에 적용되는 CSS를 두기 마련인데 이러한 것이 CSS Reset이라고 보면 된다. 특히 웹퍼블리셔들이 여러 프로젝트를 뛰면서 축적된 경험을 바탕으로 항상 가지고 다니는 CSS들이 대부분 이러한 CSS Reset파일들이나 각 요소들, 예를 들어, 테이블, 탭, 버튼 등 프로젝트 특성을 타지 않는 CSS파일들은 어느 프로젝트나 적용시킬수 있다.
일례로 데꾸벅의 경우는 CSS Reset 파일이 항상 base.css로 만들어 놓고 @import 구문을 이용해서 사용한다. 

참고적으로 많이들 사용하는 CSS Mini Reset 파일들을 공개한다.


이외에 CSS를 인터프리터언어와 같이 프로그래밍언어처럼 사용하는 여러 CSS프레임웍들이 존재하나 아직은 많이 사용되고 있지는 않다.


html, body, div, span, applet, object, iframe,
h1, h2, h3, h4, h5, h6, p, blockquote, pre,
a, abbr, acronym, address, big, cite, code,
del, dfn, em, font, img, ins, kbd, q, s, samp,
small, strike, strong, sub, sup, tt, var,
dl, dt, dd, ol, ul, li,
fieldset, form, label, legend,
table, caption, tbody, tfoot, thead, tr, th, td {
margin: 0;
padding: 0;
border: 0;
outline: 0;
font-weight: inherit;
font-style: inherit;
font-size: 100%;
font-family: inherit;
vertical-align: baseline;
}
/* remember to define focus styles! */
:focus {
outline: 0;
}
body {
line-height: 1;
color: black;
background: white;
}
ol, ul {
list-style: none;
}
/* tables still need 'cellspacing="0"' in the markup */
table {
border-collapse: separate;
border-spacing: 0;
}
caption, th, td {
text-align: left;
font-weight: normal;
}
blockquote:before, blockquote:after,
q:before, q:after {
content: "";
}
blockquote, q {
quotes: "" "";
}


body,div,dl,dt,dd,ul,ol,li,h1,h2,h3,h4,h5,h6,pre,form,fieldset,input,textarea,p,blockquote,th,td { margin:0; padding:0; } table { border-collapse:collapse; border-spacing:0; } fieldset,img { border:0; } address,caption,cite,code,dfn,em,strong,th,var { font-style:normal; font-weight:normal; } ol,ul { list-style:none; } caption,th { text-align:left; } h1,h2,h3,h4,h5,h6 { font-size:100%; font-weight:normal; } q:before,q:after { content:''; } abbr,acronym { border:0; }


/*
    Tripoli is a generic CSS standard for HTML rendering. 
    Copyright (C) 2007  David Hellsing

    This program is free software: you can redistribute it and/or modify
    it under the terms of the GNU General Public License as published by
    the Free Software Foundation, either version 3 of the License, or
    (at your option) any later version.

    This program is distributed in the hope that it will be useful,
    but WITHOUT ANY WARRANTY; without even the implied warranty of
    MERCHANTABILITY or FITNESS FOR A PARTICULAR PURPOSE.  See the
    GNU General Public License for more details.

    You should have received a copy of the GNU General Public License
    along with this program.  If not, see <http://www.gnu.org/licenses/>.
*/

* {
text-decoration: none;
font-size: 1em;
outline: none;
padding: 0;
margin: 0;
}
code, kbd, samp, pre, tt, var, textarea, 
input, select, isindex, listing, xmp, plaintext {
white-space: normal;
font-size: 1em;
font: inherit;
}
dfn, i, cite, var, address, em { 
font-style: normal; 
}
th, b, strong, h1, h2, h3, h4, h5, h6 { 
font-weight: normal; 
}
a, img, a img, iframe, form, fieldset, 
abbr, acronym, object, applet, table {
border: none; 
}
table {
border-collapse: collapse;
border-spacing: 0;
}
caption, th, td, center { 
vertical-align: top;
text-align: left;
}
body { 
background: white; 
line-height: 1; 
color: black; 
}
q { 
quotes: "" ""; 
}
ul, ol, dir, menu { 
list-style: none; 
}
sub, sup { 
vertical-align: baseline; 
}
a { 
color: inherit; 
}
hr { 
display: none; 
}
font { 
color: inherit !important; 
font: inherit !important; 
color: inherit !important; /* editor's note: necessary? */ 
}
marquee {
overflow: inherit !important;
-moz-binding: none;
}
blink { 
text-decoration: none; 
}
nobr { 
white-space: normal; 
}


html, body, ul, ol, li, form, fieldset, legend
{
margin: 0;
padding: 0;
}

h1, h2, h3, h4, h5, h6, p { margin-top: 0; }

fieldset,img { border: 0; }

legend { color: #000; }

li { list-style: none; }

sup { vertical-align: text-top; }

sub { vertical-align: text-bottom; }

table
{
border-collapse: collapse;
border-spacing: 0;
}

caption, th, td
{
text-align: left;
vertical-align: top;
font-weight: normal;
}

input, textarea, select
{
font-size: 110%;
line-height: 1.1;
}

abbr, acronym
{
border-bottom: .1em dotted;
cursor: help;
}


'Publisher > CSS' 카테고리의 다른 글

보석같은 CSS3 함수 calc()  (3) 2013.03.11
Height 100% 2~3단 컨텐츠 레이아웃잡기  (18) 2010.07.27
CSS 최적화 기법  (7) 2010.03.08
지금 바로 쓸수 있는 CSS3  (0) 2010.03.07
Firefox에서 링크 점선 없애기  (2) 2010.03.06
Post by 넥스트리소프트 데꾸벅(techbug)
, |


오늘자 ajaxian을 보다가 굉장한 CSS 애니메이션을 보게되서 함 분석해 봅니다.
이미지 3개와 background-position프로퍼티와 :hover 가상클래스를 사용하여 3D입체 이미지를 구현했군요~
고생꽤나했을듯~ ㅠ.,ㅠ;   이런거 보면 대단하다 보다는 고생이 먼저 떠오르는 이유는 뭘까요?


사용한 이미지

사용된소스 : 원본


원본소스다운로드 : 


이미지 하나에 background-position을 이용한 애니메이션

위 영역에 마우스를 올려보세요 ^^ 
이전에 포스팅한 CSS Sprites에서도 언급한 CSS background-position을 이용한 애니메이션입니다


사용된 이미지

소스


Post by 넥스트리소프트 데꾸벅(techbug)
, |

CSSHttpRequest

Scripter/AJAX / 2008. 11. 12. 15:11

XML과 XMLHttpRequest(XHR)의 시대는 물건너 갔는가?
JSON(JSONML)과 CSS만으로 통신을 하다 못해 이제는 CSSHttpRequest까지 나왔다.

CSS의 Hack을 이용한 것으로 cross-domain이 가능하다.
CSSHttpRequest(CHR)은 CSS 통신을 위한 크로스도메인 AJAX 메쏘드이다.

CSSHttpRequest.js
(function(){
    var chr = window.CSSHttpRequest = {};
   
    chr.ID = "__csshttprequest__";
    chr.DELAY = "50";
    chr.counter = 0;
    chr.requests = {};
    chr.timeout = null;
    chr.styleSheet = null;
    chr.styleElement = null;
   
   
    chr.get = function(url, callback) {
        var id = (++chr.counter);
        var s = chr.getStyleSheet();
        var item, index;
       
        // IE
        if(s.addImport) {
            index = s.addImport(url);
            item = s.imports(index);
        }
       
        // W3C
        else if(s.insertRule) {
            index = s.insertRule("@import url(" + url + ");", 0);
            item = s.cssRules[index];
        }
       
        chr.startPoll();
        return chr.requests[id] = {
            id: id,
            index: index,
            item: item,
            styleSheet: item.styleSheet || item,
            callback: callback
        };
    };
       
   
    chr.getStyleSheet = function() {
        if(chr.styleSheet)
            return chr.styleSheet;
       
        var s, e;
        if(document.createStyleSheet) {
            s = document.createStyleSheet();
            e = s.owningElement || s.ownerNode;
        } else {
            e = document.createElement("style");
            s = e.sheet;
        }
       
        e.setAttribute("type", "text/css");
        e.setAttribute("media", "print, csshttprequest");
        e.setAttribute("title", chr.ID);
        e.setAttribute("id", chr.ID);
       
        if(!e.parentNode)
            document.getElementsByTagName("head")[0].appendChild(e);
        if(!s)
            s = e.sheet;
       
        chr.styleSheet = s;
        chr.styleElement = e;
       
        return s;
    };
   
   
    chr.reset = function() {
        var s = chr.getStyleSheet();
        if(s.imports)
            while(s.imports.length)
                s.removeImport(0);
        else if(s.cssRules)
            while(s.cssRules.length)
                s.deleteRule(0);
        chr.requests = {};
    };
   
   
    chr.startPoll = function() {
        if(chr.timeout)
            return;
        chr.timeout = window.setTimeout(chr.poll, chr.DELAY);
    };
   
   
    chr.poll = function() {
        chr.timeout = null;
        var retry = false;
       
        for(var id in chr.requests) {
            var request = chr.requests[id];
            if(id != request.id)
                continue;
            var response = chr.parse(request.item.styleSheet || request.item);
            if(response === undefined)
                retry = true;
            else {
                delete chr.requests[id];
                request.callback(response, request);
            }
        }
       
        if(retry)
            chr.startPoll();
        else
            chr.reset();
    };
   
   
    chr.parse = function(s) {
        if(!s)
            return;
       
        var res = "";
        var d = decodeURIComponent;
       
        // IE
        if(s.imports && s.imports.length) {
            for(var i = 0; i < s.imports.length; i++) {
                var m = s.imports(i).href.match(/about\:chr\:(.+)/);
                if(m && m[1])
                    res += m[1];
            }
            return d(res);
        }
       
        // W3C
        else if(s.cssRules && s.cssRules.length) {           
            var rs = s.cssRules;
            for(var i = 0; i < rs.length; i++) {
                var r = rs[i];
                if(r.type != CSSRule.IMPORT_RULE)
                    continue;
                var m = r.cssText.match(/@import\s+url\("?about\:chr\:([^")]+)"?\)/);
                if(m && m[1])
                    res += m[1];
            }
            return d(res);
        }
    };
})();


XHR이 XML이나 JSON을 타겟으로 삼는다면 CHR은 CSS파일의 @import url()을 이용한다.
CSSJSON 이나 CSSML을 이용한것이 사실 XML/XSLT를 이용한것 보다 화면레더링하기는 사실 더 편하고 관리하기도 쉽다. CSS,JSON을 이용한다면 XML Node찾는것 보다 더 쉽지 않을까?


CHR을 이용하려면 AJAX Wrapper인 CSSHttpRequest.js 을 받아서 아래와 같이 입력한다.
    CSSHttpRequest.get(
        http://www.nb.io/hacks/csshttprequest/hello-world/helloworld.css,
        function(response) { alert(response); }
    );
보는바와 같이 css를 호출한다. 해당 css를 살펴보면
 @import url(about:chr:Hello%20World!);
와 같이 CSS의 about: 을 이용한다.

CHR은 XHR이나 JSONP와 같은 sampe-origin policy (같은 도메인에서 동작)과 다른 범주에 속한다. (흠..번역이..쩝..) JSONP와 같이 CHR도 GET Reqeust밖에 사용하지 못한다.


샘플 :


참조 사이트 :
http://nb.io/hacks/csshttprequest/


'Scripter > AJAX' 카테고리의 다른 글

Ajax Framework 분석  (0) 2009.05.04
HTTP Header에 대하여  (0) 2008.11.08
AJAX에서 즐겨찾기와 뒤로가기를 다루는 방법  (0) 2008.09.24
100라인 Ajax Wrapper  (0) 2008.04.19
어떤 AJAX Framework를 선택할 것인가.  (0) 2008.03.14
Post by 넥스트리소프트 데꾸벅(techbug)
, |

요즘 구글크롬으로 이제껏 작업했던 사이트의 버그 잡는 쏠쏠한(ㅠ.,ㅠ)재미에 푹 빠졌다.
google chrome의 경우 webkit엔진을 사용하므로 safari 와 비슷하게 작동해서 불행히도 css버그도 같이 공유하고 잇따.

Safari , google chrome, FF2 의 경우 Fieldset 버그가 존재한다.
이럴경우에는 다음과 같이 처리하면 된다.

fieldset:after {content: “.”; display: block; height: 0; clear: both; } 

위의 내용중 :after는 CSS2 Spec에 나온것이므로 기술하지 않은 곳에서는 다음과 같이 작업한다.
fieldset {display: block; height: 0; clear: both; }


<=== height:0, clear:both 가 중요하다.. ㅡ.,ㅡ;


사족을 붙이자면 실제 작업을 하다가 보면 DTD버전이 4.01 이냐 xhtml1.0 이냐에 따라 이놈의 fieldset은 유난히 많이 틀리다는것을 알수 있다.

html4.01일 경우에는 <fieldset>밑에  첫번째 자식노드로 <legend>가 반드시 필요하다
html4.01에서 "반드시" 라는 것이 존재하는것이 이놈 뿐이다... 대부분 W3C 권고안이기 때문에 생략이 가능하나 이놈만은 생략하면 validtion부분에서 빨간색으로 표현된다... ㅡ.,ㅡ;

그러나 xhtml1.0에서는 생략이 가능하다....


Post by 넥스트리소프트 데꾸벅(techbug)
, |

IE7 의 렌더링 방식이 IE6과 다르다.
CSS testing of Selector and Pseudo selectors 를 보면 IE7 은 FF 에 더 가까와 지고 있다.
그래서 바야흐로 브라우저 3개를 켜고 코딩을 해야하는 시대가 온 것이다.

이를 해결하기 위한 방법 중 하나는 Selector Hack 을 이용하는 것이다.
.context_bar_form_field
{
height: 15px; // 모든 브라우저
#height: 15px; // IE 전용
_height: 21px; // IE6.0 과 이전버젼용
}
우선 파폭에 맞추어 개발을 한 후 E7 에서 점검한다. 수정할 부분이 있다면 # 접두어를 붙여 수정해 준다. #이 붙은 것은 FF 에서 무시한다. 하지만 IE 는 재설정 해준다.
다음에 IE6 을 열고 수정하면서 _ 를 접두어로 붙여 새로 재설정 한다. IE7 은 '-' 가 붙은 것을 무시한다.
 
또 다른 방법은,
.title h3 {height: 21px; }
.title > h3 {height: auto; min-height: 21px; }

이렇게 하는 방법도있다. 맨 아래줄은 파이어폭스와 IE7만 적용된다.

한가지 주의할 점은

body
{
text-align:-moz-center; /*FF*/
#text-align:center; /*IE */
}
속성 키워드 자체가 다른 것이 많다. 주의 할 것!
위에서 처럼 속성값 자체가 다른 경우가 있다. 그러니 안된다고 hack 만 쳐다보고 있으면 밤세야 한다.

내가 보기에 가장 좋은 방법은 Conditional Comments 를 사용하는 것이다.
복잡하게 한 파일에 구질구질 작성하지 말고 파일을 분리해 버리는 것이다.

참고 :http://webborg.blogspot.com/2007/01/css-compatibility-ie6-ie7-firefox-and.html

<head>
<title>my css hacked page</title>
<link rel="stylesheet" type="text/css" href="styles.css" />
<!--[if lt IE 7]>
<link rel="stylesheet" type="text/css" href="iehacks.css">
<![endif]-->
<body>
  <div class="watermark">....</div>...


이렇게 분리해서 각개격파하는 것이 좋을 듯 싶다.


IE 용인 Expression을 사용하여 본다면

a { expression(어쩌구 문법) }

이렇게 해서 a 태그 즉, 링크에 걸린 항목에 대하여 Expression은 적용 시킬 수 있을것입니다.

그럼 예로.. 링크주소중에 pdf 라은 확장자가 있다면 링크 앞에 자동으로 PDF 아이콘을 띄워봅시다.


a {
   padding-left: expression(this.href.indexOf('.pdf') > 0 ? '20px' : '');
   background: expression(this.href.indexOf('.pdf')>0 ? 'transparent url(pdf.gif) no-repeat center left' : '');
}

이건 IE 용입니다. Firefox에선 이렇게 하시면 됩니다.


a[href $='.pdf']{
   padding-left: 20px;
   background: transparent url(pdf.gif) no-repeat center left;
}

음... 불여시에서 사용하는게 훨씬 간편하네요 @@;;

[href $='.pdf'] 이 구문에서 $는 .pdf로 끝나는 것을 의미합니다.

.pdf로 시작하는 것을 찾으려면 $대신에 ^을 사용하시면 됩니다.

[href ^='.pdf']가 되겠죠. 그냥 포함 되어 있는지를 찾는 거라면 *을 사용하시면 됩니다.


<style>
a[href $='.pdf']{
   padding-left: 20px;
   background: transparent url(pdf.gif) no-repeat center left;
}

a {
   padding-left: expression(this.href.indexOf('.pdf') > 0 ? '20px' : '');
   background: expression(this.href.indexOf('.pdf')>0 ? 'transparent url(pdf.gif) no-repeat center left' : '');
}
</style>

<a href="test.pdf">test1</a><br/>
<a href="test.gif">test2</a>


Netscape 4 제외시키기

Netscape 4은 media속성값에 "screen"이외의 값이 올 경우 읽어 들이지 못하는 것을 이용한 방법이다.

<link rel="stylesheet" type="text/css" href="/css/style.css" media="all" /> 이나
<link rel="stylesheet" type="text/css" href="/css/style.css" media="screen, tv" /> 

라고 지정할 경우 Netscape 4은 읽어 들이지 못한다.

부분적으로 읽어들이지 못하게 하는 경우에는 Caio's hack인 /*/*/를 이용한다. 보통 코멘트는 */으로 닫지만 /*/으로 닫게 되면 Netscape 4에서는 인식되지 않는다. 그 뒤에 평상시의 코멘트 /* */를 적어두면 그 뒤의 스타일은 Netscape 4에서도 문제없이 적용된다.

p { /*/*/ color:white; /* */ } 

Mac IE 4.5, Netscape 4 제외시키기

@import룰로 url()함수를 이용하여 외부 스타일시트를 이중인용부호로 지정한다.
Mac IE 4.5는 @import에 url()함수를 이용하는 경우, 단일 인용부호와 인용부호가 없는 것이 아니면 읽어 들이지 못한다. Netscape 4은 @import를 지원하지 않는다.

@import url("/css/style.css")

Mac IE 5 제외시키기

CSS소스 안의 코멘트 서식을 /* \*/ 이라는 방식으로 기술한다. holly hack이라고 하며 그 뒤에 평상시의 코멘트 /* */를 적어두면 그 뒤의 스타일은 Mac IE 5에서도 문제없이 적용된다.

p { /* \*/ color:white; /* */ }

Win IE 4~5 제외시키기

셀렉터 바로 뒤에 /**/라고 적는다.

p/**/ { color:white;}

Win IE 4~5, Mac IE 4.5~5 제외시키기

프로퍼티와 값을 구분하는 콜론(;) 앞에 코멘트에 스페이스를 포함하여 /* */라고 적는다.

p { color/* */:white;}

Win IE 4~6, Mac IE 4, Netscape 4 제외시키기

셀렉터 앞에 html>body를 붙인다.

html>body p { color:white;}

Win IE 6 제외시키기

프로퍼티와 값을 구분하는 콜론(;)의 앞에, 스페이스와 코멘트를 /**/라고 적는다.

p { color /**/:white;}

star hack

셀렉트 앞에 *html를 붙이면, Win IE 4~6, Mac IE 4~5 등에는 스타일이 적용되고, 그 외의 브라우저에서는 적용되지 않는다.

*html p { color:white; }

underscore hack

프로퍼티의 가장 앞부분에 언더스코어(_)를 붙이면, Win IE 4~6에서 스타일이 적용되고, 다른 브라우저에서는 적용되지 않는다.

p { _color:white; }

hash hack

프로퍼티의 앞에 샾(#)을 붙이면, Win IE 4~6, Mac IE 5, Opera 7, Mozilla, Firefox에서는 스타일이 적용되고, 다른 브라우저에는 적용되지 않는다.

p { #color:white; }

star 7 hack

셀렉트의 앞에 html*을 붙이면, Win IE 5.5~6, Mac IE 5, Safari 등에서 스타일이 적용되고, 다른 브라우저에서는 적용되지 않는다. html*과 셀렉터사이에 스페이스를 넣지 않는다.

html*p { color:white; }

xmlns hack

속성셀렉터를 이용하여, html요소에 붙이는 xmlns속성을 스타일적용을 위하여 사용하는 방법.
Mozilla, Fire-fox, Opera 7/8, Safari 등 속성셀렉터를 서포트하는 브라우저에서는 스타일이 적용되고, 다른 브라우저에서는 적용되지 않는다.

html[xmlns] h1 { color:red; }

:root hack

셀렉터의 앞에 :root를 붙이면, Mozilla, Firefox, Mac IE 5, Safari 등 :root유사클래스를 지원하는 브라우저에만 스타일이 적용되고, 다른 브라우저에서는 적용되지 않는다.

:root h1 { color:red; }

Tantek box model hack

voice-family프로퍼티를 이용한 가장 유명한 박스모델핵.

div#content { width:500px; voice-family: ""}""; voice-family:inherit; width:400px; }

Win IE 5용 패스필터

@media tty { i{content:"";/*" "*/}}; @import '/css/style.css'; {;}/*";} }/* */

Win IE 5.5용 패스필터

@media tty { i{content:"";/*" "*/}}@m; @import '/css/style.css';/*";} }/* */

Win IE 5-5.5용 패스필터

@media tty { i{content:"";/*" "*/}}@import '/css/style.css';/*";} }/* */

모던브라우저용 패스필터

@import "null?"{"; @import "/css/style.css"; @import "null?"}";

이 이외에도 많은 핵(hack)이 존재한다. CSS Filters (dithered.com)에 다양한 CSS hack이 잘 정리되어 있으므로 참고하시길…


IE7에만 적용

IE7를 포함한 모든 IE에만 적용하는 방법은

IE7을 포함한 모던브라우저에 적용(IE6이하를 제외)

IE7을 제외한 모던브라우저에만 적용


위의 내용은 썬샤인님의 블로그에서 꿈쳐온 것입니다..

나이가 먹다보니 가끔 치매끼가 있어서.. 잊어버릴것 같아 살포시... ^^


Post by 넥스트리소프트 데꾸벅(techbug)
, |

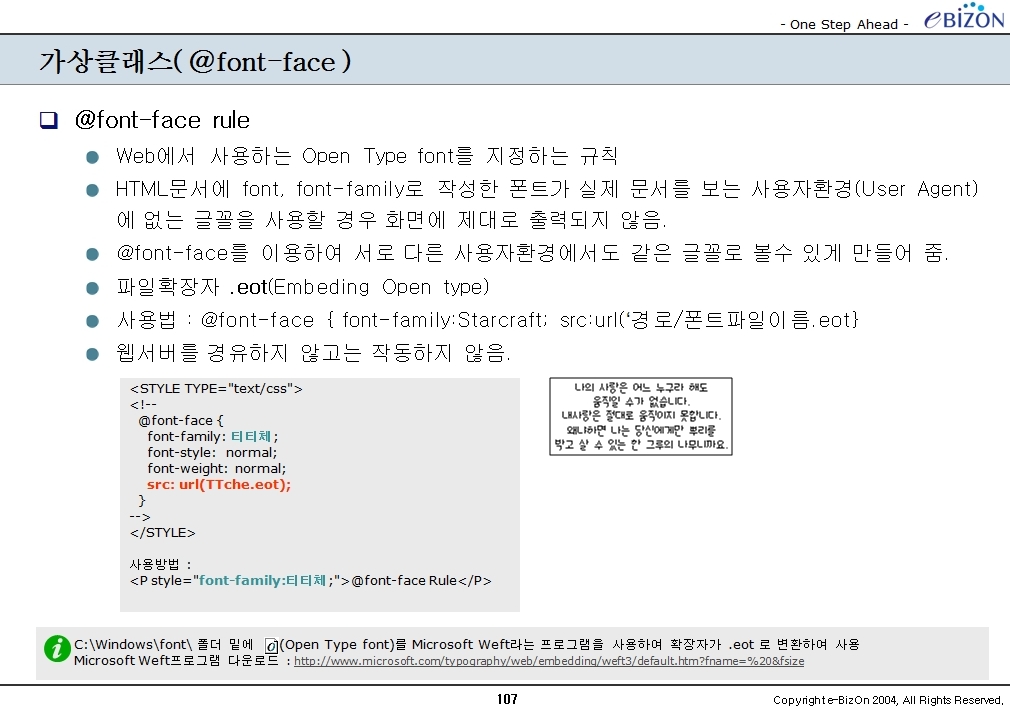
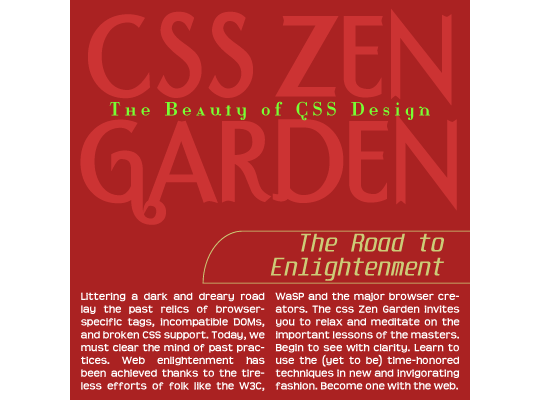
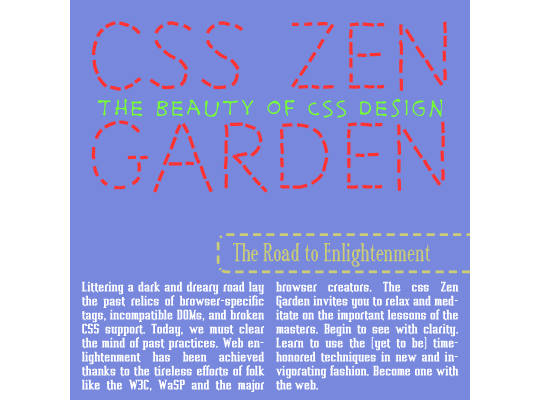
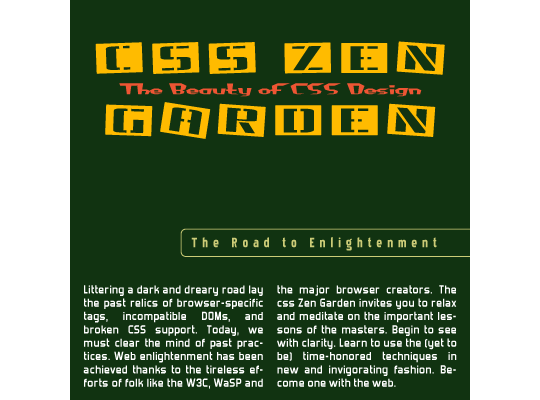
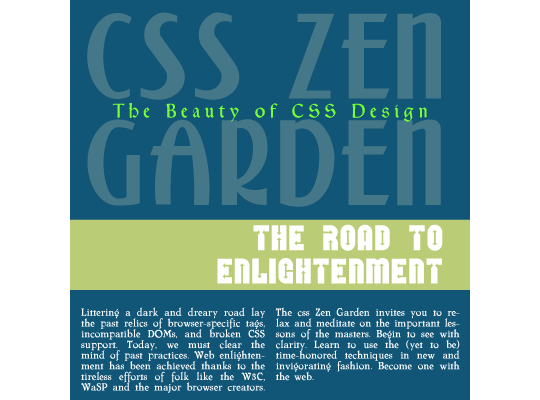
웹표준코딩에 익숙한 사용자라면 csszengarden 사이트를 잘 알것이다.
csszengarden 사이트를 보면 동일한 마크업(HTML)에 CSS만으로 페이지 자체가 완전히 틀린 분위기를 연출하게 만들며 환상적인 폰트사용을 볼수 있다.

@font-face에 대해서 말해보려 한다.
아래 이미지는 강의자료로 사용했던 내용이다.
사용자 삽입 이미지

웹폰트 제공사이트 : http://www.fontembedding.com/fonts-and-the-law/

오늘 Ajaxian에 올라온 포스트중에 재미있는 글이 있어 링크를 따라 가다 보니 다음과 같은 글이 있어 포스팅해 본다.
원문 : http://www.alistapart.com/articles/cssatten


웹폰트 사용할시
@font-face { font-family: "Kimberley"; src: url(http://www.princexml.com/fonts/larabie/ » kimberle.ttf) format("truetype"); }
h1 { font-family: "Kimberley", sans-serif }

@font-face와 같이 길게 쓰지 않고 간략한 표현
@import url(http://www.princexml.com/fonts/ » larabie/index.css) all;
h1 { font-family: Goodfish, serif }

W3에서 권장하는 방법
h1 { font-family: "Trebuchet MS", sans-serif; letter-spacing: 0.1em; }
@media all and (web-fonts: "truetype") {
   h1 { font-family: "Primer Apples", sans-serif; letter-spacing: 0.2em; }
}

사용자 삽입 이미지

Screenshot of web page using real TrueType fonts. PDF (via Prince). HTML (via your browser).


사용자 삽입 이미지

Screenshot of web page using real TrueType fonts. PDF (via Prince). HTML (via your browser).


사용자 삽입 이미지

Screenshot of web page using real TrueType fonts. PDF (via Prince). HTML (via your browser).


사용자 삽입 이미지

Screenshot of web page using real TrueType fonts. PDF (via Prince). HTML (via your browser).


사용자 삽입 이미지

Screenshot of web page using real TrueType fonts. PDF (via Prince). HTML (via your browser).


사용자 삽입 이미지

Screenshot of web page using real TrueType fonts. PDF (via Prince). HTML (via your browser).

사용자 삽입 이미지

Screenshot of web page using real TrueType fonts. PDF (via Prince). HTML (via your browser).


데꾸벅폰트 다운로드


HTML5에서 Canvas 관련 요약정리 CheatSheet


Post by 넥스트리소프트 데꾸벅(techbug)
, |
XHTML 1.0 에서 쿽스모드가 아닌 일반 Strict나 trasitional 모드에서 Height 100%를 CSS만으로 구현하기가 상당히 까다롭다.
그래서 구글신에게 물어봤다.

아는 분들은 알겠지만... 아래 방법들을 사용하면 되나 #body영역에 iframe이 들어간다면 iframe의 높이가 100%일때 처리되지 않는 단점이 있다.

[sample1]


<!DOCTYPE html PUBLIC "-//W3C//DTD XHTML 1.0 Strict//EN"
"http://www.w3.org/TR/xhtml1/DTD/xhtml1-strict.dtd">
<html xmlns="http://www.w3.org/1999/xhtml">
<head>
<meta http-equiv="Content-Type" content="text/html; charset=utf-8" />
<title>Untitled Document</title>
<style type="text/css">
html,
body {
    height: 100%;
    margin: 0;
    padding: 0;
}
#head {
    height: 100px;
    background: #ddd;
    position: relative;
    z-index: 1;
}
#body {
    min-height: 100%;
    margin: -100px 0 -50px;
}
* html #body {
    height: 100%;
}
#content-area {
    padding: 100px 0 50px;
}
#foot {
    height: 50px;
    background: #ddd;
}
</style>
</head>

<body>
<div id="head">
    요건 100px 높이 헤드
</div>
<div id="body">
    <div id="content-area">
        <p>컨텐츠 영역 1</p>
        <p>컨텐츠 영역 2</p>
        <p>컨텐츠 영역 3</p>
        <p>(계속 추가해서 테스트 가능)</p>
    </div>
</div>
<div id="foot">
    요건 50px 높이 풋
</div>
</body>
</html>


[sample2]
<!DOCTYPE html PUBLIC "-//W3C//DTD XHTML 1.0 Transitional//EN" "http://www.w3.org/TR/xhtml1/DTD/xhtml1-transitional.dtd">
<html xmlns="http://www.w3.org/1999/xhtml" xml:lang="ko">
<head>
<meta http-equiv="Content-Type" content="text/html; charset=utf-8" />
<title>CSS Layout - 100% height</title>
<style type="text/css">
html,body {
    margin:0;
    padding:0;
    height:100%; /* needed for container min-height */
    background:gray;
    font-family:arial,sans-serif;
    font-size:small;
    color:#666;
}

div#container {
    position:relative; /* needed for footer positioning*/
    margin:0 auto; /* center, not in IE5 */
    width:100%;
    background:#f0f0f0;
    height:auto !important; /* real browsers */
    height:100%; /* IE6: treaded as min-height*/
    min-height:100%; /* real browsers */
}

div#header {
    padding:1em;
    background:#ddd url("../csslayout.gif") 98% 10px no-repeat;
    border-bottom:6px double gray;

div#content {
    padding:1em 1em 5em; /* bottom padding for footer */
}

div#footer {
    position:absolute;
    width:100%;
    bottom:0; /* stick to bottom */
    background:#ddd;
    border-top:6px double gray;
    height:50px;
}
</style>
</head>
<body>
    <div id="container">
        <div id="header">
            헤더
        </div>

        <div id="content">
            컨텐츠
        </div>

        <div id="footer">
            푸터
        </div>
    </div>
</body>
</html>


[sample3]

  1. html,
  2. body {
  3. margin:0;
  4. padding:0;
  5. height:100%; /* 100 % height */
  6. }
  7. html>body #wrap {height:100%;} /* 100 % height */
  8. #header {
  9. width:100%;
  10. height:5em;
  11. }
  12. html>body #header {
  13. position:fixed;
  14. z-index:10; /* Prevent certain problems with form controls */
  15. }
  16. html>body #content-wrap {height:100%;} /* 100 % height */
  17. html>body #content {padding:6em 1em;} /* 6em = height of #header and #footer + 1em, 1em = give the content some breathing space */
  18. #footer {
  19. width:100%;
  20. height:5em;
  21. }
  22. html>body #footer {
  23. position:fixed;
  24. bottom:0;
  25. z-index:10; /* Prevent certain problems with form controls */
  26. }

[sample4]


  1. html,
  2. body {
  3. margin:0;
  4. padding:0;
  5. height:100%; /* 100 % height */
  6. }
  7. html>body #wrap {height:100%;} /* 100 % height */
  8. #wrap {
  9. width:40em;
  10. margin:0 auto;
  11. }
  12. #header {
  13. width:40em;
  14. height:5em;
  15. }
  16. html>body #header {
  17. position:fixed;
  18. z-index:10; /* Prevent certain problems with form controls */
  19. }
  20. html>body #content-wrap {height:100%;} /* 100 % height */
  21. html>body #content {padding:6em 1em;} /* 6em = height of #header and #footer + 1em, 1em = give the content some breathing space */
  22. #footer {
  23. width:40em;
  24. height:5em;
  25. }
  26. html>body #footer {
  27. position:fixed;
  28. bottom:0;
  29. z-index:10; /* Prevent certain problems with form controls */
  30. }


Post by 넥스트리소프트 데꾸벅(techbug)
, |
제목은 그럴듯 하지만 CSS의 hover속성을 이용한 mouseover, click 이벤트에 따른 이미지로드이다.

원본출처 : http://www.sitepen.com/blog/2008/03/28/svg-css-animations-fisheye-fun/
데모 : http://sitepen.com/labs/code/cssDock/

.dock img {
   width:50px;
   padding:10px;
   float:left;
   position:relative;
   display:block;
   -webkit-transition:width 0.5s ease-out, top 0.2s ease-out;
}
 
.dock img:hover {
   width:100px;
}
 
.dock img:active {
   top:-40px;
}
 
.dock img:hover + img {
   width:70px;
}
 

Post by 넥스트리소프트 데꾸벅(techbug)
, |
IE7과 IE8일때와 그 이하의 버전에서 "맑은 고딕"체를 사용하지 못하는 버전에서는 다른 폰트를 사용하려고 스타일쉬트를 작성하다 별도로 만들지 않고 hack을 이용해 볼까 하고 찾다가 아래와 같은 좋은 방법을 발굴(?)하다..


IE7 의 렌더링 방식이 IE6과 다르다.
CSS testing of Selector and Pseudo selectors 를 보면 IE7 은 FF 에 더 가까와 지고 있다.
그래서 바야흐로 브라우저 3개를 켜고 코딩을 해야하는 시대가 온 것이다.
이를 해결하기 위한 방법 중 하나는 Selector Hack 을 이용하는 것이다.

.context_bar_form_field {
    height: 15px; // 모든 브라우저
    #height: 15px; // IE 전용
    _height: 21px; // IE6.0 과 이전버젼용
}


우선 파폭에 맞추어 개발을 한 후 E7 에서 점검한다. 수정할 부분이 있다면 # 접두어를 붙여 수정해 준다. #이 붙은 것은 FF 에서 무시한다. 하지만 IE 는 재설정 해준다. 
다음에 IE6 을 열고 수정하면서 _ 를 접두어로 붙여 새로 재설정 한다. IE7 은 '-' 가 붙은 것을 무시한다.
또 다른 방법은,

.title h3 {height: 21px; }
.title > h3 {height: auto; min-height: 21px; }


이렇게 하는 방법도있다. 맨 아래줄은 파이어폭스와 IE7만 적용된다.한가지 주의할 점은


body {
    text-align:-moz-center; /*FF*/
    #text-align:center; /*IE */
}


속성 키워드 자체가 다른 것이 많다. 주의 할 것!
위에서 처럼 속성값 자체가 다른 경우가 있다. 그러니 안된다고 hack 만 쳐다보고 있으면 밤세야 한다.
내가 보기에 가장 좋은 방법은 Conditional Comments 를 사용하는 것이다.
복잡하게 한 파일에 구질구질 작성하지 말고 파일을 분리해 버리는 것이다.

참고 : WebBorg

<head>
<title>my css hacked page</title>
<link rel="stylesheet" type="text/css" href="styles.css" />
<!--[if lt IE 7]>
<link rel="stylesheet" type="text/css" href="iehacks.css">
<![endif]-->
<body>
  <div class="watermark">....</div>...

이렇게 분리해서 각개격파하는 것이 좋을 듯 싶다.


IE전용인 Expression을 사용하여 본다면
a { expression(어쩌구 문법) }

이렇게 해서 a 태그 즉, 링크에 걸린 항목에 대하여 Expression은 적용 시킬 수 있을것입니다.그럼 예로.. 링크주소중에 pdf 라은 확장자가 있다면 링크 앞에 자동으로 PDF 아이콘을 띄워봅시다.
a {
   padding-left: expression(this.href.indexOf('.pdf') > 0 ? '20px' : '');
   background: expression(this.href.indexOf('.pdf')>0 ? 'transparent url(pdf.gif) no-repeat center left' : '');
}

이건 IE 용입니다. Firefox에선 이렇게 하시면 됩니다.
a[href $='.pdf']{
   padding-left: 20px;
   background: transparent url(pdf.gif) no-repeat center left;
}

음... 불여시에서 사용하는게 훨씬 간편하네요 @@;;
[href $='.pdf'] 이 구문에서 $는 .pdf로 끝나는 것을 의미합니다.
.pdf로 시작하는 것을 찾으려면 $대신에 ^을 사용하시면 됩니다.
[href ^='.pdf']가 되겠죠. 그냥 포함 되어 있는지를 찾는 거라면 *을 사용하시면 됩니다.
<style>
a[href $='.pdf']{
    padding-left: 20px;
    background: transparent url(pdf.gif) no-repeat center left;
}

a {
    padding-left: expression(this.href.indexOf('.pdf') > 0 ? '20px' : '');
    background: expression(this.href.indexOf('.pdf')>0 ? 'transparent url(pdf.gif) no-repeat center left' : '');
}
</style>
<a href="nextree.pdf">넥스트리1</a><br/>
<a href="nextree.gif">넥스트리2</a>

출처 : 플래쉬카페


IE6 버그정리

Doubled Float-Margin Bug
버전: IE6
문제: float 요소에 margin을 적용했을 경우, margin이 이중으로 표현되는 문제
해결: float 요소에 display:inline 적용
참고: http://positioniseverything.net/explorer/doubled-margin.html

——

Peekaboo Bug
버전: IE6, IE7
문제: float 요소 안의 내용이 나오지 않다가, 브라우저 창 크기를 조절하거나 스크롤했을때에만 가끔 내용이 나타나는 문제
해결: float 요소와 그 요소를 감싸는 요소 모두 적용
position: relative; /* IE6 bugfix */
min-width: 0; /* IE7 bugfix */
참고: http://positioniseverything.net/explorer/peekaboo.html
참고: http://www.brownbatterystudios.com/sixthings/2007/01/06/css-first-aid-for-ie-peekaboo-bug/

——

Duplicate Characters Bug
버전: IE6
문제: float 요소가 1개 이상 연속될때 마지막 float 요소의 문자 끝부분이 중복 출력되는 문제로, float 요소 내부에 <!– comment –>, <input type=”hidden” />, { display:none; } 와 같은 요소들이 포함되어있을때 발생.
해결: float 요소에 display:inline 적용
참고: http://positioniseverything.net/explorer/dup-characters.html

——

Expanding Box Problem
버전: IE6
문제: 레이아웃 요소의 크기를 지정했음에도 불구하고, 지정한 크기보다 큰 텍스트(띄어쓰기가 없는 긴 텍스트)를 포함할 경우 요소의 크기가 늘어나버리는 문제
해결: 해당 요소에 word-wrap:break-word; overflow: hidden; 적용
참고: http://positioniseverything.net/explorer/expandingboxbug.html

——

Guillotine Bug
버전: IE6, IE7
문제: float 요소의 하단이 잘리거나(IE6), float 요소를 포함하는 컨테이너 요소의 크기가 늘어나버리는(IE7) 문제
해결: float 요소를 포함하는 컨테이너 요소 바로 뒤에 clear해주는 요소를 삽입(예: <div style=”clear: both”></div>)
참고: http://positioniseverything.net/explorer/guillotine.html

——

IE6 Float Model Problem
버전: IE6
문제: float 요소 다음에 width가 선언되지 않은 non-floated 요소가 위치하면, 두 요소의 바운더리는 겹쳐야 한다. 하지만 non-floated 요소의 width가 선언되면, non-floated 요소가 float 요소 옆으로 나란히 위치하는 문제.
해결: 없다. 두 요소의 바운더리가 겹쳐져야 하는 상황을 아예 만들지 말거나, 꼭 겹쳐져야한다면 position을 사용하는 등의 다른 방법을 구사.
참고: http://positioniseverything.net/explorer/floatmodel.html

——

Three Pixel Text-Jog
버전: IE6
문제: float 요소 다음에 non-floated 요소가 위치하면, non-floated 요소의 텍스트가 3 pixel 밀리는 문제.
해결: float 요소에 {margin-right:-3px}, non-floated 요소에 {height:1%; margin-left:0} 적용
참고: http://positioniseverything.net/explorer/threepxtest.html

——

Inherited margins on form elements
버전: IE6, IE7
문제: form을 포함하는 컨테이너 요소에 margin이 적용되어있을때, 특정 input 요소들이 컨테이너의 margin을 상속받는 오류.
해결: input 요소 앞에 inline 요소를 삽입하거나, span, label 등의 컨테이너 요소로 input 요소를 감싼다.
참고: http://positioniseverything.net/explorer/inherited_margin.html

——

Line-height Bug
버전: IE6
문제: plain text 중간에 inline으로 img, input, textarea, select, object가 삽입되어있을 경우 line-height 제대로 표현하지 못하는(collapse됨) 문제.
해결: inline으로 삽입된 img, input… 요소의 상하 margin을 교정 (예: {margin:45px 0; vertical-align:middle;})
참고: http://positioniseverything.net/explorer/lineheightbug.html

——

Border Chaos
버전: IE6
상황: block 요소가 두개 있다. 두번째 요소의
문제: 연속되는 block 요소중 두번째 이후 요소들의 margin-top이 음수이고, border가 적용되어있을때, 나타나는 광란의 버그
해결: 연속되는 block 요소들의 컨테이너(parent)에 {position: relative;} 적용
참고: http://positioniseverything.net/explorer/border-chaos.html

——

Disappearing List-Background Bug
버전: IE6
문제: 리스트(ol, ul, dl)를 감싸는 div의 position이 relative이고 float되어있으며, 리스트요소(li, dt)에 background가 사라지는 문제(background를 적용했을때).
해결: 리스트요소(li, dt)에 {display:inline} 적용
참고: http://positioniseverything.net/explorer/ie-listbug.html

——

Unscrollable Content Bug
버전: IE6
문제: position이 relative이고 크기가 지정되지않은 컨테이너 요소가, position이 absolute이고 크기가 페이지보다 큰 컨텐츠를 포함하고 있다면 스크롤바가 나타나야 하지만 그렇지않은 문제.
해결: 컨테이너 요소에 {height:1%} 적용
참고: http://positioniseverything.net/explorer/unscrollable.html

——

Duplicate Indent Bug
버전: IE6
문제: float요소가 padding 또는 margin이 적용된 컨테이너에 위치하고 있다면, 이중으로 적용되는 문제.
해결: 경우의 수가 워낙 많지만, 대부분의 경우 {display:inline} 으로 해결 가능.
참고: http://positioniseverything.net/explorer/floatIndent.html

——

Escaping Floats Bug
버전: IE6
문제: 크기를 지정하지 않은 컨테이너가 float요소 여러개를 포함하고 있는데(clear 요소로 float 해제했음), 컨테이너 영역이 제대로 표현되지 못하는 문제.
해결: 컨테이너에 {height:1%} 적용
참고: http://positioniseverything.net/explorer/escape-floats.html

——

Creeping Text Bug
버전: IE6
문제: block요소가 또 다른 block요소를 포함하고 있고, border-left, padding-bottom이 적용되어있을때, 내부의 block요소가 1px씩 좌측으로 기어들어가는 문제
해결: 외부 block요소에 {height:1%;} 적용
참고: http://positioniseverything.net/explorer/creep.html

——

기타
문제: a를 block으로 지정하면, 블록 전체가 마우스에 반응해야하는데 여전히 텍스트에만 반응하는 문제
해결: height:1%

문제: 리스트요소(li)간 간격이 발생하는 문제
해결: display: inline

문제: {position:absolute; bottom:0; right:0}인 요소가 relative인 부모의 우측하단에 위치하지 않고 전체 화면의 우측하단에 위치하는 문제
해결: height:1%

——

FireFox의 버그
문제: 배경 이미지의 위치를 bottom으로 했을 경우, 브라우저 크기보다 컨텐츠의 크기가 짧다면, 배경이미지가 컨텐츠 하단에 위치하는 버그
해결: html {height:100%}


Post by 넥스트리소프트 데꾸벅(techbug)
, |