블로그 이미지

카테고리

데꾸벅 (194)
Publisher (39)
Scripter (97)
Programmer (1)
Designer (30)
Integrator (18)
Pattern Searcher (4)
News (2)
강좌 및 번역 (3)

최근에 올라온 글

최근에 달린 댓글

'데꾸벅'에 해당되는 글 194건

  1. 2008.02.26 ExtJS를 지원하는 IDE 개발이 시작되다.
  2. 2008.02.26 ExtTLD : XML을 이용한 Extjs 컴포넌트 생성
  3. 2008.02.26 Extjs를 이용한 PHP 플러그인 Simplicity
  4. 2008.02.26 드디어 Adobe AIR v1.0 & Flex3.0 릴리즈 2
  5. 2008.02.26 Extjs v2.02 릴리즈
  6. 2008.02.25 Extjs 기본레이아웃에 grid panel 붙이기
  7. 2008.02.25 subversion 및 trac 설치가이드 1
  8. 2008.02.25 Extjs Apatana ext2.0 plugin
  9. 2008.02.22 Extjs Grid panel 및 데이타 축출하기 8
  10. 2008.02.22 Extjs 레이아웃에서 center region 숨기기 꽁수
  11. 2008.02.21 Extjs 그리드안에서 프로세스바 구현하기 3
  12. 2008.02.21 Extjs 프로세스바 구현하기
  13. 2008.02.21 Extjs을 이용한 특정이벤트 컨텍스트 메뉴달기
  14. 2008.02.21 리눅스 스트리밍 서버에 관한 솔류션 2
  15. 2008.02.21 ftp passive mode
  16. 2008.02.21 아파치 웹 서버 무단 링크 방지
  17. 2008.02.21 Trac - project management
  18. 2008.02.21 윈도우 서비스 등록하기 1
  19. 2008.02.21 칼라에 대한 고찰
  20. 2008.02.21 IE6 PNG background없애기
  21. 2008.02.21 favicon 생성기
  22. 2008.02.21 저작권 없는 무료 이미지 사이트 100선 1
  23. 2008.02.21 한국의 색상 3
  24. 2008.02.21 매킨토시의 휴먼인터페이스 - 인터페이스 디자인 원칙
  25. 2008.02.21 영문폰트를 웹폰트로
  26. 2008.02.21 포토샵 팁
  27. 2008.02.20 Extjs와 Adobe AIR를 이용한 Window.gadget만들기
  28. 2008.02.19 Extjs ASP.NET Web Controls
  29. 2008.02.18 Extjs를 이용한 에러핸들링 2
  30. 2008.02.18 Extjs 서로 다른 도메인일 경우 ScriptTagProxy를 이용한 Ajax통신 5
ExtJS 관련 IDE를 정리하다. 관련URL : http://ajaxian.com/archives/ext-js-ide-support-roundup
ExtJS 2.0 API탑재 Aptana plug-in download : http://orsox.mocis.at/download.php?view.1

사용자 삽입 이미지


There’s been a lot of talk lately about the different IDEs and the support they offer for the various JavaScript libraries. Ext’s uber-coder, Jack Slocum, has put up a blog entry explaining which IDEs support the Ext JS framework:

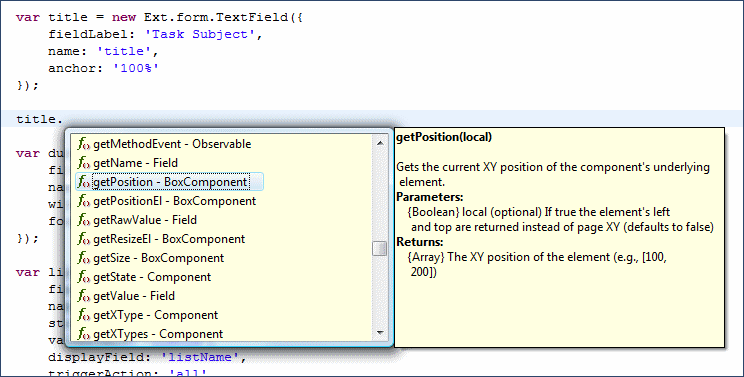
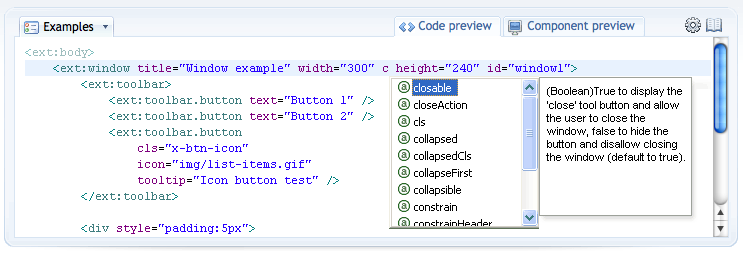
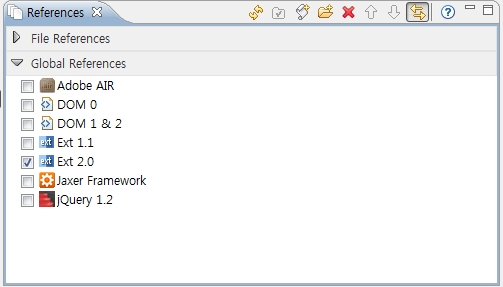
The Ext 2.0 API is very extensive and remembering all of the functions, properties or configs available is virtually impossible. The API documentation is very thorough, but it would be nice if IDEs would provide code assist options in JavaScript as they do in other languages such as Java and C#. Luckily, there are some IDEs and plugins available that do just that — and also have direct support for Ext 2.0.

Included in the mix are:

This great news and it shows that IDE vendors are taking JavaScript frameworks seriously. Anything that makes development easier is definitely welcome.


Post by 넥스트리소프트 데꾸벅(techbug)
, |
사용자 삽입 이미지


Jaroslav Benc는 XML을 이용하여 Java 프로젝트용 ExtJS JSP Taglib 생성기를 만들었다.

아직 완변하진 않지만 그의 사이트에 포스트된 로드맵을 보자면

  • Hibernate integration - HibernateStore component
  • DWR integration etc.
  • Eclipse plugin
  • UX Tags: Ext.ux.*, Ext.portal.*, Ext.feedreader.*, Ext.desktop.*
을 지원한다고 하는데 ExtJS의 config 옵션을 모두 xml 어트리뷰트로 처리가능하며 모든 ID값 (ExtJS에서 Ext.getCmp("id") )으로 처리된


참조사이트 : http://www.exttld.com/index.php

Post by 넥스트리소프트 데꾸벅(techbug)
, |
사용자 삽입 이미지
John Le Drew씨의 Simplicity PHP Application Framework은 규모가 크고 트래픽이 많은 사이트에 적합하다.

이번에 facelift된 그의 사이트는 Ajax UI Library인 extjs를 채택함으로써 좀더 Web2.0 애플리케이션의 면모를 갖추고 있다.
Ajax 인터페이스(extjs)를 이용한 관리자콘솔 및 stub controller, 데이타베이스 모델링까지 포함하고 있다.
소스를 함 뜯어볼 가치는 있는것 같네...


출처 : https://launchpad.net/simplicity/
Post by 넥스트리소프트 데꾸벅(techbug)
, |
사용자 삽입 이미지

어도브사는 오늘 AIR v1.0과 Flex3.0 을 릴리즈화면서 RIA세계의 행진을 계속했다.
Ajax개발자로써 어도브의 애플리케이션 개발은 상당히 접근하기 어려운 분야였음을 감안하면 이번 릴리즈는 여타 다른 스크립트를 포용하는 정책을 써 개발자들의 많은 사랑을 받을것 같다는 생각이 드낟.


Adobe AIR
AIR runtime and SDK는 매우 긴 베타버전 기간을 걸쳐 이번에 선보이는 것으로써
구글기어를 써보신 개발자라는 AIR의 강력함을 느낄수 있을것이다.
(데꾸벅도 써보고 놀랐어요.. ^^)
먼저 이번에 릴리즈된 기능을 보자면

데스탑을 기능적으로 향상 :
드래그앤 드랍, 트레이 미니마이징 기능등..

데이타 액세스 :
로컬파일 액세스.. 상당히 강력한 기능이죠..

자바스크립트 라이브러리 지원 :
jQuery, Extjs(이것땜에 데꾸벅도 AIR를 써요..), Dojo, Spry를 지원

보안 :
어차피 인스톨되어 배포되는것이기 때문에 보안에는 문제가...
나름 생각한건데 패킷을 후킹하면?? 흠..UUID값을 써야하는 문제가 생길수 있다고 생각하는 데꾸벅.. ㅠ.,ㅠ;


Flex 3.0
플렉스는 여러분도 다 아시다시피 Flash기반의 RIA 개발 플랫폼입니다.
점점더 발전하고 있고 여러 블로그에서도 많은 기술관련 글들이 포스팅 되기도 하고 개발자에게도 상당히 인기가 있습니다.
비록 아직 써보진 않았지만 2008년 유망 기술중 하나에 꼽히기도 했습니다.
사용자 삽입 이미지


이 참에 한번 Flex를 함 써봐야 겠네요.. ^^


Post by 넥스트리소프트 데꾸벅(techbug)
, |

Extjs v2.02 릴리즈

Scripter/EXTJS / 2008. 2. 26. 09:29
Adobe AIR를 지원해주는 Extjs 2.02버전이 릴리즈 되었다.

Adobe AIR팀과 ExtJS개발팀의 협업으로 탄생한 2.02버전에서는 AIR API를 완벽지원하고 있다.
오래전 Jack Slocum의 블로그에서 봤던 간단한 태스크관리 샘플을 봤을때의 충격이 채가시지 않은채 발표된 이번 버전에서는 AIR API를 패키징하여 Ext.air 형태로 다음과 같이 배포된다.

- 네이티브 윈도우 관리하기
- AIR beta3에서 소개되었던 데이타베이스 동기화
- 네이티브 드래그엔 드롭과 클립보드 접근
- 사운드 새생
- 시스템 트레이에 AIR 애플리케이션 miniming하기(아래소스 참조)

var win = new Ext.air.NativeWindow({
    id: 'mainWindow',
    instance: window.nativeWindow,
 
    // System tray config
    minimizeToTray: true,
    trayIcon: 'ext-air/resources/icons/extlogo16.png',
    trayTip: 'Simple Tasks',
    trayMenu : [{
        text: 'Open Simple Tasks',
        handler: function(){
            win.activate();
        }
    }, '-', {
        text: 'Exit',
        handler: function(){
            air.NativeApplication.nativeApplication.exit();
        }
    }]
});

트리뷰(treeview) 콤보박스의 리스트트리 샘플
사용자 삽입 이미지

extjs listtree


Custom Grid Columns
사용자 삽입 이미지


Switch : 버튼 모음 테두리 (메타포어기능)
사용자 삽입 이미지


Ext V2.02 다운로드 : 다운로드하기(http://extjs.com/download)

데꾸벅 블로그에서 바로 다운로드 받기 :

Post by 넥스트리소프트 데꾸벅(techbug)
, |

Basic Concept

이번 장은 이전에 작성해놓은 기본레이아웃잡기 및 기본그리드기리기를 이용하여 레이아웃의 좌측영역(west region)에 그리드를 붙이는 작업을 진행한다.
이전장을 충분히 숙지하였다는 가정하에 Grid를 붙여보자

기본소스 :


<그리드 해부도>

사용자 삽입 이미지


Step 1.  왼쪽 기본 패널을 Grid패널로 변경

basicLayout_AttachedGrid.html

<html>
<head>
<title>Basic Layout</title>
<link rel="stylesheet" type="text/css" href="http://techbug.tistory.com/resources/css/ext-all.css" />
<script type="text/javascript" src="../../adapter/ext/ext-base.js"></script>
<script type="text/javascript" src="../../ext-all.js"></script>
<script type="text/javascript" src="basicLayout_AttachedGrid.js"></script>
</head>
<body id="basicLayoutBody"></body>
</html>


basicLayout_AttachedGrid.js

// 그리드 패널 클래스 시작
LeftArea = function(viewport){ //왼쪽 패널(LeftArea)을 정의한다.
this.viewport = viewport;

this.store = new Ext.data.Store({
proxy: new Ext.data.HttpProxy({
url: 'basicGrid.json'
}),
sortInfo: {
field: 'price',
direction: "DESC"
},
reader: new Ext.data.JsonReader({
root: 'testData'
}, [{
name: 'company',
type: 'string',
mapping: 'company'
}, {
name: 'price',
type: 'float',
mapping: 'price'
}, {
name: 'change',
type: 'float',
mapping: 'change'
}, {
name: 'pctChange',
type: 'float',
mapping: 'pctChange'
}, {
name: 'lastChange',
type: 'date',
dateFormat: 'n/j h:ia',
mapping: 'lastChange'
}])
});
// 왼쪽 패널의 config옵션을 정의한다.
LeftArea.superclass.constructor.call(this, {
region: 'west', // 굵게 표시된 부분은 기본레이아웃을 잡는 config옵션이다.
title: 'WEST',
collapsible: true,
collapsed: false,
width: 250,
split: true,
layout: 'fit',
margins: '5 0 5 5',
cmargins: '5 5 5 5',
store: this.store,
columns: [{
id: 'company',
header: "Company",
width: 160,
sortable: true,
dataIndex: 'company'
}, {
header: "Price",
width: 75,
sortable: true,
renderer: 'usMoney',
dataIndex: 'price'
}, {
header: "Change",
width: 75,
sortable: true,
dataIndex: 'change'
}, {
header: "% Change",
width: 75,
sortable: true,
dataIndex: 'pctChange'
}, {
header: "Last Updated",
width: 85,
sortable: true,
renderer: Ext.util.Format.dateRenderer('m/d/Y'),
dataIndex: 'lastChange'
}],
stripeRows: true,
autoExpandColumn: 'company',
loadMask: {
msg: '데이타 로드중'
},
sm: new Ext.grid.RowSelectionModel({
singleSelect: true
}),
view: new Ext.grid.GridView({
forceFit: true,
enableRowBody: true,
emptyText: 'No Record found'
})
});
};

//기본레이아웃에서는 Ext.Panel을 상속받았지만
//여기서는 그리드패널이므로 Ext.grid.GridPanel을 상속받음.
Ext.extend(LeftArea, Ext.grid.GridPanel, {
});


// 그리드 패널 클래스 끝


// 메인 레이아웃 클래스 시작
BasicLayoutClass = function(){
return {
init: function(){
Ext.QuickTips.init();
this.viewport = new Ext.Viewport({
layout: 'border',
items: [this.WestPanel = new LeftArea(this), this.CenterPanel = new Ext.Panel({
region: 'center',
title: 'CENTER',
layout: 'fit',
margins: '5 5 5 0',
html: '<div id="_CONTENTS_AREA_">컨텐츠 영역입니다.</div>'
})]
});

this.viewport.doLayout();
this.viewport.syncSize();

// 좌측그리드의 데이타 스토어를 화면을 최초 그릴때 데이타를 로드한다.
this.WestPanel.store.load();
}
}
}
();
Ext.EventManager.onDocumentReady(BasicLayoutClass.init, BasicLayoutClass, true);
// 메인 레이아웃 클래스 끝

 기본레이아웃에서 달라진 부분은 왼쪽 패널(LeftArea)이  기본패널(Ext.Panel)에서 그리드패널(Ext.grid.GridPanel)로 바뀌었을 뿐이다. 

위소스중 기본패널의 config옵션( 굵게 표현된 부분)에 Grid 옵션이 더 추가되었을 뿐이다. 대신 왼쪽 그리드패널의 데이타스토어를 메인레이아웃에서 호출(this.WestPanel.store.load();)하였다.
Step2에서는 좌측 그리드패널 클래스를 별도의 파일로 추가하여 정리해보자


Step 2. 좌측그리드패널 클래스 별도 파일로 관리하기

basicLayout_AttachedGrid.html

<html>
<head>
<title>Basic Layout</title>
<link rel="stylesheet" type="text/css" href="http://techbug.tistory.com/resources/css/ext-all.css" />
<script type="text/javascript" src="../../adapter/ext/ext-base.js"></script>
<script type="text/javascript" src="../../ext-all.js"></script>
//좌측 그리드 패널클래스 별도 파일로 분리, 반드시 main 레이아웃 클래스보다 먼저 호출
<script type="text/javascript" src="basicLayout_LeftGrid.js"></script>
<script type="text/javascript" src="basicLayout_AttachedGrid.js"></script>
</head>
<body id="basicLayoutBody"></body>
</html>

basicLayout_AttachedGrid.js

BasicLayoutClass = function(){
    return {
        init: function(){
            Ext.QuickTips.init();
            this.viewport = new Ext.Viewport({
                layout: 'border',
                items: [this.WestPanel = new LeftArea(this),
                //좌측 그리드 클래스 호출
                this.CenterPanel = new Ext.Panel({
                    region: 'center',
                    title: 'CENTER',
                    layout: 'fit',
                    margins: '5 5 5 0',
                    html: '<div id="_CONTENTS_AREA_">컨텐츠 영역입니다.</div>'
                })]
            });
            this.viewport.doLayout();
            this.viewport.syncSize();
            //좌측 패널의 public method호출
            this.WestPanel.loadGridDataSet();
        }
    }
}
();
Ext.EventManager.onDocumentReady(BasicLayoutClass.init, BasicLayoutClass, true);

basicLayout_LeftGrid.js

LeftArea = function(viewport){

    this.viewport = viewport;

    this.store = new Ext.data.Store({
        proxy: new Ext.data.HttpProxy({
            url: 'basicGrid.json'
        }),
        sortInfo: {
            field: 'price',
            direction: "DESC"
        },
        reader: new Ext.data.JsonReader({
            root: 'testData'
        }, [{
            name: 'company',
            type: 'string',
            mapping: 'company'
        }, {
            name: 'price',
            type: 'float',
            mapping: 'price'
        }, {
            name: 'change',
            type: 'float',
            mapping: 'change'
        }, {
            name: 'pctChange',
            type: 'float',
            mapping: 'pctChange'
        }, {
            name: 'lastChange',
            type: 'date',
            dateFormat: 'n/j h:ia',
            mapping: 'lastChange'
        }])
    });

    LeftArea.superclass.constructor.call(this, {
        region: 'west',
        title: 'WEST',
        collapsible: true,
        collapsed: false,
        width: 250,
        split: true,
        layout: 'fit',
        margins: '5 0 5 5',
        cmargins: '5 5 5 5',
        store: this.store,
        columns: [{
            id: 'company',
            header: "Company",
            width: 160,
            sortable: true,
            dataIndex: 'company'
        }, {
            header: "Price",
            width: 75,
            sortable: true,
            renderer: 'usMoney',
            dataIndex: 'price'
        }, {
            header: "Change",
            width: 75,
            sortable: true,
            dataIndex: 'change'
        }, {
            header: "% Change",
            width: 75,
            sortable: true,
            dataIndex: 'pctChange'
        }, {
            header: "Last Updated",
            width: 85,
            sortable: true,
            renderer: Ext.util.Format.dateRenderer('m/d/Y'),
            dataIndex: 'lastChange'
        }],
        stripeRows: true,
        autoExpandColumn: 'company',
        loadMask: {
            msg: '데이타 로드중'
        },
        sm: new Ext.grid.RowSelectionModel({
            singleSelect: true
        }),
        view: new Ext.grid.GridView({
            forceFit: true,
            enableRowBody: true,
            emptyText: 'No Record found'
        })
    });
};

Ext.extend(LeftArea, Ext.grid.GridPanel, {
    //public Method 정의 부분
    loadGridDataSet: function(){
        this.store.load();
    }


});


위의 Step1과 변경된것이라고는 좌측그리드패널 클래스를 별도 파일로 분리하고 클래스내의 public 메쏘드를 메인레이아웃에서 호출한다는것이다.
그러나 이 러한 구조의 클래스는 항상 메인 레이아웃에서 특정 레이아웃일때만 사용된다 예를 들어  좌측그리드패널클래스(LeftArea)의 config option중에 레이아웃에 해당하는 값들이 이미 들어가 있기 때문에 다른 구조의 레이아웃에서는 이 클래스를 호출하여 사용할수 없다는 단점이 있다.


Step 3. 클래스 리팩토링

basicLayout_LeftGrid.js
LeftArea = function(viewport, config){

    this.viewport = viewport;
    Ext.apply(this, config);

    this.store = new Ext.data.Store({
        proxy: new Ext.data.HttpProxy({
            url: 'basicGrid.json'
        }),
        sortInfo: {
            field: 'price',
            direction: "DESC"
        },
        reader: new Ext.data.JsonReader({
            root: 'testData'
        }, [{
            name: 'company',
            type: 'string',
            mapping: 'company'
        }, {
            name: 'price',
            type: 'float',
            mapping: 'price'
        }, {
            name: 'change',
            type: 'float',
            mapping: 'change'
        }, {
            name: 'pctChange',
            type: 'float',
            mapping: 'pctChange'
        }, {
            name: 'lastChange',
            type: 'date',
            dateFormat: 'n/j h:ia',
            mapping: 'lastChange'
        }])
    });
    // 레이아웃과 관련된 부분을 제외하고 순수 그리드 config option 부분만 사용
    LeftArea.superclass.constructor.call(this, {
        store: this.store,
        columns: [{
            id: 'company',
            header: "Company",
            width: 160,
            sortable: true,
            dataIndex: 'company'
        }, {
            header: "Price",
            width: 75,
            sortable: true,
            renderer: 'usMoney',
            dataIndex: 'price'
        }, {
            header: "Change",
            width: 75,
            sortable: true,
            dataIndex: 'change'
        }, {
            header: "% Change",
            width: 75,
            sortable: true,
            dataIndex: 'pctChange'
        }, {
            header: "Last Updated",
            width: 85,
            sortable: true,
            renderer: Ext.util.Format.dateRenderer('m/d/Y'),
            dataIndex: 'lastChange'
        }],
        stripeRows: true,
        autoExpandColumn: 'company',
        loadMask: {
            msg: '데이타 로드중'
        },
        sm: new Ext.grid.RowSelectionModel({
            singleSelect: true
        }),
        view: new Ext.grid.GridView({
            forceFit: true,
            enableRowBody: true,
            emptyText: 'No Record found'
        })
    });
};

Ext.extend(LeftArea, Ext.grid.GridPanel, {
    loadGridDataSet: function(){
        this.store.load();
    }
});


basicLayout_AttachedGrid.js

BasicLayoutClass = function(){
return {
init: function(){
Ext.QuickTips.init();
//레이아웃과 관련된 내용을 메인레이아웃 클래스 밖으로 빼냄
this.WestPanel = new LeftArea(this, {
region: 'west',
title: 'WEST',
collapsible: true,
collapsed: false,
width: 650,
split: true,
layout: 'fit',
margins: '5 0 5 5',
cmargins: '5 5 5 5'
}), this.viewport = new Ext.Viewport({
layout: 'border',
items: [this.WestPanel, this.CenterPanel = new Ext.Panel({
region: 'center',
title: 'CENTER',
layout: 'fit',
margins: '5 5 5 0',
html: '<div id="_CONTENTS_AREA_">컨텐츠 영역입니다.</div>'
})]
});
this.viewport.doLayout();
this.viewport.syncSize();
this.WestPanel.loadGridDataSet();
}
}
}
();
Ext.EventManager.onDocumentReady(BasicLayoutClass.init, BasicLayoutClass, true);

위 와 같이 작성되었을 경우는 별도 파일로 빼낸 BasicLayout_LeftGrid.js 파일은 다른 곳에서도 재사용할수 있다. 그러나 ExtJS Panel특성상 바로 Ext.apply()를 통하여 해당 config option을 LayoutContainer에 적용할수 없다. 위 소스를 실행 시켜 보면  왼쪽 판넬의 collapseMode가  잘못 적용되어 container 속성까지 변경되었다. 이럴 경우에는 NestedLayout Manager를 사용하여 다음과 같이 표현하면 된다.


basicLayout_AttachedGrid.js

BasicLayoutClass = function(){
    return {
        init: function(){
            Ext.QuickTips.init();
            
            this.viewport = new Ext.Viewport({
                layout: 'border',
                items: [{
                    region: 'west', // 일반 Ext.panel로 설정하여 왼쪽
                    title: 'WEST',
                    collapsible: true,
                    collapsed: false,
                    width: 650,
                    split: true,
                    margins: '5 0 5 5',
                    cmargins: '5 5 5 5',
                    layout: 'border',
                    items: [ // 일반 Ext.panel에 Nested된 좌측패널
                        this.WestPanel = new LeftArea(this, {
                        region: 'center',
                        layout: 'fit',
                        border: false
                    })]
                }, this.CenterPanel = new Ext.Panel({
                    region: 'center',
                    title: 'CENTER',
                    layout: 'fit',
                    margins: '5 5 5 0',
                    html: '<div id="_CONTENTS_AREA_">컨텐츠 영역입니다.</div>'
                })]
            });
            this.viewport.doLayout();
            this.viewport.syncSize();
            this.WestPanel.loadGridDataSet();
        }
    }
}
();
Ext.EventManager.onDocumentReady(BasicLayoutClass.init, BasicLayoutClass, true);


Step 4. 그리드 판넬에 새로고침 메뉴넣기

basicLayout_AttachedGrid.js

BasicLayoutClass = function(){
return {
init: function(){
Ext.QuickTips.init();

this.viewport = new Ext.Viewport({
layout: 'border',
items: [{
region: 'west',
title: 'WEST',
collapsible: true,
collapsed: false,
width: 650,
split: true,
margins: '5 0 5 5',
cmargins: '5 5 5 5',
layout: 'border',
items: [this.WestPanel = new LeftArea(this, {
region: 'center',
layout: 'fit',
border: false,
tbar: [{
text: '새로고침',
scope: this,
handler: function(){
this.WestPanel.store.reload();
}
}]
})]
}, this.CenterPanel = new Ext.Panel({
region: 'center',
title: 'CENTER',
layout: 'fit',
margins: '5 5 5 0',
html: '<div id="_CONTENTS_AREA_">컨텐츠 영역입니다.</div>'
})]
});
this.viewport.doLayout();
this.viewport.syncSize();
this.WestPanel.loadGridDataSet();
}
}
}
();
Ext.EventManager.onDocumentReady(BasicLayoutClass.init, BasicLayoutClass, true);

 위의 Toolbar 를 basicLayout_LeftGrid.js를 이용하여 붙일수도 있으나 사용하는곳 마다 툴바가 틀릴수 있으므로 되도록이면 좌측 그리드패널 클래스를 호출하는 메인 클래스에 붙이는것이 재사용성에 좋다. 넥스트리소프트의 경우는 모두 좌측그리드패널 클래스 안에 private로 선언되어 있다. 어느것이 좋을지는 사용하는곳마다 틀리므로 해당 상황을 보면서 붙여보도록 한다.

넥스트리의 경우는 모두 클래스안에 private method로 해당 클래스내에서만 사용하는 메쏘드를 두었으며 필요에 따라 외부클래스에서 호출하는 식으로 되어 있다. 취향에 따라 맞춰 하면 될듯... ^^


Step 5. 선택시 우측컨텐츠 판넬(cente region Basic fit layout)의 body 업데이트하기

basicLayout_AttachedGrid.js

BasicLayoutClass = function(){
return {
init: function(){
Ext.QuickTips.init();

this.viewport = new Ext.Viewport({
layout: 'border',
items: [{
region: 'west',
title: 'WEST',
collapsible: true,
collapsed: false,
width: 650,
split: true,
margins: '5 0 5 5',
cmargins: '5 5 5 5',
layout: 'border',
items: [this.WestPanel = new LeftArea(this, {
region: 'center',
layout: 'fit',
border: false,
tbar: [{
text: '새로고침',
scope: this,
handler: function(){
this.WestPanel.store.reload();
}
}]
})]
}, this.CenterPanel = new Ext.Panel({
region: 'center',
title: 'CENTER',
layout: 'fit',
margins: '5 5 5 0',
html: '<div id="_CONTENTS_AREA_">컨텐츠 영역입니다.</div>'
})]
});
this.viewport.doLayout();
this.viewport.syncSize();
this.WestPanel.loadGridDataSet();
//Row선택시 발생하는 이벤트를 this.updateCenter() 메쏘드에서 실행
this.WestPanel.getSelectionModel().on('rowselect', this.updateCenter, this);
},

// 선택된 Row의 데이타를 가져와서 오른쪽 center Region의 Body에 업데이트한다.
updateCenter: function(selectionModel, index, record){
// 선택된 Row의 데이타를 가져온다.
var data_company = record.get('company');
var data_price = record.get('price');
var data_change = record.get('change');
var data_pctChange = record.get('pctChange');
var data_lastChange = record.get('lastChange');
// update할 HTML생성
var updateHTML = "<table cellpadding=2 cellspacing=1 border=1 width='100%'>" +
"<tr><td>Company</td><td>" +
data_company +
"</td></tr>" +
"<tr><td>Price</td><td>" +
data_price +
"</td></tr>" +
"<tr><td>Change</td><td>" +
data_change +
"</td></tr>" +
"<tr><td>Percentage</td><td>" +
data_pctChange +
"</td></tr>" +
"<tr><td>Last</td><td>" +
data_lastChange +
"</td></tr>" +
"</table>";

Ext.get("_CONTENTS_AREA_").update(updateHTML); //update
},


//다른 방법으로 선택된 데이타 모두 가져오기
updateCenter1: function(selectionModel, index, record){
var updateHTML = "<table cellpadding=2 cellspacing=1 border=1 width='100%'>"
// 선택된 데이타의 컬럼을 모두 가져오기
var cmc = this.WestPanel.getColumnModel().getColumnCount();
for (var i = 0; i < cmc; i++) {
//선택된 데이타의 컬럼Head (그리드 헤더 가져오기)
var columnName = this.WestPanel.getColumnModel().getColumnHeader(i);
//그리드 헤더의 데이타 인덱스 코드 가져오기
var columnCode = this.WestPanel.getColumnModel().getDataIndex(i);
var updateHTML = updateHTML + "<tr><td>" + columnName + "</td><td>" + record.get(columnCode);
+"</td></tr>" //데이타 가져와서 업데이트할 HTML 셋팅하기
}
var updateHTML = updateHTML + "</table>";
Ext.get("_CONTENTS_AREA_").update(updateHTML);

}
}
}
();
Ext.EventManager.onDocumentReady(BasicLayoutClass.init, BasicLayoutClass, true);

위 의 소스에서 updateCenter() 메쏘드는 this.WestPanel의 데이타 및 데이타인덱스 코드값을 모두 알고 있을 경우(대부분 소스까보면 다 나옴.. ㅡ.,ㅡ;) 사용하기 편리하고 아래의 updateCenter1() 메쏘드의 경우는 데이타 인덱스값을 모르거나 동적으로 필드값들이 셋팅 되는 경우에 상당히 유용하게 사용할수 있다. 넥스트리에서는 용어사전에 등록된 용어필드들을 자동으로 가져올때 사용되었던 소스이다.


Post by 넥스트리소프트 데꾸벅(techbug)
, |

이상하게 분류가 형상관리에 들어가 버린 이유는 subversion때문인가 보다..


1. Apache 2.0.xx 버전 설치 (2.0.59 버전 설치 했음)
아래 링크에서 아파치를 다운받아 설치 한다. httpd/binaries/win32/ 에서 받으면 된다. (apache_2.0.59-win32-x86-openssl-0.9.7j.msi)
http://www.apache.org/dyn/closer.cgi
2.0.xx 이상 버전(2.2.x)은 Window Subversion이 지원하지 못한다. 꼭 2.0.xx 버전대를 설치하도록 한다.
(자세한 사항은 링크를 참조한다. http://subversion.tigris.org/project_packages.html)
2007년 1월 25일 Apache 2.2.x 버전을 위한 Subversion 이 build됨. - 아직 테스트 해보지 못함.
버전 또는 다른 사유로 Apache를 재설치 시 3-2. mod_python과 2. Subversion을 재설치하여야 한다.

2. Subversion 최신버전 설치 (1.4.3 설치)
아래의 링크에서 Window용 Subversion을 다운받아 설치한다. (svn-1.4.3-setup)
http://subversion.tigris.org/servlets/ProjectDocumentList?folderID=91&expandFolder=91&folderID=8100
Apache가 설치된후에 설치를 해야 httpd.conf 에 Subversion의 올바른 경로가 설정된다.

3. Python 2.4 설치
아래 링크에서 Python을 다운받아 설치한다.(Python 2.4.4)
http://www.python.org/download/
Python 2.5 버전은 지원하지 모듈이 있으므로 가급적 2.4 버전을 설치한다.(6)
그래도 2.5 버전을 설치하고 싶다면  http://trac.edgewall.org/wiki/TracInstall 페이지를 참조한다.

3-1. svn-win32-1.4.3_py2.4.exe 을 다운받아 설치
아래의 링크에서 Subversion 1.4.3 Win32 Installer for the Python 2.4 bindings 을 다운받아 설치한다.
http://subversion.tigris.org/servlets/ProjectDocumentList?folderID=91&expandFolder=91&folderID=8100 

3-2. mod-python-3.3.1-py2.4 다운받아 설치
Apache의 속도를 빠르게 하기 위해서 아래의 링크에서 mod_python을 다운받아 설치한다. (mod_python-3.3.1.win32-py2.4-Apache2.0.exe)
http://httpd.apache.org/modules/python-download.cgi
* Win32Binaries 라고 중간에 링크가 걸려있다.
* Apache를 재설치할경우 mod_python은 다시 설치해 주어야 한다.

3-3. Docutils 설치
아래의 링크에서 docutils-0.4.tgz 를 다운받아 압축을 푼다음 $ python ./setup.py install 와 같이 실행하여 설치한다.
http://docutils.sourceforge.net/

3-4. PySQLite 설치
아래의 링크에서 Python 버전(2.4)에 맞는 PySQLite를 다운받아 설치
http://initd.org/tracker/pysqlite/wiki/pysqlite
TRAC에서 MySQL을 지원하나 아직 테스트 단계이므로 PySQLite를 설치하도록 하자.

3-5. ClearSilver 설치
아래의 링크에서 Python 버전(2.4)에 맞는 ClearSilver를 다운받아 설치(clearsilver-0.9.14.win32-py2.4.exe) - Python2.5용 버전이 없다.
http://www.clearsilver.net/downloads/

4. TRAC 0.10.3.1 설치
아래의 링크에서 윈도우용 인스톨러 TRAC을 다운받아 설치
http://trac.edgewall.org/wiki/TracDownload

이곳까지 설치를 완료했다면 Apache와 TRAC 그리고 Subversion 이 연동되도록 최소한 설치작업을 모든 마쳤다.
테스트를 해보지는 않았지만 이 모두를 한꺼번에 설치하기위한 웹페이지가 있다.
각 설치파일들의 버전도 가장 최신버전으로 설정되어 있다.
아래의 링크를 참조한다.
http://yeoupooh.us.to:8080/wiki/display/pu/TracOnWindows

 
5. Subversion Repository 생성 및 TRAC의 DB생성
Subversion의 Repository를 생성하는 방법으로 2가지가 있다.
첫번째는 console을 사용하여 text로 생성하는 방법과 TortoiseSVN을 사용하여 생성하는 방법이 있다.
생성하는 방법은 아래의 참고자료의 링크들을 참고하여 생성하도록 한다.
TRAC의 DB는 Python환경에서 console에서 작성하여야 한다.
자세한 방법은 아래의 링크를 참조한다.
http://jongyeob.com/moniwiki/wiki.php/TracInstall

TRAC의 DB와 Subversion의 Repository를 구성한 예시)

d:\SVN  --+- TEST
                +- PROJECTA
               +- PROJECTB
d:\TRAC --+- TEST
              +- PROJECTA
              +- PROJECTB

* 디랙토리 구조는 어디까지 예시이다. 그러나 어떻게 구성할것인가 미리 검토하고 작성하는것이 두번일 안하는 비결이다.
TRAC을 위해서는 Apache config 파일(httpd.conf)에 아래 내용들을 추가한다.

LoadModule python_module modules/mod_python.so
<Location /test>
   SetHandler mod_python
   PythonHandler trac.web.modpython_frontend
   PythonOption TracEnv d:\trac\test
</Location>


http://localhost/test 로 접근해서 TRAC의 첫페이지가 나오면 성공이다.
Subversion의 Repository를 위해서는 아래의 내용을 추가한다.

<Location /svn/test>
   DAV svn
   SVNPath d:\svn\test
</Location>

http://localhost/svn/test 로 접근해서 Repository revision 화면이 나오면 성공이다.

6. login 설치 - 인증
* .htaccess 파일을 생성해서 특정한 폴더에 두고 TRAC의 login시와 Subversion의 login시 같이 사용하도록 하면 계정관리하기도 수월하다.

TRAC의 login을 위해서는 아래와 같은 내용을 httpd.conf에 추가한다.

<Location /test/login>
  Authtype Basic
  AuthName "TEST"
  AuthUserFile d:\.htaccess
  Require valid-user
</Location>


.htaccess 는 Apache의 htpasswd.exe를 실행하여 생성한다.
Subversion에 anonymous가 아닌 인증된 사람만 접근을 허용하려면 아래와 같은 내용을 추가한다.

<Location /svn/test>
  DAV svn
  SVNPath d:\svn\test
 Authtype Basic
 AuthName "TEST"
 AuthUserFile d:\.htaccess
 Require valid-user
</Location>

7. Plugin 설치
TRAC의 admin을 사용하여 관리하기 불편하다면 plugin을 설치하자.
http://trac-hacks.org/wiki
ez_setup.py 를 실행 설치후 python24/scripts/easy_install.exe 생성
easy_install.exe ~.egg 로 설치
trac.db/conf/trac.ini 파일에 [components] 에 webadmin.* = enabled 와 같이 추가하여 사용한다.
trac-hacks 에 있는 Plugin등을 다운받지 않고 svn 경로명(http://test.co.kr/test/trunk/0.10)을 easy_install.exe 경로명 으로도 설치 가능하다.

8. http이외의 보안을 위한 접속프로토콜

https로 접속을 위한 SSL 설치

8-1. ssl 설치
LoadModule ssl_module modules/mod_ssl.so 주석(#)을 해제한다.
Apache Service Monitor 를 열어서 아래에 보면 어떤 모듈이 지금 현재 동작중인지 나온다. 참고하자.
Apache/2.0.59(win32) mod_ssl/2.0.59 OpenSSL/0.9.7.j SVN/1.4.3. DAV/2

8-2 인증키 만들기
OpenSSL.exe 를 사용하여 인증서를 만든다.
openssl req -new -out filename.csr
openssl rsa -in privkey.pem -out filename.key
openssl req -new -x509 -days 365 -key filename.key -out filename.crt
생성된 filename.key와 crt 파일을 Apache의 conf 디렉토리에 복사해 넣는다.

8-3 httpd.conf 설정하기
아래의 내용을 추가한다.

Listen 443
<VirtualHost *:443>
SSLEngine on
SSLCertificateFile "C:\Program Files\Apache Group\Apache2\conf\filename.crt"
SSLCertificateKeyFile "C:\Program Files\Apache Group\Apache2\conf\filename.key"
SSLProtocol all
SSLCipherSuite HIGH:MEDIUM
<Location /svn>
DAV svn
SVNPath d:\svn\test
Authtype Basic
AuthName "TEST"
AuthUserFile d:\trac\.htaccess
Require valid-user
</Location>
</VirtualHost>


Svnserver로 접속을 위한 방법
설치는 아래의 링크를 참조한다.
http://serious-code.net/moin.cgi/SubversionSetup
이재홍님의 SVNmanager를 실행하여 운영한다.
주의할점은 Subversion 디렉토리와 Trac 디렉토리를 구분한다.
TortoiseSVN으로 접속시 Multi Project로 작업이 가능하다.
svn://test.co.kr/test
svn://test.co.kr/projecta

SVN+SSH
Cygwin을 설치
http://ist.uwaterloo.ca/~kscully/CygwinSSHD_W2K3.html
환경변수에 Path=c:\cygwin 와 cygwin=ntsec tty 를 추가

9. 한글화
KLDP의 트랙 한글화 웹페이지를 참조
http://kldp.net/projects/trac-ko/
아래의 링크에서 최신트랙을 다운받아 설치한다.
http://kldp.net/frs/?group_id=724

tarball (tar.gz등 압축된 파일)을 다운받아서 압축을 푼다음 $ python ./setup.py install 와 같이 설치한다.
윈도우용 TRAC이 설치되어 있는 경우 제대로 설치가 되지 않을수 있다. 프로그램 추가삭제에서 TRAC을 삭제후 재설치 해본다.


참고사이트


Subversion
윈도우에 Subversion 설치 - 이재홍님
http://www.pyrasis.com/main/SubversionServerForWindows

SVN manger Utility - 이재홍님
http://www.pyrasis.com/main/SVNSERVEManager

TRAC
Trac 설치 - 종엽님위키
http://jongyeob.com/moniwiki/wiki.php/TracInstall

윈도우XP에 TRAC, Subversion 및 Moniwiki 설치
http://aslongas.pe.kr/tt/index.php?pl=11
http://gaedol.org/resources/wiki/TracGuide

TRAC의 도움말 부분 번역 페이지
http://ai.uos.ac.kr/trac/ailab/wiki/TracInstall

윈도우에 TRAC 설치하기 - TRAC 영문
http://trac.edgewall.org/wiki/TracOnWindows

TRAC에서 Plugin 설치하기 - TRAC 영문
http://trac.edgewall.org/wiki/TracPlugins

WebAdmin Pluging
http://trac.edgewall.org/wiki/WebAdmin

TRAC의 Plugin 이 있는곳 - TRAC Hack 영문
http://trac-hacks.org/wiki

Windows에서 TRAC(StandAlone)과 서브버전 설치 - 영문
http://lazutkin.com/blog/2006/feb/18/setting-tools-windows/

Trac Apache Subversion AllinOne - 모두를 한꺼번에 설치하기
http://yeoupooh.us.to:8080/wiki/display/pu/TracOnWindows

TRAC에서 문서작성을 편하게 하기위한 WikiExporter - CRIZIN님
http://crizin.net/entry/TinyMCE-플러그인-WikiExporter

Subversion과 TRAC연동
Cygwin을 사용한 SVN+SSH 연동
http://hankiya.com/tt/jhk8211/330

Window 2003 server에서 Cygwin SSH daemon 설치 - 영문
http://ist.uwaterloo.ca/~kscully/CygwinSSHD_W2K3.html

SVN+SSH 연동
http://wiki.kldp.org/wiki.php/SubversionTips
http://kwon37xi.egloos.com/2521260

SSH Howto(영문)
http://www.logemann.org/day/archives/000099.html 

서적

서브버전을 이용한 실용적인 버전관리
http://kangcom.com/common/bookinfo/bookinfo.asp?sku=200603080013

보안을 위한 효율적인 방법 PKI
http://kangcom.com/common/bookinfo/bookinfo.asp?sku=200309040006

기타
SSL이란?
http://www.junjaewoo.com/kldp/SSL-Certificates-HOWTO/x70.html

OpenSSL HOWTO 문서  - kldp
http://wiki.kldp.org/wiki.php/DocbookSgml/SSL-Certificates-HOWTO
http://wiki.kldp.org/wiki.php/LinuxdocSgml/ApacheSSL-KLDP
http://wiki.kldp.org/wiki.php/DocbookSgml/SSL-RedHat-HOWTO

tortoiseSVN 다운받기
http://tortoisesvn.net/downloads
tortoiseSVN Howto
http://wiki.kldp.org/wiki.php/TortoiseSVN-USE


TRAC 한글화 프로젝트 : http://kldp.net/projects/trac-ko/

TRAC 설치문서 : http://wiki.kldp.org/wiki.php/trac (*nux)

                        http://jangyeol.wikidot.com/tracinstall  (Windows *)

TRAC 셋팅 : http://daybreaker.springnote.com/pages/39637

TRAC,SVN,SSL 함께 설치하기 : http://kldp.org/node/84957


svn dump 받기

svn 데이터 dump 및 load 방법( Repository 를 MyTest 로 가정)


 1. 해당 Repository 가 생성된 상위 directory 로 이동 한다.


 2. Repository 를 dump 한다.
  command >> svnadmin dump MyTest > MyTest.20006.09.09.dump
     ->  전체 dump
  command >> svnadmin dump MyTest -r 10 > MyTest.20006.09.09.dump
     -> 리비전 10 만 dump
  command >> svnadmin dump MyTest -r 10:20 > MyTest.20006.09.09.dump
     -> 리비전 10 부터 20 까지 만 dump


 3. 새로운 Repository 를 생성 한다. (Repository 를 MyTestNew 로 가정)
  command >> 
svnadmin create MyTestNew


 4. dump 된 데이터를 load 한다. (Repository 를 MyTestNew 로 가정)
  command >> svnadmin load MyTestNew < MyTest.20006.09.09.dump
     -> 새로운 리비전 으로 load (리비전 번호는 1부터 생성)
  command >> svnadmin load MyTestNew --force-uuid < MyTest.20006.09.09.dump
     
-> 기존 dump 했던 리비전 유지


 # 기존 리비전을 유지 하면 좋은점.
   1. 동일한 URL 일 경우 Client 에서는 별도의 작업이 필요 없이 기존에 사용
      하던 그대로 사용 가능.
   2. URL 이 바뀐 경우는 저장소 URL 변경을 수행후 기존에 사용 하던 그대로 사용 가능.


'Integrator > SCM' 카테고리의 다른 글

Trac - project management  (0) 2008.02.21
Post by 넥스트리소프트 데꾸벅(techbug)
, |
eclipse로 extjs2.0 버전을 사용하고 싶으면 다음과 같이 하면된다.

extjs2.0 버전 플러그인 다운로드 : http://support.aptana.com/asap/browse/STU-547

사용자 삽입 이미지

extjs2.01 최신버전은 아래에서 다운로드 받으세요!
Post by 넥스트리소프트 데꾸벅(techbug)
, |

들어가며

본 포스팅은 사내(넥스트리소프트) 솔루션 개발시 가이드작성했던 문서를 다시 정리하여 올린것입니다.


기본개념

기본적인 Grid 사용법및 DataStore 및 RowSelectionModel에 대해 알아본다.
GridPanel을 이용하여 데이타스토어에 저장된 데이타를 가져오는 법과 기본적인 그리드 렌더링 방법, 각각의 Row에 대한 Model에서 Data를 축출하는 법에 대해서 기술한다.

아래소스다운로드


Step 1. Basic Array Grid

basicGrid.html

<html>
<head>
<title>Basic Grid</title>
<link rel="stylesheet" type="text/css" href="http://techbug.tistory.com/resources/css/ext-all.css" />
<script type="text/javascript" src="../../adapter/ext/ext-base.js"></script>
<script type="text/javascript" src="../../ext-all.js"></script>
<script type="text/javascript" src="basicGrid.js"></script>
</head>
<body id="basicGridBody">
<div id="DIV_GRID_HERE"></div> <!-- Grid를 렌더링 할 위치 -->
</body>
</html>


basicGrid.js

BasicGridClass = function(){
    return {
        init: function(){
            //데이타스토어에 사용할 데이타
            var myData = [
                ['3m Co',71.72,0.02,0.03,'9/1 12:00am'],
                ['Alcoa Inc',29.01,0.42,1.47,'9/1 12:00am'],
                ['Altria Group Inc',83.81,0.28,0.34,'9/1 12:00am'],
                ['American Express Company',52.55,0.01,0.02,'9/1 12:00am'],
                ['American International Group, Inc.',64.13,0.31,0.49,'9/1 12:00am'],
                ['AT&T Inc.',31.61,-0.48,-1.54,'9/1 12:00am'],
                ['Boeing Co.',75.43,0.53,0.71,'9/1 12:00am'],
                ['Caterpillar Inc.',67.27,0.92,1.39,'9/1 12:00am'],
                ['Citigroup, Inc.',49.37,0.02,0.04,'9/1 12:00am'],
                ['E.I. du Pont de Nemours and Company',40.48,0.51,1.28,'9/1 12:00am'],
                ['Exxon Mobil Corp',68.1,-0.43,-0.64,'9/1 12:00am'],
                ['General Electric Company',34.14,-0.08,-0.23,'9/1 12:00am'],
                ['General Motors Corporation',30.27,1.09,3.74,'9/1 12:00am'],
                ['Hewlett-Packard Co.',36.53,-0.03,-0.08,'9/1 12:00am'],
                ['Honeywell Intl Inc',38.77,0.05,0.13,'9/1 12:00am'],
                ['Intel Corporation',19.88,0.31,1.58,'9/1 12:00am'],
                ['International Business Machines',81.41,0.44,0.54,'9/1 12:00am'],
                ['Johnson & Johnson',64.72,0.06,0.09,'9/1 12:00am'],
                ['JP Morgan & Chase & Co',45.73,0.07,0.15,'9/1 12:00am'],
                ['McDonald\'s Corporation',36.76,0.86,2.40,'9/1 12:00am'],
                ['Merck & Co., Inc.',40.96,0.41,1.01,'9/1 12:00am'],
                ['Microsoft Corporation',25.84,0.14,0.54,'9/1 12:00am'],
                ['Pfizer Inc',27.96,0.4,1.45,'9/1 12:00am'],
                ['The Coca-Cola Company',45.07,0.26,0.58,'9/1 12:00am'],
                ['The Home Depot, Inc.',34.64,0.35,1.02,'9/1 12:00am'],
                ['The Procter & Gamble Company',61.91,0.01,0.02,'9/1 12:00am'],
                ['United Technologies Corporation',63.26,0.55,0.88,'9/1 12:00am'],
                ['Verizon Communications',35.57,0.39,1.11,'9/1 12:00am'],
                ['Wal-Mart Stores, Inc.',45.45,0.73,1.63,'9/1 12:00am']
            ];
                      
            this.store = new Ext.data.SimpleStore({
                fields: [{
                    name: 'company'
                }, //1번째 컬럼을 'company'로 정의
                {
                    name: 'price',
                    type: 'float'
                },//2번째 컬럼을 'price'로 정의하며 데이타 타입은 float으로 정의
                {
                    name: 'change',
                    type: 'float'
                }, {
                    name: 'pctChange',
                    type: 'float'
                }, {
                    name: 'lastChange',
                    type: 'date',
                    dateFormat: 'n/j h:ia'
                }]
            });
            //데이타 스토어 로드하기
            this.store.loadData(myData);
            
            //그리드 그리기
            this.grid = new Ext.grid.GridPanel({
                store: this.store, //그리드에 사용될 데이타 스토어 정의
                columns: [ //그리드 헤드 및 데이타 정제(ColumnModel 정의)
                {
                    id: 'company',
                    header: "Company",
                    width: 160,
                    sortable: true,
                    dataIndex: 'company'
                }, {
                    header: "Price",
                    width: 75,
                    sortable: true,
                    renderer: 'usMoney',
                    dataIndex: 'price'
                }, {
                    header: "Change",
                    width: 75,
                    sortable: true,
                    dataIndex: 'change'
                }, {
                    header: "% Change",
                    width: 75,
                    sortable: true,
                    dataIndex: 'pctChange'
                }, {
                    header: "Last Updated",
                    width: 85,
                    sortable: true,
                    renderer: Ext.util.Format.dateRenderer('m/d/Y'),
                    dataIndex: 'lastChange'
                }],
                stripeRows: true, //Row마다 CSS class를 적용하고 싶을때 처리
                autoExpandColumn: 'company', //정의된 ColumnModel에서 자동으로 늘리고 싶은 컬럼
                loadMask: {
                    msg: '데이타 로드중'
                }, //그리드 로드시 화면로딩 indicator설정
                //그리드 선택모델(selectionModel)정의 : RowSelectionMode -> Row별로 처리하겠다.
                sm: new Ext.grid.RowSelectionModel({
                    singleSelect: true //Row 하나만 선택가능하게 하기
                }),
                viewConfig: { //그리드의 Dataview 설정
                    forceFit: true //가로에 그리드의 크기를 맞춘다.
                },
                height: 350,
                width: 800,
                title: '기본기리드'
            });
            //그리드를 DIV_GRID_HERE 라는 ID값을 가진 객체에 렌더링한다.
            this.grid.render('DIV_GRID_HERE');
            //그리드 로드시 첫번째 Row를 자동으로 선택되게 한다.
            this.grid.getSelectionModel().selectFirstRow();
        }
    }
}
();
Ext.EventManager.onDocumentReady(BasicGridClass.init, BasicGridClass, true);


Step 2. How to use HttpProxy & ScriptTagProxy

Step1에서 배열데이타를 사용할때(Ext.data.SimpleStore)와 직접 통신하여 사용할때(Ext.data.Store)를 비교하면서 아래 소스를 보기 바란다.
Simplestore 는 기본적으로 네트웍을 사용하지 않으므로 Proxy를 사용하지 않는다. 그러나 Store, JsonStore, GroupingStore의 경우 Proxy를 사용하여 데이타의 위치를 지정할수 있다.

SimpleStore vs. (Json, Grouping) Store


SimpleStore
(Json, Grouping) Store
Proxy
없음(없을시 HttpProxy사용)
HttpProxy, ScriptTagProxy, MemoryProxy
Reader
ArrayReader
JsonReader, XmlReader, ArrayReader
Load Method
store.loadData(data);
store.load()
Extend
Ext.data.Store
Ext.data.Store


basicGrid.js

BasicGridClass = function(){
    return {
        init: function(){
            ////DataStore를 정의한다. Ext.data.Store
            this.store = new Ext.data.Store({
                // Data를 가져올 Proxy설정
                proxy: new Ext.data.HttpProxy({
                    url: 'basicGrid.json',
                    method: 'POST'
                }),
                // Client쪽에서 Sort할 경우 소트할 항목
                sortInfo: {
                    field: 'price',
                    direction: "DESC"
                },
                reader: new Ext.data.JsonReader({
                    root: 'testData'
                },
                [{
                    name: 'company'
                }, {
                    name: 'price',
                    type: 'float'
                }, {
                    name: 'change',
                    type: 'float'
                }, {
                    name: 'pctChange',
                    type: 'float'
                }, {
                    name: 'lastChange',
                    type: 'date',
                    dateFormat: 'n/j h:ia'
                }])
            });
            this.grid = new Ext.grid.GridPanel({
                store: this.store,
                columns: [{
                    id: 'company',
                    header: "Company",
                    width: 160,
                    sortable: true,
                    dataIndex: 'company'
                }, {
                    header: "Price",
                    width: 75,
                    sortable: true,
                    renderer: 'usMoney',
                    dataIndex: 'price'
                }, {
                    header: "Change",
                    width: 75,
                    sortable: true,
                    dataIndex: 'change'
                }, {
                    header: "% Change",
                    width: 75,
                    sortable: true,
                    dataIndex: 'pctChange'
                }, {
                    header: "Last Updated",
                    width: 85,
                    sortable: true,
                    renderer: Ext.util.Format.dateRenderer('m/d/Y'),
                    dataIndex: 'lastChange'
                }],
                stripeRows: true,
                autoExpandColumn: 'company',
                loadMask: {
                    msg: '데이타 로드중'
                },
                sm: new Ext.grid.RowSelectionModel({
                    singleSelect: true
                }),
                viewConfig: {
                    forceFit: true
                },
                height: 350,
                width: 800,
                title: '기본 그리드'
            });
           
            this.grid.render('DIV_GRID_HERE');
            this.grid.getSelectionModel().selectFirstRow();
            this.store.load(); //데이타를 로드한다.
        }
    }
}
();
Ext.EventManager.onDocumentReady(BasicGridClass.init, BasicGridClass, true);

  HttpProxy나 ScriptTagProxy로 서버 통신을 한다. ScriptTagProxy에 대한 고찰(?) 을 참조하라.

  • HttpProxy : 같은 도에인일 경우
  • ScriptTagProxy: 다른 도메인일 경우
  • MemoryProxy: 메모리에 있는 데이타


basicGrid.json
{
    testData: [{
        'company': '3m Co',
        'price': 71.72,
        'change': 0.02,
        'pctChange': 0.03,
        'lastChange': '9/1 12:00am'
    }, {
        'company': 'Alcoa Inc',
        'price': 29.01,
        'change': 0.42,
        'pctChange': 1.47,
        'lastChange': '9/1 12:00am'
    }, {
        'company': 'Altria Group Inc',
        'price': 83.81,
        'change': 0.28,
        'pctChange': 0.34,
        'lastChange': '9/1 12:00am'
    }, {
        'company': 'American Express Company',
        'price': 52.55,
        'change': 0.01,
        'pctChange': 0.02,
        'lastChange': '9/1 12:00am'
    }, {
        'company': 'American International Group, Inc.',
        'price': 64.13,
        'change': 0.31,
        'pctChange': 0.49,
        'lastChange': '9/1 12:00am'
    }, {
        'company': 'AT&T Inc.',
        'price': 31.61,
        'change': -0.48,
        'pctChange': -1.54,
        'lastChange': '9/1 12:00am'
    }, {
        'company': 'Boeing Co.',
        'price': 75.43,
        'change': 0.53,
        'pctChange': 0.71,
        'lastChange': '9/1 12:00am'
    }, {
        'company': 'Caterpillar Inc.',
        'price': 67.27,
        'change': 0.92,
        'pctChange': 1.39,
        'lastChange': '9/1 12:00am'
    }, {
        'company': 'Citigroup,Inc.',
        'price': 49.37,
        'change': 0.02,
        'pctChange': 0.04,
        'lastChange': '9/1 12:00am'
    }, {
        'company': 'E.I. du Pont de Nemours and Company',
        'price': 40.48,
        'change': 0.51,
        'pctChange': 1.28,
        'lastChange': '9/1 12:00am'
    }, {
        'company': 'Exxon Mobil Corp',
        'price': 68.1,
        'change': -0.43,
        'pctChange': -0.64,
        'lastChange': '9/1 12:00am'
    }, {
        'company': 'General Electric Company',
        'price': 34.14,
        'change': -0.08,
        'pctChange': -0.23,
        'lastChange': '9/1 12:00am'
    }, {
        'company': 'General Motors Corporation',
        'price': 30.27,
        'change': 1.09,
        'pctChange': 3.74,
        'lastChange': '9/1 12:00am'
    }, {
        'company': 'Hewlett-Packard Co.',
        'price': 36.53,
        'change': -0.03,
        'pctChange': -0.08,
        'lastChange': '9/1 12:00am'
    }, {
        'company': 'Honeywell Intl Inc',
        'price': 38.77,
        'change': 0.05,
        'pctChange': 0.13,
        'lastChange': '9/1 12:00am'
    }, {
        'company': 'Intel Corporation',
        'price': 19.88,
        'change': 0.31,
        'pctChange': 1.58,
        'lastChange': '9/1 12:00am'
    }, {
        'company': 'International Business Machines',
        'price': 81.41,
        'change': 0.44,
        'pctChange': 0.54,
        'lastChange': '9/1 12:00am'
    }, {
        'company': 'Johnson & Johnson',
        'price': 64.72,
        'change': 0.06,
        'pctChange': 0.09,
        'lastChange': '9/1 12:00am'
    }, {
        'company': 'JP Morgan & Chase & Co',
        'price': 45.73,
        'change': 0.07,
        'pctChange': 0.15,
        'lastChange': '9/1 12:00am'
    }, {
        'company': 'McDonald\'s Corporation',
        'price': 36.76,
        'change': 0.86,
        'pctChange': 2.40,
        'lastChange': '9/1 12:00am'
    }, {
        'company': 'Merck & Co., Inc.',
        'price': 40.96,
        'change': 0.41,
        'pctChange': 1.01,
        'lastChange': '9/1 12:00am'
    }, {
        'company': 'Microsoft Corporation',
        'price': 25.84,
        'change': 0.14,
        'pctChange': 0.54,
        'lastChange': '9/1 12:00am'
    }, {
        'company': 'Pfizer Inc',
        'price': 27.96,
        'change': 0.4,
        'pctChange': 1.45,
        'lastChange': '9/1 12:00am'
    }, {
        'company': 'The Coca-Cola Company',
        'price': 45.07,
        'change': 0.26,
        'pctChange': 0.58,
        'lastChange': '9/1 12:00am'
    }, {
        'company': 'The Home Depot,Inc.',
        'price': 34.64,
        'change': 0.35,
        'pctChange': 1.02,
        'lastChange': '9/1 12:00am'
    }, {
        'company': 'The Procter & Gamble Company',
        'price': 61.91,
        'change': 0.01,
        'pctChange': 0.02,
        'lastChange': '9/1 12:00am'
    }, {
        'company': 'United Technologies Corporation',
        'price': 63.26,
        'change': 0.55,
        'pctChange': 0.88,
        'lastChange': '9/1 12:00am'
    }, {
        'company': 'Verizon Communications',
        'price': 35.57,
        'change': 0.39,
        'pctChange': 1.11,
        'lastChange': '9/1 12:00am'
    }, {
        'company': 'Wal-Mart Stores, Inc.',
        'price': 45.45,
        'change': 0.73,
        'pctChange': 1.63,
        'lastChange': '9/1 12:00am'
    }]
}


Step 3. Data-Mapping and Renderer

BasicGridClass = function(){
    return {
        init: function(){
            //데이타 스토어 정의
            this.store = new Ext.data.Store({
                proxy: new Ext.data.HttpProxy({
                    url: 'basicGrid.json',
                    method: 'POST'
                }),
                sortInfo: {
                    field: 'price',
                    direction: "DESC"
                },
                reader: new Ext.data.JsonReader({
                    root: 'testData'
                }, [{
                    name: 'company',
                    type: 'string',
                    mapping: 'company',
                    convert: this.convertCompany
                }, //응답받은 JSON의 company와 맵핑된다. 맵핑정보 변경을 converting한다.
                {
                    name: 'price',
                    type: 'float',
                    mapping: 'price'
                }, {
                    name: 'change',
                    type: 'float',
                    mapping: 'change'
                }, {
                    name: 'pctChange',
                    type: 'float',
                    mapping: 'pctChange'
                }, {
                    name: 'lastChange',
                    type: 'date',
                    dateFormat: 'n/j h:ia',
                    mapping: 'lastChange'
                }])
            });
            this.grid = new Ext.grid.GridPanel({
                store: this.store,
                columns: [{
                    id: 'company',
                    header: "Company",
                    width: 160,
                    sortable: true,
                    dataIndex: 'company'
                }, // 맵핑된 company의 name을 dataIndex로 잡는다.
                {
                    header: "Price",
                    width: 75,
                    sortable: true,
                    renderer: 'usMoney',
                    dataIndex: 'price'
                }, {
                    header: "Change",
                    width: 75,
                    sortable: true,
                    dataIndex: 'change'
                }, {
                    header: "% Change",
                    width: 75,
                    sortable: true,
                    renderer: this.pctChange,
                    dataIndex: 'pctChange'
                }, // 화면에 렌더링할때  renderer를 이용해 칼라를 바꿔준다.
                {
                    header: "Last Updated",
                    width: 85,
                    sortable: true,
                    renderer: Ext.util.Format.dateRenderer('m/d/Y'),
                    dataIndex: 'lastChange'
                }],
                stripeRows: true,
                autoExpandColumn: 'company',
                loadMask: {
                    msg: '데이타 로드중'
                },
                sm: new Ext.grid.RowSelectionModel({
                    singleSelect: true
                }),
                viewConfig: {
                    forceFit: true
                },
                height: 350,
                width: 800,
                title: '기본 그리드'
            });
           
            this.grid.render('DIV_GRID_HERE');
            this.grid.getSelectionModel().selectFirstRow();
            this.store.load();
           
        },
        //화면에 렌더링할때 renderer에 의해서 칼라를 바꿔주느 메쏘드
        pctChange: function(val){
            if (val > 0) {
                return '<span>' + val + '%</span>';
            }
            else
                if (val < 0) {
                    return '<span>' + val + '%</span>';
                }
            return val;
        },
        // 데이타 맵핑할때 자식노드가 있을 경우 해당 자식노드로 변환하여 반환한다.
        convertCompany: function(value, p, record){
            return (value.name != undefined) ? value.name : value;
        }
       
    }
}
();
Ext.EventManager.onDocumentReady(BasicGridClass.init, BasicGridClass, true);

위의 convert 와 renderer 옵션을 이용하여 여러가지 다양한 형태의 grid 생성이 가능하다. 또한 JsonReader의 root 노드또한 Json 표기 형식의 . (dot) 연산자로 해당 자식 노드를 가져올수 있다.


추가적으로 extjs의 API Doc에는 rederer에 대해서 다음과 같이 기술하고 있다.

rederer의 파라미터값들
* value : Object - 셀에 들어가는 데이타
* metadata : Object - 정의한 객체 메타데이타
* css : String : 테이블테그에서 td에 먹이는 css
* attr : String : HTML 애트리뷰트 정의
* record : Ext.data.record : 데이타가 압축된 레코드
* rowIndex : Number
* colIndex : Number
* store : Ext.data.Store


Step 4. DataStore Load & Loadexception Handling

 데이타스토어가 모두 로드가 완료됐을 경우 혹은 서버이상으로 로드가 되지 않았을 경우를 예를 들어 설명한다.

BasicGridClass = function(){
return {
init: function(){
//데이타 스토어 정의
this.store = new Ext.data.Store({
proxy: new Ext.data.HttpProxy({
url: 'basicGrid.json'
}),
sortInfo: {
field: 'price',
direction: "DESC"
},
reader: new Ext.data.JsonReader({
root: 'testData'
}, [{
name: 'company',
type: 'string',
mapping: 'company'
}, {
name: 'price',
type: 'float',
mapping: 'price'
}, {
name: 'change',
type: 'float',
mapping: 'change'
}, {
name: 'pctChange',
type: 'float',
mapping: 'pctChange'
}, {
name: 'lastChange',
type: 'date',
dateFormat: 'n/j h:ia',
mapping: 'lastChange'
}])
});
this.grid = new Ext.grid.GridPanel({
store: this.store,
columns: [{
id: 'company',
header: "Company",
width: 160,
sortable: true,
dataIndex: 'company'
}, {
header: "Price",
width: 75,
sortable: true,
renderer: 'usMoney',
dataIndex: 'price'
}, {
header: "Change",
width: 75,
sortable: true,
dataIndex: 'change'
}, {
header: "% Change",
width: 75,
sortable: true,
dataIndex: 'pctChange'
}, {
header: "Last Updated",
width: 85,
sortable: true,
renderer: Ext.util.Format.dateRenderer('m/d/Y'),
dataIndex: 'lastChange'
}],
stripeRows: true,
autoExpandColumn: 'company',
loadMask: {
msg: '데이타 로드중'
},
sm: new Ext.grid.RowSelectionModel({
singleSelect: true
}),
view: new Ext.grid.GridView({
forceFit: true,
enableRowBody: true,
ignoreAdd: true,
emptyText: 'No Record found'
}),
height: 350,
width: 800,
title: '기본 그리드'
});

this.grid.render('DIV_GRID_HERE');
//this.grid.getSelectionModel().selectFirstRow();
this.store.load();


this.grid.on('rowcontextmenu', function(grid, index, e){
alert('오른쪽 버튼 클릭');
}, this);

// Row에서 마우스 오른쪽 클릭시
this.grid.on('rowclick', function(grid, index, e){
alert('클릭');
}, this);

// Row 클릭시
this.grid.on('rowdblclick', function(grid, index, e){
alert('더블클릭');
}, this);

// Row 더블클릭시
this.gsm = this.grid.getSelectionModel();

// 데이타 스토어에서 데이타 로드 완료시 첫번째 Row 선택되게하기
this.store.on('load', this.gsm.selectFirstRow, this.gsm);
this.store.on('load', function(store, records, options){
alert('데이타로드완료')
}, this);

// 데이타 스토어에서 데이타 로드실패시 exception throw
this.store.on('loadexception', function(a, conn, resp){
//alert(resp.status.toString() +'\n'+ resp.statusText);
this.grid.emptyText = 'data load error';
}, this);

// Ext.data.Dataproxy 통신 에러시
this.store.proxy.on('loadexception', function(proxy, dataObj, callbackArgs, e){
if (Ext.gecko)
console.log(e);
});

}
}
}
();
Ext.EventManager.onDocumentReady(BasicGridClass.init, BasicGridClass, true);


Step 5. 선택된 Row에서 값 추출하기

BasicGridClass = function(){
return {
init: function(){
//데이타 스토어 정의
this.store = new Ext.data.Store({
proxy: new Ext.data.HttpProxy({
url: 'basicGrid.json'
}),
sortInfo: {
field: 'price',
direction: "DESC"
},
reader: new Ext.data.JsonReader({
root: 'testData'
}, [{
name: 'company',
type: 'string',
mapping: 'company'
}, {
name: 'price',
type: 'float',
mapping: 'price'
}, {
name: 'change',
type: 'float',
mapping: 'change'
}, {
name: 'pctChange',
type: 'float',
mapping: 'pctChange'
}, {
name: 'lastChange',
type: 'date',
dateFormat: 'n/j h:ia',
mapping: 'lastChange'
}])
});
this.grid = new Ext.grid.GridPanel({
store: this.store,
columns: [{
id: 'company',
header: "Company",
width: 160,
sortable: true,
dataIndex: 'company'
}, // DataIndex정의
{
header: "Price",
width: 75,
sortable: true,
renderer: 'usMoney',
dataIndex: 'price'
}, {
header: "Change",
width: 75,
sortable: true,
dataIndex: 'change'
}, {
header: "% Change",
width: 75,
sortable: true,
dataIndex: 'pctChange'
}, {
header: "Last Updated",
width: 85,
sortable: true,
renderer: Ext.util.Format.dateRenderer('m/d/Y'),
dataIndex: 'lastChange'
}],
stripeRows: true,
autoExpandColumn: 'company',
loadMask: {
msg: '데이타 로드중'
},
//RowSelectionModel 이거나 CellSelectionModel일 경우만 데이타 가져오기
sm: new Ext.grid.RowSelectionModel({
singleSelect: true
}),
view: new Ext.grid.GridView({
forceFit: true,
enableRowBody: true,
emptyText: 'No Record found'
}),
height: 350,
width: 800,
title: '기본 그리드'
});

this.grid.render('DIV_GRID_HERE');
this.store.load();
this.gsm = this.grid.getSelectionModel();
this.store.on('load', this.gsm.selectFirstRow, this.gsm);

// ① Row에서 오른쪽 마우스 클릭했을 경우
this.grid.on('rowcontextmenu', this.getRowData, this);
// ① Row 클릭했을 경우
this.grid.on('rowclick', this.getRowData, this);
// ① Row 더블클랙했을 경우
this.grid.on('rowdblclick', this.getRowData, this);
// ① Row가 선택됐을 경우
this.gsm.on('rowselect', this.rowSelect, this);
},

getRowData: function(thisGrid, rowIndex, eventObject){
// ② 클릭,컨텍스트,더블클릭시 해당 이벤트가 일어난 Row의 Record가져오기
var record = this.store.getAt(rowIndex) || this.gsm.getSelected();
// ③ 선택된 레코드에서 데이타 가져오기
alert(record.data.company + '\n' + record.get('company'));
},
// ④ rowSelectionModel에서 선택된 Row의 데이타 가져오기
rowSelect: function(selectionModel, index, record){
alert(record.data.company + '\n' + record.get('company'));
}

}
}
();
Ext.EventManager.onDocumentReady(BasicGridClass.init, BasicGridClass, true);


  • ① : Ext.grid.GridPanel에 등록된 Event  사용법에 유의할것
    this.grid.on('rowclick',this.getRowData(), this );
    잘못된표현  - argument가 없이 ()로만 사용하였을 경우 closure로 인식하여 바로 실행된다.

    this.grid.on('rowclick',this.getRowData(grid,rowIdex,eventObject), this);
    정확한 표현 - argument가 있을시는 closure로 인식하지 않음

    this.grid.on('rowclick',this.getRowData, this);
    정확한 표현

    this.grid.on('rowclick',function(grid,rowIndex,eventObject){this.getRowData(grid,rowIndex,evnetObjt);},this);
    정확한 표현


  • ② 선택된 Row에서 Record를 가져오는 방법에는 위오 같이 두가지 방법이 있다. 
    데이터스토어.getAt(Row의 Index Number) - 데이타 스토어의 인덱스에서 가져오는 방법
    셀렉션 모델.getSelected() - RowSelectionModel이나 CellSelectionModel에서 가져오는 방법

  • ③ Record에서 해당 데이타셋 가져오기 : 아래의 가져올DataIndex는 Columns에서 정의한 DataIndex를 가져온다.
    레코드.data.가져올DataIndex텍스트 
    레코드.get('가져올DataIndex텍스트)

  • ④ rowSelectionModel일 경우 rowselect 이벤트를 이용하여 선택된 Row의 값을 가져올수 있다.  클릭이나 더블클릭, 컨텍스트 메뉴와 달리 사용자로 부터 이벤트를 받는것이 아니라 데이터 스토어가 최초 로드 되거나 하였을 경우 해당 이벤트를 바로 자아 처리해줄 로직이 있을 경우에는 상당히 유용하다. 만약 예를 들어 초기 데이타 로드시 첫번째 Row가 선택된지 선택된 Row의 상세정보를 오른쪽 패널에 보여줄 경우 선택된 Row의 정보를 사용자의 어떠한 액션 없이 해당 레코드의 값을 받아 올수 있다. 데이타 스토어의 'load'이벤트를 사용할때 첫번째 Row를 선택하여 해당 선택된 row의 데이타를 뽑아내는 방법으로도 가능하다.


Post by 넥스트리소프트 데꾸벅(techbug)
, |

기본적으로 ExtJS의 레이아웃을 잡을때 Center Region은  Hide/show 및 Collapse/Expand가 되지 않으나 해당 Center Region을 감추는 방법에 대해서 기술한다. (꼼수). 단, 해당 꼼수(^^)는 fullscreen이거나 전체 사이즈가 고정되어 있다고 전제하에 동작한다.  만약 좌측패널이 전체 화면으로 center region을 감췄을때 브라우저 사이즈를 줄이거나 한다면 다시 syncSize해줘야 한다.


basicLayout.html

<html>
<head>
<title>Basic Layout</title>
<link rel="stylesheet" type="text/css" href="http://techbug.tistory.com/resources/css/ext-all.css" />
<script type="text/javascript" src="../../adapter/ext/ext-base.js"></script>
<script type="text/javascript" src="../../ext-all.js"></script>
<script type="text/javascript" src="basicLayout.js"></script>
</head>
<body id="basicLayoutBody"></body>
// body container의 id(basicLayoutBody)를 이용하여 전체 화면사이즈를 가져온다.
</html>


basicLayout.js

LeftArea = function(viewport) {

    this.viewport = viewport;

    LeftArea.superclass.constructor.call(this, {
        region : 'west',
        title : 'WEST',
        width : 250,
        layout : 'fit',
        margins : '5 5 5 5',
        html : '좌측',
        tbar : [{
            text : 'CenterPanel 없애기',
            tooltip : {
                title : '전체화면',
                text : '화면을 전체/축소합니다.'
            },
            pressed : false,
            enableToggle : true,
            scope : this,
            toggleHandler : this.showHideCenterRegion
        }]
    })
};

Ext.extend(LeftArea, Ext.Panel, {
    // toggleHandler는 2개의 arguments를 가지고 있다. pressed는 클릭시 true , 그렇지 않을시 false반환
        showHideCenterRegion : function(btn, pressed) {
            if (pressed) {
                var fullWidth = this.viewport.getFullBody('width') - 10;
                this.setWidth(fullWidth);
                this.viewport.CenterPanel.hide();
                this.viewport.CenterPanel.ownerCt.doLayout();
            } else {
                this.setWidth(250);
                this.viewport.CenterPanel.show();
                this.viewport.CenterPanel.ownerCt.doLayout();
            }
        }

    });

BasicLayoutClass = function() {
    return {
        init : function() {
            Ext.QuickTips.init();
            this.viewport = new Ext.Viewport( {
                layout : 'border',
                items : [this.WestPanel = new LeftArea(this),
                        this.CenterPanel = new Ext.Panel( {
                            region : 'center',
                            title : 'CENTER',
                            layout : 'fit',
                            margins : '5 5 5 0',
                            html : '<div id="_CONTENTS_AREA_">컨텐츠 영역입니다.</div>'
                        })]
            });

            this.viewport.doLayout();
            this.viewport.syncSize();
        },

        getFullBody : function(wh) {
            if (wh == 'width')
                return Ext.get('basicLayoutBody').getWidth();
            else if (wh == 'height')
                return Ext.get('basicLayoutBody').getHeight();
            else
                return Ext.get('basicLayoutBody').getWidth();
        }

    }
}();
Ext.EventManager.onDocumentReady(BasicLayoutClass.init, BasicLayoutClass, true);


Post by 넥스트리소프트 데꾸벅(techbug)
, |
Extjs를 사용하다가 각 그리드 row에 각각의 프로세스바를 구현하게 되었다.
각 grid의 node 마다 프로세스 클래스를 재선언하였더니 너무 페이지자체가 무거워져
taskMgr를 이용하여 CSS로 구현하기로 하였다.
아래 소스는 넥스트리 사내프로젝트에서 구현되었던 일부소스이다.


[Extjs 소스중 일부] 기밀이므로 요기 까지만... ^^
// 타스크매니저로 autorefresh한다.
this.showTask = Ext.TaskMgr.start({
    run: this.store.reload,
    scope: this.store,
    interval:1000,
    args:[{params:{'appId':appId, 'deployId':deployId}, add:false}]
});

// 배포상태를 가져오는것을 멈춘다.
 Ext.TaskMgr.stop(this.showTask);


// 데이타가 모두 로드되었을 경우 해당 데이타값을 비교하여 계속
// autoRefresh할것인가를 결정한다.
this.store.on('load',function(store,records,opts){
    this.loadCompleteStatus(store,records,opts);
},this);


/**
 * 데이타가 모두 로드되었을 경우 해당 데이타값을 비교하여 계속 autoRefresh할것인가를 결정한다.
 * this.store.on('load',fn) 에 해당하는 메쏘드 실제 그리드안의
 * record에 해당하는 내용들을 모두 update한다.
 */
loadCompleteStatus : function(store,records,opts){
    var totalSize = store.getCount();
    var totalStop = 0;


    for(var i=0; i < totalSize; i++){
        var record = store.getAt(i);
        var pid = '_PROGRESSING_'+record.data.instsId;
        var lastMessage = (record.data.lastMessage) ? record.data.lastMessage : '';
        var progressRate= (record.data.progressRate)? parseInt(record.data.progressRate) : 0;
        var curStop = (record.data.isStop) ? parseInt(record.data.isStop) : 0 ;
       
        totalStop = totalStop + curStop;
        // 성공+실패 횟수가 전체 갯수와 같을 경우 autorefresh를 멈춘다.
        if(totalStop == totalSize) this.stopDeployStatus();


    }// for end
}

/**
 * 각 인스턴스마다의 정보(인스턴스명, 인스턴스Id, IP,port)를 그리드Row에 모두 표현한다.
 */
rendererDeployStatus : function(value, metadata, record,rowIndex,colIndex,store) {
return String.format(
        '<div class="_DEPLOYSTATUS_ROW_"><b>{0}</b><span class="_INSTANCE_IP_">{1}</span>'
        +'<div class="_PROGRESSBAR_CLASS_">'
        +'<div class="_PROGRESSBAR_" style="background-position-x:{2}%">{2}% : {3}</div>'
        +'<div id="_PROGRESSING_{4}" class="_PROGRESSBAR_COM_" '
        +'style="top:0;width:{2}%">{2}% : {3}</div></div></div>',
        value
        ,'http://'+record.data.ip +':'+record.data.port
        , record.data.progressRate
        , record.data.lastMessage
        , record.data.instanceId
        );
},


스타일시트
/* Progress bar 만들기 시작*/
DIV._DEPLOYSTATUS_ROW_ { padding-left:20px; }
DIV._DEPLOYSTATUS_ROW_ B {
    display:block;
    color:#333;
}
DIV._DEPLOYSTATUS_ROW_ SPAN._INSTANCE_IP_ { color:#333; }
._PROGRESSBAR_CLASS_LEFT_ {text-align:left !important}
DIV._PROGRESSBAR_CLASS_ {
    text-align:left !important;
    vertical-align:middle !important;
    padding:0 !important;
    height:18px !important;
    overflow:hidden !important;
    margin:7px 20px 10px 0 !important;
    background : transparent url(../img/progressbgwhite.png) 0 0 repeat-x !important;
    border:#6593CF solid 1px !important;
    position:relative;
}

DIV._PROGRESSBAR_ {
    text-align:left !important;
    vertical-align:middle !important;
    padding:0 3px 0 10px !important;
    margin:0 !important;
    height:18px !important;
    line-height:18px !important;
    white-space:nowrap !important;
    overflow:hidden !important;
    font-family:'segoe ui',verdana,arial;
    color:#396095;
    background-image : url(../img/progressbgwhite.png) !important;
    background-repeat : no-repeat ;
    background-position-y : 0;
    border:0 !important;
}

DIV._PROGRESSBAR_COM_ {
    text-align:left !important;
    vertical-align:middle !important;
    padding:0 3px 0 10px !important;
    margin:0 !important;
    height:18px !important;
    line-height:18px !important;
    white-space:nowrap !important;
    overflow:hidden !important;
    font-family:'segoe ui',verdana,arial;
    color:white;
    background: url(../img/progressbarbg.png) 0 0 repeat-x !important;
    border:0 !important;
    position:absolute;left:0;
    z-index:10;
}


.failrow DIV._PROGRESSBAR_COM_ {
    background-image: url(../img/progressbarfail.png) !important;
    background-color:#EFF39B !important;
}

/*프로그레스바 만들기 끝 */


Post by 넥스트리소프트 데꾸벅(techbug)
, |
아래와 같은 상태진행(progress)바를 생성할때 사용합니다.

사용자 삽입 이미지


Ext.onReady(function() {

    var percent;
    var textfield;

    var testPanel = new Ext.Panel( {
        title : 'progressbar test',
        collapsible : true,
        renderTo : document.body,
        width : 600,
        height : 200,
        bodyStyle : 'padding:10px',
        html : '<div id="_progress_"></div>',
        tbar : [
                percent = new Ext.form.NumberField( {
                    id : '_1_',
                    maxValue : 100,
                    minValue : 0,
                    width : 50,
                    value : '20'
                }),
                textfield = new Ext.form.TextField( {
                    id : '_2_',
                    width : 400,
                    value : '다운로드: - Application already exists at path /bcf'
                }),
                '-',
                {
                    text : '변경',
                    handler : function() {
                        // 상태바의 값을 입력한 값으로 계산하여 뿌려준다.
                        pbar.updateProgress(parseInt(percent.getValue()) / 100,
                                percent.getValue() + '% - '
                                        + textfield.getValue());
                    }
                }]
    });
    // 실제 프로그래스바를 생성하는 컴포넌트
        var pbar = new Ext.ProgressBar( {
            text : 'Initializing...',
            autoWidth : false,
            width : '100%',
            cls : 'left-align',
            renderTo : '_progress_'
        });
    });
}

<body><div id="techbugbar" ></div>

Post by 넥스트리소프트 데꾸벅(techbug)
, |

특정 CSS Object 값에 이벤트를 걸어주는 방법에 대해서 소개한다.

아래의 소스에는 "menu"라는 id값을 가진 객체에 클릭이벤트를 걸어주는 소스이다.

 
        Ext.select('#menu').on('click', function(e){
            alert(e.target)
            text = Ext.get(e.target); //이벤트 타겟을 찾는다.
            text.puff(); //텍스트에 fade효과를 준다.
            e.stopEvent() //Event bubble효과를 막기위해서 event를 멈춘다.
        });

위의 소스는 어플리케이션 기본정보나 컴포넌트 기본정보에서 담당자 클릭시 나오는 컨텍스트 메뉴를 구현하는데 사용되었다.


사용자 삽입 이미지


사용자 삽입 이미지

Post by 넥스트리소프트 데꾸벅(techbug)
, |

리눅스에서 스트리밍 서비스가 어렵다는 이야기가 많아서 한번 찾아봤습니다.

1. 기본적으로 real 은 되신다는 것을 아실 것이고

2. 미국사이트를 찾아보니 리눅스 스트리밍 전문 서비스들이 있더군요.
http://shoutcast.serverroom.us/?OVRAW=linux%20streaming&OVKEY=linux%20stream%20media%20server&OVMTC=advanced
이곳에서는 nullsoft 의 shoutcast 를 서버로 사용하더군요.
클라이언트는 윈도우미디어 플레이어대신 winamp을 사용하구요. PC, MAC, LINUX 에서 모두 사용되구요. ( http://www.nullsoft.com/ntv/publicaccess/ )
http://www.shoutcast.com/download/broadcast.phtml
가격도 저렴한편이네요. 50메가하드+30기가트래픽에 월11.99달러네요.

3. 오디오스트리밍(MP3) 는 icecast 를 가직고 하나봐요. 셋업하는 방법이 나와있네요 참고하세요.
http://www.yolinux.com/TUTORIALS/LinuxTutorialAudioStreaming.html

4 다음은 MPEG4 스트리밍에 관한 내용이고요
http://www.linuxjournal.com/article/6720

5. BYU브로드캐스팅은 TV 라디오와 웬만하게 알려진 파일들은 대부분 제어하는 것 같습니다.  http://www.byubroadcasting.org/

6. 요즘 야후블로그의 비디오나 cj쇼핑에서 나오는 실시간방송은 한국에서 만든 건데
seevideo라는 플레이어로 dideonet.com 에서 만들었죠
샘플과 asp파일 자바스크립트 파일을 받으시려면 다음을 방문하세요.
http://www.seemedia.co.kr/
seevideo 는 리눅스기반 서버에서만 사용이되고, 클라이언트는 윈도우 사용자들을 위해 개발이 되었는 데, AVI파일을 사용하고 있습니다. 기능은 메디아플레이어에 비해 훨씬 뛰어나지만 플레이중 다른 프로그램을 사용하면 시스템이 불안정해지는 것이 흠이더군요.

7. 가장 강력한 것은 프랑스에서 개발된 VLS streaming 입니다.
VLS 는 그간 리눅스의 문제점으로 지적됐던 asf wmv divx avi 등을 스트리밍 할수 있으며, 제작자에의하면 별도의 미디어 서버가 필요없이 리눅스 웹서버에서 바로 작동을 한다고 합니다. VLS는 무료이며 소스가 공개되어 있습니다.

아뭏튼 도움이 되었으면 합니다.
윈도우 메디아 플레이어가 시장을 잡고있으니 리눅스 기반이 흔들리는 것 같습니다.
스트리밍프로그램이나 서비스를 개발하시는 분들께 도움이 되셨으면 합니다.


VLS 정말 멋지군요..
가이드 : http://www.videolan.org/doc/vls-user-guide/en/vls-user-guide-en.html
다운로드 : http://www.videolan.org/streaming/download-vls-sources.html

스트리밍 하실분 써보셔도 좋을듯하네요..^^

조금 대중 적이지는 못하지만 apple의 quicktime기반의 quicktime streaming server도 있습니다. 성능과 화질은 아주 만족하실만 하실겁니다. 리눅스, 윈도우, 맥(osx)기반에서 모두 사용이 가능 하구요... 리얼타임 스트리밍 부터 분산처리까지 구현 가능 합니다. 단지.... quicktime이 아직은 (국내에서는)대중적이지 못하다는 단점이 있긴 합니다.... http://www.apple.com/trailers/ 퀵타임을 설치하시고 여기에 가셔서 HD화질의 영화 트레일러를 보세요... 윈도우 미디어나 리얼 미디어는 눈에도 안들어 옵니다...


'Integrator > U-LINUX' 카테고리의 다른 글

우분투에서 하드드라이브 추가하기  (2) 2008.03.04
우분투 IP변경하기  (0) 2008.03.04
우분투 vsftpd 설치하기  (1) 2008.03.04
ftp passive mode  (0) 2008.02.21
아파치 웹 서버 무단 링크 방지  (0) 2008.02.21
Post by 넥스트리소프트 데꾸벅(techbug)
, |

ftp passive mode

Integrator/U-LINUX / 2008. 2. 21. 19:31

사설(내부) 아이피에서 ftp 사용시 passive mode 때문에 접속이 제대로 안되는 경우가 종종 있는데..
그때는 아래처럼 해 보시기 바랍니다.

$ ftp 218.xx.xxx.xx 10002
Connected to 218.xx.xxx.xx.
220 Welcome to FTP Server
530 Please login with USER and PASS.
KERBEROS_V4 rejected as an authentication type
Name (218.xx.xxx.xx:con): sadad
331 Please specify the password.
Password:
230 Login successful.
Remote system type is UNIX.
Using binary mode to transfer files.
ftp> dir
227 Entering Passive Mode (192,168,123,107,197,183)
<== passive가 on으로 되어 있을 경우 출력되는 내용이다.
vsftp에서 따로 설정이 되지 않으면 기본적으로 on으로 설정된다..

ftp> passive
Passive mode off. <== off로 전환
ftp> dir
550 Permission denied.
Passive mode refused. Turning off passive mode.
200 PORT command successful. Consider using PASV.
150 Here comes the directory listing.
-rw-r--r-- 1 0 0 1093 Mar 19 09:50 test.txt


이처럼 출력이 된다면..
/usr/local/etc/vsftpd.conf 파일에다..
pasv_enable=NO
를 추가후 inetd를 재실행해 주면 되고..
다시 접속을 하면 재대로 실행이 될것이다..

이것 때문에 클라이언트의 cuteftp 설정을 만지는등.. 무지 하게 시간 허비했는데..
윈도우 ftp 프로그램으로 접근할시 개인 방화벽이 있다면.. ftp서버의 아이피에서 접근이 가능하게 해 주어야 합니다.
(포트는 주기적으로 변경이 됨으로 ip주소를 등록해 주는게 좋다.)
다른 곳(linux)에서 콘솔상에서 테스트시에는 구지 iptables로 접근을 허가하지 않아도 되나..
잘 되지 않는다면.. 해당 아이피 접근을 열어주기 바랍니다.

FTP 접속방식은 Port Mode(Active Mode)와 Passive Mode 두 가지가 있습니다.

(1) Port Mode (Active Mode)

처 음 client가 server로 21번 포트로 접속을 맺게 되는데 이 session을 Command Session이라고 하며, 이 Command Session을 통해 사용자는 server에게 사용자 ID와 Password를 전달해서 인증을 받습니다. 인증을 거친 client는 pwd, dir, get, put…등의 원하는 작업에 해당하는 명령어를 전달합니다.

FTP 를 통해 실제 파일을 주고 받을 때는 새로운 session이 하나 더 연결되는데 이를 Data Session이라고 합니다. Data Session은 server에서 자신의 출발지 포트를 20번으로 하고 client로 1024이상의 포트로 접속을 맺습니다.

이 Data Session을 통해 client는 server로부터 파일을 다운로드 할 수 있고 server로 업로드를 하게 됩니다.


그 러나 client가 사설이면 server와 Command Session은 맺어지지만, Data Session은 맺어지지 않게 됩니다. server에서 사설 client로 Data session 연결을 시도하지만 사설IP이기 때문에 연결이 되지 않습니다.

이런 이유로 FTP Gateway설정을 해서 방화벽이 내부 사용자들의 FTP 접속을 대행하게 됩니다.

방화벽이 내부 사설 PC의 FTP접속 요구를 가로채서 방화벽이 대신 server로 접속을 하게 됩니다. 방화벽이 server와 client의 중간에서 data의 흐름을 중개하게 됩니다.

(2) Passive Mode

Port Mode(Active Mode)가 client에서 server로 , server에서 client로의 접속인 반면 Passive Mode는 client가 server로 Command Session과 Data Session을 모두 연결하는 방식입니다.


내부 사설 PC에서 server로 Command와 Data Session을 모두 연결하기 때문에 내부에서 외부로 FTP접속시 Passive Mode로만 접속한다면 방화벽에서는 FPT Gateway를 설정할 필요는 없습니다.
Post by 넥스트리소프트 데꾸벅(techbug)
, |

역시 아파치 웹서버 환경설정 파일인 "httpd.conf" 파일을 찾아서 메모장으로 열고, 다음 소스를 추가한 후 아파치 웹서버를 재실행 하시면 됩니다.

<Directory />
    Options FollowSymLinks
    AllowOverride None

    <IfModule mod_setenvif.c>
    SetEnvIF Referer "http://daum.net" pass  // 도메인명을 코딩합니다. (즉, 설정한 도메인명과 현재 접속한 도메인명이 같을 경우 pass 를 반환합니다.)

    <FilesMatch ".(gif|jpg|png|bmp|zip|tar|rar|alz|a00|ace|jpg|jpeg|txt|GIF|JPG|BMP|ZIP
|TAR|RAR|ALZ|A00|ACE|TXT|mp3|MP3|mpeg|MPEG|wav|WAV|asf|ASF
|wmv|WMV|swf|SWF|exe|EXE)$"> // or (.(*)$)
// 무단 링크 방지할 파일 확장자를 코딩합니다.
        Order deny,allow
        deny from all
        allow from env=pass // pass 값이 존재할 경우 링크를 허용합니다.
    </FilesMatch>
    </IfModule>
</Directory>

httpd.conf

# 도메인 aaa.com

<Directory "디렉토리 지정">
Options FollowSymLinks
AllowOverride None


#링크를 허용할 주소.
SetEnvIfNoCase Referer ^http://aaa.com
SetEnvIfNoCase Referer ^http://aaa.com goout


#이미지의 경우 클릭시 새창에서 X로 보이는것을 방지하기위해.레퍼렐이 존재하지 않는 요청.
SetEnvIfNoCase Referer ^$ goout


#파일 확장자 지정.
<Files ~ ".(gif|jpe?g|png|bmp|zip|tar|rar|alz|a00|ace|txt|mp3|mpe?g|wav|asf|wma|wmv
|swf|exe)$">
Order deny,allow
deny from all
allow from env=goout


#무단링크시 보일 이미지 지정.지정안하고 주석처리하시면 기본 403포빈 에러뜸.
ErrorDocument 403 http://주소/이미지.gif
</Files>
</Directory>

'Integrator > U-LINUX' 카테고리의 다른 글

우분투에서 하드드라이브 추가하기  (2) 2008.03.04
우분투 IP변경하기  (0) 2008.03.04
우분투 vsftpd 설치하기  (1) 2008.03.04
리눅스 스트리밍 서버에 관한 솔류션  (2) 2008.02.21
ftp passive mode  (0) 2008.02.21
Post by 넥스트리소프트 데꾸벅(techbug)
, |

1. 소개

http://projects.edgewall.com/trac/

인용:
Trac is an enhanced wiki and issue tracking system for software development projects.

비교적 복잡하지 않은 issue tracking system 으로 subversion(svn) 을 소스관리, wiki 를 문서관리포맷으로 사용하고 있습니다.

위키에 익숙하신 분은 쉽게 적응하실 수 있으리라 생각됩니다.
또한 svn 을 사용하시는 분들께는 금상첨화라고 볼수 있죠.^^

현재 버전은 0.8 버전이지만, 사용해본 짧은 경험으로 상당히 완성도가 있음을 느꼈습니다.(개인차가 있음을 밝힙니다.)

2. 설치

데비안,우분투 사용자
http://projects.edgewall.com/trac/wiki/TracOnDebian 참조

그외
http://projects.edgewall.com/trac/wiki/TracInstall 참조

위 설치문서대로 하면 문제없이 사용할 수 있었습니다.

trac 자체는 설치가 쉽습니다. 뒷부분의 apache 설정을 조심해서 하시면 큰 문제는 없을 듯 합니다.

3. 국내자료

http://zope.openlook.org/blog/daylist_html?year=2004&month=12&day=21 를 보시면 perky 님이 상세한 리뷰를 해주셨습니다. 그외에는 찾을수가 없었습니다.

4. 한글화

trac 사이트 내에서는 제공하지 않고 있습니다.
위의 perky 님의 리뷰자료는 한글화가 되어 있는데, 공개는 하지 않고 계십니다.(요청을 하면 공개해주실지도..)

첨부파일에는 제가 임의로 한글화한 자료입니다. (50%도 안된자료이지만 필요하신분은 쓰시길..)
F/OSS 프로젝트 게시판은 첨부가 안되네요.

첨부파일 링크 : http://bbs.kldp.org/download.php?id=3631
한글화 첨부파일 설명

인용:

trac 은 Clearsilver 템플릿 라이브러리를 씁니다.
/usr/share/trac 의 templates 폴더의 내용을 한글화 하였습니다.
UTF-8 환경이라 EUC-KR 환경을 쓰시는 분은 깨질 듯 합니다.
(첨부파일을 푸시고, templates 폴더를 교체하시면 됩니다.)
설치환경에 따라 /usr/share/trac 의 위치가 아닐수도 있을 듯 합니다.

5. 문제점
UTF-8 환경을 사용하다보니, 윈도우에서 svn 커밋후에 trac 의 소스브라우저를 보면 내용이 깨집니다.
저장시 UTF-8 로 저장해야 할 듯 합니다.
EUC-KR 환경은 큰 영향이 없을 듯 합니다.(써보신분 확인바랍니다.)

첨부 파일파일 크기
trac_ticket_property.jpg 31.95 KB
templates.zip 31.46 KB


출처 : KLDP ( http://kldp.org/node/52258 )

'Integrator > SCM' 카테고리의 다른 글

subversion 및 trac 설치가이드  (1) 2008.02.25
Post by 넥스트리소프트 데꾸벅(techbug)
, |
윈도 서비스에 등록을 시도할 참이다.

아래의 파일들이 필요하단다.. 인터넷에서 구해 받았다.


* instsrv.exe 설명
- exe 파일을 서비스로 등록시켜주는 프로그램
- 등록시 : instsrv [서비스명] [등록할exe파일]
- 삭제시 : instsrv [서비스명] remove
- 더 자세한건 usage 를 참조하시라~~ (귀찮더라도.. 지발~~~)


* srvany.exe 설명
  window NET 서비스 리소스킷


* HttpRequester.class 설명
- 지속적으로 Http 요청을 쏴주는 클래스
- arg[0] : TargetURL
- arg[1] : interval (millisecond)
- 네이버를 1분간격으로 한번씩 http 요청을 때린다 가정하면
  "java HttpRequester http://www.naver.com 60000"

  되시겠다..


* 이제 Java 어플리케이션을 윈도우 서비스에 등록해보자
- 위 3개의 파일을 c:\windows 에 복사 (암데나 복사하셔도 되며 아래 경로만 맞춰주면 됨)
- 명령프롬프트를 연다(시작->실행 "cmd")
- "c:\windows\instsrv.exe HttpRequesterService c:\windows\srvany.exe" 실행
- 레지스트리 편집기를 연다(시작 -> 실행 -> "regedit" 입력)
- HKEY_LOCAL_MACHINE\SYSTEM\CurrentControlSet\Services 뒤져서

- HttpRequesterService 폴더선택
- 마우스 오른쪽 "새로만들기" -> "키"
- 폴더이름에 "Parameters" 입력
- Parameters 폴더 선택
- 마우스 오른쪽 "새로만들기" -> "문자열값"
- 이름 : "Application"

- 값: "java -classpath c:\windows HttpRequester http://www.naver.com 60000" 을 입력
- 명령프롬프트를 연다(시작 -> 실행 ->"cmd" 입력)
- "net start HttpRequesterService" 실행

  -------------------------------------------------------
  HttpRequesterService 서비스를 시작합니다..
  HttpRequesterService 서비스가 잘 시작되었습니다.
  -------------------------------------------------------
  라는 메시지 나오면 성공 !!

- 서비스 정지시키려면 "net stop HttpRequesterService"

- 서비스 시작 및 정지는 "내컴퓨터 -> 관리 -> 서비스 및 응용프로그램"에서도 제어가능하다는거~~

'Integrator > Windows' 카테고리의 다른 글

GET Method 길이 제한 (최대 URL 길이 )  (3) 2008.11.20
데꾸벅체 다운로드  (0) 2008.07.09
MS office2007 Excel 파일 각각 따로 열기  (8) 2008.06.27
Post by 넥스트리소프트 데꾸벅(techbug)
, |

칼라에 대한 고찰

Designer/UX / 2008. 2. 21. 19:14
항상 디자인을 할때 칼라매치에 고민하다가 괜찮은 사이트하나(칼라러버) 발견

사용자 삽입 이미지


'Designer > UX' 카테고리의 다른 글

IE8을 미리 대비하기  (0) 2008.06.13
PhotoshopExpress : 포토샵이 웹으로?  (2) 2008.03.28
IE6 PNG background없애기  (0) 2008.02.21
favicon 생성기  (0) 2008.02.21
저작권 없는 무료 이미지 사이트 100선  (1) 2008.02.21
Post by 넥스트리소프트 데꾸벅(techbug)
, |
방법1 : -------------------------------------------------------------------------------------------------------------
<style type="text/css">
.png24 { tmp:expression(setPng24(this)); }
</style>

<script>
function setPng24(obj)
{
obj.width=obj.height=1;
obj.className=obj.className.replace(/\bpng24\b/i,'');
obj.style.filter = "progid:DXImageTransform.Microsoft.AlphaImageLoader(src='"+ obj.src +"',sizingMethod='image');"
obj.src='';
return '';
}
</script>

<table>
<tr>
<td bgcolor="blue"><img src=left.png class="png24"></td>
</tr>
</table>


방법2 -------------------------------------------------------------------------------------------------------
참조 : http://naradesign.net/wp/2006/12/15/100/


1. img 로 불러올 때

css에서
.png24 {
    tmp
:expression(setPng24(this));
}


이렇게 선언하고

js에서
function setPng24(obj) {
    obj
.width=obj.height=1;
    obj
.className=obj.className.replace(/\bpng24\b/i,'');
    obj
.style.filter =
   
"progid:DXImageTransform.Microsoft.AlphaImageLoader(src='"+ obj.src +"',sizingMethod='image');"
    obj
.src=''; 
   
return '';
}


이렇게 선언해 준 후에 사용하는 이미지에 class="png24"를 삽입.
BUT - 페이지를 한 번더 호출하는 경우가 발생 -_-;


2. background-image로 불러올 때

background: url(../images/asdf.png) no-repeat center top;
//CSS문서 위치를 중심으로 이미지 경로를 따질것

background
-image : none;
filter
: progid:DXImageTransform.Microsoft.AlphaImageLoader(src='../images/asdf.png',sizingMethod='scale');
//실제 읽어들이는 페이지를 중심으로 이미지 경로를 따질것


출처 : http://forum.standardmag.org


특수한 경우
필터 먹은 DIV 안에 있는 링크를 아무리 눌러도
클릭이 되지 않는 현상이 생깁니다. (IE-_-신발)

이 특수한 경우는 다음과 같습니다.

필터먹인 DIV
div {
   position
: relative;
  
// offset 설정이 되어버리는 순간 (absolute 마찬가지)
}


위와 같이 필터먹인 DIV에
position: relative, absolute 설정을 주면
안에 있는 링크는 무용지물이 되고 맙니다.

해결방법
1. 필터 먹인 DIV에는 position: static;
2. 그 안에 들어있는 링크(a)에 relative 혹은 absolute 를 주세요.

'Designer > UX' 카테고리의 다른 글

PhotoshopExpress : 포토샵이 웹으로?  (2) 2008.03.28
칼라에 대한 고찰  (0) 2008.02.21
favicon 생성기  (0) 2008.02.21
저작권 없는 무료 이미지 사이트 100선  (1) 2008.02.21
한국의 색상  (3) 2008.02.21
Post by 넥스트리소프트 데꾸벅(techbug)
, |

favicon 생성기

Designer/UX / 2008. 2. 21. 19:09
매일 포토샵으로 아이콘 만들기 귀찮았는데 png이미지를 알아서 아이콘으로 만들어주는 사이트가 있어 포스팅한다.

사용자 삽입 이미지

Post by 넥스트리소프트 데꾸벅(techbug)
, |

출처 : http://www.virtualhosting.com/blog/2007/100-legal-sources-for-free-stock-images/


Most Popular

These resources are some of the most popular free stock image sites on the Web and with good reason. If you’re looking for some mainstream images, these are the first place to try.

  1. FreeFoto: FreeFoto.com claims to be “the largest collection of free photographs on the Internet.” They’re available for offline projects as well, as long as you’re not using them to make a profit.
  2. KAVEWALL: Look for images and textures in unique categories like tattoo, smoke, and food.
  3. Digital Dreamer: Free, royalty-free stock images can be found here.
  4. Free Photos Bank: This features a handful of the newest photos in their directory, so check back often.
  5. Free Digital Photos: Find gorgeous, easy-to-download photographs in categories like animals, celebrations, home & garden, and lots more.
  6. PD Photo: Browse through the categories and subcategories in this site’s database, most of which depict the urban and rural landscapes of the United States.
  7. Visipix: Search over a million photographs and fine art pieces.
  8. Cepolina: On cepolina, you can choose to save photos in up to five different formats.
  9. DexHaus: A wide array of beautiful images are found on this well-organized site.
  10. FreeStockImages.net: Chances are you’ll find whatever it is you’re looking for on this terrific site.
  11. TurboPhoto: TurboPhoto has 10 categories keep the high res photos easy to find.
  12. Yotophoto: An immensely popular site, Yotophoto is worth checking out.
  13. Stockvault: Search by photo subject or by the newest and most popular photos on Stockvault.
  14. Dreamstime: While most of the photos on this site cost a fee (some as low as $0.26/image), Dreamstime provides a few free stock photos.
  15. Open Stock Photography: This site offers over one million images for you to download and use however you want.

Community-Powered Content

In addition to being a great source of images, these sites host forums, file sharing and other features designed to nurture community spirit.

  1. Image After: Search tons of free photos on this site while meeting other photography lovers on the forum.
  2. Unprofound.com: Use the images however you want, just make sure you let them know where you’ve published it!
  3. Font Play: This site has nearly 10,000 free photos for you to use any way you want. Look under the “Guests” heading to search by your favorite contributor.
  4. Studio 25: This attractive site lets you upload and search images.
  5. Vintage Pixels: Share your archived photos with other users. Download images that work for your Web site or blog.
  6. Abstract Influence: Search for the stock images you want while talking about photography with other visitors on the site’s forum.
  7. amygdela’s atmosphere: This site hosts a forum and a blog, as well as tons of stock images.
  8. Every Stock Photo: A forum and blog keep this stock image site fun and informative.
  9. Photocase: The good people at Photocase are “prettying up the world.” Check out their great library of stock images.
  10. deviantART: Provocative photos spawn great debates on the site’s forum.

Artists Welcome

It’s probably pretty safe to say that every stock image site on the Web needs the help of photographers to keep it running. The following sites, however, really cater to the needs of photographers, designers, and other artists even though they’re donating their photos for free.

  1. Stock.xchng: Check out the gorgeous shots organized into lots of different categories, making your search as easy as possible.
  2. Morguefile: Browse thousands of beautiful photos in this site’s archives, but don’t miss their job board either!
  3. Woophy: This site organizes photographs by geographical location. Enter into their contest for a chance to win great prizes.
  4. The NOAA Library: Breathtaking science and nature shots are available at this site. Don’t forget to check out the “Meet the Photographers” page which includes short bios and descriptions of the featured photogs.
  5. Pixel Perfect Digital: Get tons of free stock images and read the latest in photography news.
  6. Free Range Stock: Photographers are rewarded for giving away their pictures by getting a percentage of the site’s total ad revenue.
  7. AMG Media: As long as you give credit to the photographer somewhere on your site, these images are yours for the taking.
  8. Free Photographs Network: Submit photographs for others to see, or download some for your own use.
  9. FreePhotos.com: If you’re a photographer, submit your best pictures for a chance to win cool prizes.
  10. PhotoRogue.com: If you can’t find a picture of anything you want, go to PhotoRogue.com and make a request for whatever it is you’re thinking of. Photographers will take pictures for you — and it’s still free!
  11. Graphicsarena.com: Submit your photos for consideration.
  12. Fotogenika: Send in your photos for other visitors to use on their personal sites.
  13. Image Temple: Send in your own photos to be included in this site’s gallery.
  14. Flickr: Most of the photos on this site are not free, but a clever search will turn up some real goodies.
  15. FreeLargePhotos.com: Downloaders must link their chosen photo back to the site, which gives the photographer credit.

Less is Sometimes More

Just because the sites listed in this section aren’t as expansive as some of the others on our list doesn’t mean they’re not worth checking out. Sometimes less can really means more, especially when it comes to narrowing down your search or coming across hard-to-find treasures.

  1. Mayang’s Free Texture Library: Download high-res textures from this site, which has categories like architecture, buildings, plants, wood, and stone.
  2. Liam’s Pictures from Old Books: Discover hard-to-find illustrations from old books, “most with multiple high-resolution versions.”
  3. Texture Warehouse: Find interesting textures at this great site.
  4. Free Stock Photos: Nature shots and religious themes are abundant at this free stock photography site.
  5. BurningWell: Totally free images are organized into categories like animals, bugs, cityscapes, people, plants, and textures.
  6. Design Packs: New images and themes are added monthly, so this site may not be a well kept secret too much longer!
  7. Amazing Textures: This site is a web designer’s dream. Browse hundreds of high res textures and backgrounds.
  8. Aarin Free Photo and Digital Images: These site boasts nearly 1,000 fantastic images for you to choose from.
  9. Image Base: On Image Base, breathtaking photographs are organized in categories like nature, concept, people, and city.
  10. Majestic Imagery: All the photos on this site were taken by the host.
  11. diwiesign studio: All the images are free, but if you’re a frequent user, you might want to consider making a donation to this photo entrepreneur.
  12. Zurb Photos: Photographer Bryan Zmijewski uploads his own images onto this site.
  13. tOfz.org: Find urban images for free, but consider making a contribution to this artist’s cause.
  14. LIGHTmatter: These gorgeous photos were all taken by the same artist, who also hosts the Web site.
  15. Insect Images: Find all kinds of photos of creepy crawlers here.

Stock Images Plus

There is a lot more to legal stock images than just a bank of free photos. The sites in this section all go beyond being a basic stock photography resource by offering more services that will help improve your search for and use of stock images.

  1. Creative Commons: This nonprofit site shows you how to license your images once they’ve been uploaded onto your site.
  2. Free Images: This British site offers free images as well as wallpapers, desktops, and a section of ideas and tips that will help you customize your image experience, whether you’re a photographer or not.
  3. Creating Online: This stock images site is an excellent resource for any new blogger or Web site developer. Learn about editing your images, hosting, domains, and more.
  4. ArtFavor: Find stock images, fonts, sounds, flash clipart, and more, are all on this terrific site.
  5. Geek Philosopher: Find hilarious and beautiful stock images side by side. Also check out the site’s blog and web hosting capabilities.
  6. Gimp Savvy: In addition to finding great images, Gimp Savvy also gives tips on photo touchups, making a collage, and more.
  7. Creativity 103: Find free abstract images and videos on Creativity 103.
  8. Afflict.net: Search photos and textures while learning about images in the tutorials section.
  9. One Odd Dude: Download photographs, wallpapers, textures, and more on One Odd Dude.
  10. Discover: Search for your favorite subjects or web sites, and hundreds of free icons, stock images, and other designs will appear.
  11. Photoshop Support: On Photoshop Support, browse photos, read the tutorials, and check out the great imaging tools.
  12. AncestryImages.com: Search antique portraits and use the geneaology resources link to connect you to even more tools.
  13. Free Media Goo: Download free stock images, audio, and video on Free Media Goo.
  14. National Park Service Digital Image Archive: Check out beautiful pictures taken for the NPS. This site also provides a link to the NPS official site.
  15. <New York Public Library Digital Gallery: Browse through thousands of prints, illustrations, and photos. Read the photographic services and permissions page for more information on downloading high-res files.

Miscellaneous

These image sites don’t necessarily fit into one particular category, but they’ve still got a lot to offer.

  1. Backgrounds Archive: Find beautiful backgrounds for your desktop or MySpace page.
  2. USDA Agricultural Research Service: The government’s Agricultural Research Service sponsors this “complimentary source of high quality digital photographs.”
  3. Holy Land Photos: Poignant photos of the Holy Land are available here.
  4. Stockcache.com: This site makes organizing your downloads easy.
  5. Four Bees: Browse through the stock images directory, or download royalty free music and video on Four Bees.
  6. Clipmarks: Search for free stock images with this handy tool.
  7. Yellowstone Digital Slide File: These beautiful shots of Yellowstone National Park are available for use by the media and public.
  8. Plants of Hawaii: Perfect for any botanist, this site has over 45,000 images of Hawaiian plants.
  9. Microshots: This site specializes in microscopic images.
  10. IN TEXTURE: Free stock textures are plentiful on this site.
  11. Trip Album: This site is all in French, but the photos are divided into categories based on country, making it easy to figure out.
  12. Orange Trash: Find pictures about Hungary on this Web site.
  13. Public domain stock photos: Browse categories like backgrounds, food, nature, objects, and seasonal on this site.
  14. BAJstock: Written in both French and English, this stock image site has tons of photos for you to use for free.
  15. NWYK Stock Image Library: This hilarious site provides free images that capture the drudgery and playfulness of office life.

General

These stock image sites offer a wide range of photo subjects, perfect for casual browsing or a way to get ideas before you plan out your site.

  1. Public Domain Photos: Check out these gorgeous pictures of animals, cities, landscapes, and more.
  2. Bigfoto.com: Find photos of beautiful places all around the world, as well as fun shots in the Christmas, grafitti, or food categories
  3. Photogen: Look through the Top 10 gallery to find the most popular downloads in a preview-friendly thumbnail format.
  4. Free Pixels: Find free photos, logos, or other images on this site.
  5. DHD Multimedia Gallery: Search through thousands of basic photos.
  6. PIX: This site is so easy, you don’t even have to register to download.
  7. Photo Rack: New photos are featured at the bottom of the page, so check back often to make sure you don’t miss anything great.
  8. Free Stock Photos: On Free Stock Photos, each image comes with a description detailing its size.
  9. Barry’s Free Photos: This is a great site for finding all different kinds of images for your Web site.
  10. Cromavista: This site is all in Spanish but still easy to navigate if you’re not a native speaker.
  11. IronOrchid: Several different categories allow for an efficient search on IronOrchid.
  12. Image Blowout: Have fun looking through these unique photos.
  13. FreeImages.com: Tons of categories and subcategories make searching for photos on this site simple.
  14. ilovefreePhoto: This fun, attractive site makes searching for that perfect photo a little less frustrating.
  15. Free Photo Station: Loads of great photos are all free on this site.

'Designer > UX' 카테고리의 다른 글

IE6 PNG background없애기  (0) 2008.02.21
favicon 생성기  (0) 2008.02.21
한국의 색상  (3) 2008.02.21
매킨토시의 휴먼인터페이스 - 인터페이스 디자인 원칙  (0) 2008.02.21
영문폰트를 웹폰트로  (0) 2008.02.21
Post by 넥스트리소프트 데꾸벅(techbug)
, |

한국의 색상

Designer/UX / 2008. 2. 21. 19:05
원래 CMYK색인데 포토샵에서 RGB값으로 바꾸어서 웹상에서 사용할 수 있도록 하였습니다.
무채색계(無彩色界)
흑백 1D1E23 93,89,83,52
백색 FFFFFF 0,0,0,0
회색 A4AAA7 38,27,31,0
구색 959EA2 45,32,32,0
치색 616264 72,64,62,4
연지회색 6F606E 55,58,40,20
설백색 DDE7E7 12,4,7,0
유배색 E7E6D2 9,5,18,0
지배색 E3DDCB 6,6,17,4
소색 D8C8B2 10,15,26,5
적색계(赤色界)
적색 B82647 21,98,68,8
홍색 F15B5B 0,80,60,0
적토색 9F494C 29,80,64,17
휴색 683235 40,80,66,44
갈색 966147 31,61,73,21
호박색 BD7F41 21,51,84,8
추향색 C38866 19,48,61,6
육색 D77964 11,62,59,2
주색 CA5E59 15,75,62,4
주홍색 C23352 18,94,60,5
담주색 EA8474 4,59,50,0
진홍색 BF2F7B 20,94,17,4
선홍색 CE5A9E 16,79,2,0
연지색 BE577B 19,77,28,7
훈색 D97793 9,64,20,2
진분홍색 DB4E9C 9,84,0,0
분홍색 E2A6B4 7,39,14,1
연분홍색 E0709B 6,69,11,1
장단색 E16350 6,75,70,1
석간주색 8A4C44 30,71,65,30
흑홍색 8E6F80 40,54,31,15
황색계(黃色界)
황색 F9D537 3,13,89,0
유황색 EBBC6B 6,25,67,1
명황색 FEE134 2,7,89,0
담황색 F5F0C5 4,2,27,0
송화색 F8E77F 4,4,62,0
자황색 F7B938 2,29,89,0
행황색 F1A55A 3,40,73,0
두록색 E5B98F 8,27,45,1
적황색 ED9149 4,51,80,0
토황색 C8852C 18,50,97,5
지황색 D6B038 14,26,91,3
토색 9A6B31 30,54,91,20
치자색 F6CF7A 3,18,61,0
홍황색 DDA28F 9,39,38,2
자황색 BB9E8B 22,33,40,7
금색
별색
청록색계(靑綠色界)
청색 0B6DB7 89,56,0,0
벽색 00B5E3 73,5,4,0
천청색 5AC6D0 59,0,20,0
담청색 00A6A9 96,4,40,0
취람색 5DC19B 62,0,51,0
양람색 6C71B5 64,58,0,0
벽청색 448CCB 72,36,0,0
청현색 006494 99,59,22,3
감색 026892 93,57,26,2
남색 6A5BA8 68,73,0,0
연람색 7963AB 60,69,0,0
벽람색 6979BB 64,52,0,0
숙람색 45436C 86,84,40,9
군청색 4F599F 80,73,6,0
녹색 417141 82,44,95,9
명록색 16AA52 81,5,94,0
유록색 6AB048 64,8,97,0
유청색 569A49 72,20,96,1
연두색 C0D84D 29,0,87,0
춘유록색 CBDD61 24,0,78,0
청록색 009770 97,15,74,0
진초록색 0A8D5E 87,26,82,1
초록색 1C9249 85,20,98,2
흑록색 2E674E 89,52,83,9
비색 72C6A5 55,0,45,0
옥색 9ED6C0 38,0,30,0
삼청색 5C6EB4 71,59,0,0
뇌록색 397664 74,27,59,6
양록색 31B675 74,0,74,0
하염색 245441 83,43,75,39
흑청색 1583AF 84,39,17,0
청벽색 18B4E9 69,8,0,0
자색계(紫色界)
자색 6D1B43 41,95,45,40
자주색 89236A 40,96,18,20
보라색 9C4998 42,85,1,1
홍람색 733E7F 58,85,10,15
포도색 5D3462 70,90,35,20
청자색 403F95 90,90,1,1
벽자색 84A7D3 47,25,1,1
회보라색 B3A7CD 28,32,1,1
담자색 BEA3C9 23,36,1,1
다자색 47302E 75,86,85,35
적자색 BA4160 15,86,42,13
Post by 넥스트리소프트 데꾸벅(techbug)
, |
1) 은유-Metaphor

  사람들의 지식을 이용해 Application의 개념과 특징을 전달하고 이해시킨다

- 친숙한 아이디어 포함한 메타포사용
- 명확한 메타포 사용
  *사용자가 쉽게 컴퓨터 환경에 적응할 수 있도록 한다.
     .사무실의 folder - 문서보관
     .Computer folder - 전자문서보관, 여러형식의 데이타보관
     .사무실의 desk - 문서작성등의 작업
     .Computer desktop - 각종 작업의 기본 구역
     .사무실의 휴지통 - 각종 쓰레기 버림
     .Computer 휴지통 - data 버림
     .식당의 메뉴와 Computer상의 행동선택을 메뉴로 하는 것 등.

  *메타포의 용도는 비슷하지만 실행에 대한 제한은 컴퓨터마다 상이
  *메타포가 제시하는 용도와 컴퓨터 능력간의 균형을 맞추어야 한다.


2) 직접조작-Direct Manipulation

  컴퓨터에 의해 묘사된 object를 직접 제어하고 있다는 느낌을 갖도록 하기위한 조작방식을 말한다.

 - 물리적 행동이 곧 컴퓨터의 object를 제어한다.
 - 사용자는 물리적 결과를 기대하고 feedback도 기대한다.
 - 사용자는 명령어 실행여부를 알고 싶어한다.
 - 명령어 실행 불가시 이유와 대체방안을 알고싶어한다.
  *실행에 대한 feedback은 적절한 에니메이션이 필요
     .drag
     .click
     .cursor의 위치 조작
     .drawing 도구의 움직임 - 라인 형성


3) 보고 지정하기-See and Point

  Pointing device인 mouse등으로 사용자와 computer와의 상호작용하도록 하는 것을 말한다.

Macintosh desktop에서의 기본 패러다임

 -사용자가 하고 있는 일을 screen 상에서 볼 수 있다.
  i.사용자가 관심있는 object 선택
   ii.object가 실행할 행동지정(메뉴등으로 지정)
   iii.실행(메뉴실행, 직접실행)
     .document icon click > file menu > print

  -사용자가 자신이 보고있는 것을 지정할 수 있다.
   i.사용자가 object를 연관된 행동을 위해 drag해서 실행
     .document icon drag > 휴지통에 (삭제)
     .document icon drag > 폴더에 (복사 및 이동)


4) 일관성-Consistency

  일관성은 어떤 표준요소에 의해 애플리케이션 내부나 애플리케이션 간의 학습전이 효과를 창출할 수 있도록 서로 공통성을 찾아주는 과정이다.

이런식의 제작은 다른 애플리케이션으로 기본적인 조작의 학습전이 효과를 창출할 수 있다. 목표 사용자 집단에 요구와 관련된 일관성 문제들을 보면서 문제를 다루어야 한다.

 -시각적 일관성
   i.그래픽 언어의 학습과 학습전이 용이
   ii.한번의 학습은 필요

 -제품의 일관성 고려시 자문할 사항
   i.제품자체내에서 일관성이 이루어지고 있는가?
   ii.이전버젼과 비교해서 일관성이 이루어지고 있는가?
   iii.인터페이스 표준과 관련해서 일관성이 이루어지고 있는가?
   iv.metaphor 사용에서 일관성이 이루어지고 있는가?
   v.사용자의 기대와 비교해서 일관성이 이루어지고 있는가?


5) WYSIWYG-What You See Is What You Get

  "보이는 것을 그대로 얻는다."
스크린에서 보는 것과 print후 얻게되는 출력물간에는 거의 차이가 없어야 한다.

 -폰트, 폰트내용과 format을 모두 제공
 -폰트, 폰트내용과 format을 변형시 즉시 볼 수 있어야 한다.
  *사용자가 보여질 것에 대해 계산을 하도록 하면 안된다.


6) User Control-사용자 조절

  사용자가 실제 참여하는 것처럼 느끼도록 하여야 한다.
사용자는 실제 자기참여에 의한 학습의 능률이 뛰어나다.
 
 -사용자로 하여금 행동을 개시하고 조절하도록 한다.
  *작업수행에 필요한 능력을 사용자에게 제공하는 것과 사용자가 데이타를
   파괴하지 못하도록 방지하는 것간의 균형유지가 중요하다...


7) Feedback and Dialogue-피드백과 대화

  사용자가 제품의 상태에 대해 계속 알려준다.
작업수행시 가능한한 feedback 즉각 제공한다.

 -사용자의 입력행동시나 지정시 시각적,청각적 신호제공.
 -작동시간에 대한 display.
 -다른 작업처리로 인해 사용자 작업불가시 그 작업시간과 종류출력.
 -인터럽트 방법도 알려줄 수 있어야 한다.
 -유용한 메시지를 보여준다...


8) Forgiveness-관대함

  computer상의 행위를 대개의 경우 철회할 수 있도록 제작한다.
시스템상의 손상없이 일을 시도해 볼 수 있다는 느낌을 사용자가 갖도록 한다.

 -사용자들이 편안히 제품을 살펴볼 수 있도록 해야한다.
 -사용자의 최악의 실수에 대해서는 경고상자를 사용한다.
 -가능한한 경고상자가 없도록 자연스러운 시스템이 되도록 디자인 되어야 한다.


9) Perceived Stability-인지된 안정감

  사용자에게 개념적인 안정감을 제공한다.
 
-Interface는 분명하고 제한적인 object set와 이를 object에서 실행할 수 있는
  분명하고 제한적인 동작세트를 제공한다.
   .Desktop 제공, 일관성을 유지한 그래픽요소의 제공이 확고해야한다.
   .특정동작 사용방지시에 icon을 흐리게 처리한다.


10) Aesthetic Integrity-미적 완전함

  정보가 잘 조직되어 시각디자인 원칙에 일치하는 것을 말한다.   
 
-모든 것이 screen 상에서 display 기술수준이 훌륭해야 한다.   
 -장시간 화면을 보아도 훌륭히 보이도록 만들어야 한다.   
 -button과 icon, window의 적정수를 유지해야 한다.   
 -인터페이스의 그래픽언어를 준수해 표준 아이템의 의미를 바꾸지 않도록
   유의해야 한다.   
 -개념을 나타내는 데 있어 임의적(독단적) 그래픽이미지를 사용하면 안된다.
 -가능한한 표준심볼을 사용한다.
 -사용자가 기대하는 행동에 그래픽요소를 맞춘다 /누르면 눌러진듯한
   버튼, 스피너
 -사용자에게 외관조정의 재량을 부여한다.


11) Modelessness-비정형화

  사용자가 주어진 application에서 하려는 일을 할 수 있도록 비정형화된 기능을 만들도록 시도한다.


12) Knowledge of Audience-사용자에 대한 이해

  제품제작을 하면서 사용자에 대한 이해는 필수이다.
 
-사용자의 일과를 시나리오로 작성하여 분석한다.
 -사용자들의 작업공간의 환경에 대해 분석한다.
 -사용하는 툴의 한계를 분석한다.
 -실제작업현장을 방문하여 관찰한다.
 -prototype 제작 및 테스트를 한다.
 -사용자의 feedback을 듣고 요구를 반영하여 재평가한다.


13) Accessibility-접근가능성

  평균사용자와 다른 사용대상자를 분석하여 보다 근접한 제품을 만들어야 한다.
 
-연령, 스타일, 능력 등을 조사한다.
 -언어적, 육체적, 인식적 차이에 유의한다.
 -개개인의 특별요구사항들을 확인한다.

'Designer > UX' 카테고리의 다른 글

IE6 PNG background없애기  (0) 2008.02.21
favicon 생성기  (0) 2008.02.21
저작권 없는 무료 이미지 사이트 100선  (1) 2008.02.21
한국의 색상  (3) 2008.02.21
영문폰트를 웹폰트로  (0) 2008.02.21
Post by 넥스트리소프트 데꾸벅(techbug)
, |

사용자 삽입 이미지

'Designer > UX' 카테고리의 다른 글

IE6 PNG background없애기  (0) 2008.02.21
favicon 생성기  (0) 2008.02.21
저작권 없는 무료 이미지 사이트 100선  (1) 2008.02.21
한국의 색상  (3) 2008.02.21
매킨토시의 휴먼인터페이스 - 인터페이스 디자인 원칙  (0) 2008.02.21
Post by 넥스트리소프트 데꾸벅(techbug)
, |

포토샵 팁

Designer/Photoshop / 2008. 2. 21. 18:59
각종 포토샵 설정 팁
1. 포토샵에서 갑자기 폰트들이 안 보일 때

컴퓨터를 안전모드에서 부팅해서
시작 >> 검색 >> 파일 또는 폴더  
ttfcache 라고 입력한 다음 나오는 파일을 삭제해주시면 됩니다.

2. 포토샵 처리속도 빠르게하기

+ 영문버젼  Edit> Preferences> Memory & Image Cache > Used by Photoshop
+ 한글버젼  편집 > 환경설정 > 메모리와 이미지 캐쉬 > 메모리사용
기본적으로 50% 로 되어있는 부분을 80% 정도로 높여주면 처리속도가  빨라진답니다.  

3. 다운받은 "브러쉬", "스타일" 삽입하는 방법

+ 브러쉬[Program Files]-[Adobe]-[Photoshop]-[Presets]-[Brushes] 폴더안에 넣으세요.
+ 스타일 [Program Files]-[Adobe]-[Photoshop]-[Presets]-[Style] 폴더안에 넣으세요.

4. 한글 포토샵→영문으로

한글 포토샵을 영문버전으로 바꾸시려면 [Program Files] - [Adobe Photoshop6.0]-[Required]에서 tw10428.dat를 지워주시면 됩니다.

5. 포토샵에서 한글 폰트 한글로 나오게 하기  

+ 포토샵 5.5 : 파일 (File)-환경설정(preferences)-일반(general)-show font names in english 체크 해제
+ 포토샵 6.0 : 편집 (Edit)- 환경설정(preferences)-일반(general)-show font names in english 체크 해제

6. 포토샵 필터 사용법

필터를 다운받은 담에 압축을 풀때 꼭 photoshop-->plug-ins 폴더안에 압축을 풀어주세요.
다른 디렉토리에 이미 압축을 풀었다면 꼭 plug-ins 폴더안으로 옮겨주세요.
포토샵을 종료한후 다시 실행하면 메뉴의 필터라는 메뉴안에 새로운 필터가 들어있는걸 보게 됩니다.

7. 웹폰트 포토샵에서 최적싸이즈..

웹폰트 뒤에 나오는 숫자를 보면 9,10,12 이러케 3종류입니다.
(예;웝정9,웹정10,웹정12,민9,네딱12,둥딱12)

숫자가 9인폰트들 - 글씨크기 12싸이즈로 작업합니다.
숫자가 10인폰트들 - 글씨크기 13싸이즈로 작업합니다.
숫자가 12인폰트들 - 글씨크기 16싸이즈로 작업합니다.

숫자가 없는 폰트일경우 포토샵에서의 기본싸이즈는
거의가 글씨크기12싸이즈입니다.
Post by 넥스트리소프트 데꾸벅(techbug)
, |

와우~ 죽인다. Extjs와 AIR가 만나니 이런 종류의 윈도우 프로그램도 가능하구나..!!
Jack Slocum 이 작성한 AIR와 ExtJS를 이용한 Vista Gadget이다.

사용자 삽입 이미지

extjs.comAIR DOC설치후 아래 window.gadget파일을 다운로드 받은후 더블클릭한다.


AIR 설치하기 : http://extjs.com/playpen/air/docs.html
관련URL : http://jackslocum.com/blog/category/ext-js/
윈도우가젯 만들기 : MSDN

function changeDock(){
if(System.Gadget.docked){
System.Gadget.background = 'images/docked.png';
var bd = Ext.getBody();
bd.setSize(130, 250);
bd.addClass('docked');
cm.setHidden(1, true);
cm.setRenderer(0, renderTopicMini);
grid.setPosition(4, 4);
grid.setSize(121, 241);
toggleDetails(null, false);
}else{
System.Gadget.background = 'images/undocked2.png';
var bd = Ext.getBody();
bd.setSize(528, 383);
bd.removeClass('docked');
cm.setHidden(1, false);
cm.setRenderer(0, renderTopic);
grid.setPosition(14, 14);
grid.setSize(494, 349);
cm.setColumnWidth(0, 350);
toggleDetails(null, true);
}
}
 
System.Gadget.onUndock = changeDock;
System.Gadget.onDock = changeDock;


Post by 넥스트리소프트 데꾸벅(techbug)
, |
GWT-EXT2.0에 이어 .NET용 Ext버전이 출시됐다.

Ext Framework을 이용한 .NET 웹컨트롤 유닛인 Coolite Studio 는 Ext의 대부분의 기능을 GWT-EXT와 마찬가지로 Server-Side Ajax를 지원한다.

사용자 삽입 이미지


Post by 넥스트리소프트 데꾸벅(techbug)
, |
기본적인 에러핸들링에 대해서 설명한다.

GridPanel 의 loadexception을 이용한 ErrorHandling 방법

기본 그르드 패널에서 데이타 로드시 loadexception이벤트에 대해서 설명한다.

BasicGridClass = function() {
    return {
        init : function() {
            // 데이타 스토어 정의
            this.store = new Ext.data.Store( {
                proxy : new Ext.data.HttpProxy( {
                    url : 'basicGrid.json'
                }),
                sortInfo : {
                    field : 'price',
                    direction : "DESC"
                },
                reader : new Ext.data.JsonReader( {
                    root : 'testData'
                }, [ {
                    name : 'company',
                    type : 'string',
                    mapping : 'company'
                }, {
                    name : 'price',
                    type : 'float',
                    mapping : 'price'
                }, {
                    name : 'change',
                    type : 'float',
                    mapping : 'change'
                }, {
                    name : 'pctChange',
                    type : 'float',
                    mapping : 'pctChange'
                }, {
                    name : 'lastChange',
                    type : 'date',
                    dateFormat : 'n/j h:ia',
                    mapping : 'lastChange'
                }])
            });
            this.grid = new Ext.grid.GridPanel( {
                store : this.store,
                columns : [ {
                    id : 'company',
                    header : "Company",
                    width : 160,
                    sortable : true,
                    dataIndex : 'company'
                }, {
                    header : "Price",
                    width : 75,
                    sortable : true,
                    renderer : 'usMoney',
                    dataIndex : 'price'
                }, {
                    header : "Change",
                    width : 75,
                    sortable : true,
                    dataIndex : 'change'
                }, {
                    header : "% Change",
                    width : 75,
                    sortable : true,
                    dataIndex : 'pctChange'
                }, {
                    header : "Last Updated",
                    width : 85,
                    sortable : true,
                    renderer : Ext.util.Format.dateRenderer('m/d/Y'),
                    dataIndex : 'lastChange'
                }],
                stripeRows : true,
                autoExpandColumn : 'company',
                loadMask : {
                    msg : '데이타 로드중'
                },
                sm : new Ext.grid.RowSelectionModel( {
                    singleSelect : true
                }),
                view : new Ext.grid.GridView( {
                    forceFit : true,
                    enableRowBody : true,
                    emptyText : 'No Record found'
                }),
                height : 350,
                width : 800,
                title : '기본 그리드'
            });

            this.grid.render('DIV_GRID_HERE');
            // this.grid.getSelectionModel().selectFirstRow();
            this.store.load();

            this.grid.on('rowcontextmenu', function(grid, index, e) {
                alert('오른쪽 버튼 클릭');
            }, this);
            this.grid.on('rowclick', function(grid, index, e) {
                alert('클릭');
            }, this);
            this.grid.on('rowdblclick', function(grid, index, e) {
                alert('더블클릭');
            }, this);
            this.gsm = this.grid.getSelectionModel();
            this.store.on('load', this.gsm.selectFirstRow, this.gsm);

            this.store.on('load', function(store, records, options) {

            }, this);

            this.store.on('loadexception',
                    function(a, conn, resp) {
                        if (resp.status == 200) {  ============> 혹은 resp.statusText를 사용
                            var jsonData = resp.responseText;
                            var result = (jsonData != undefined && jsonData
                                    .trim() != "") ? Ext.decode('(' + jsonData
                                    + ')') : null;
                            if (result != null && result.code != undefined
                                    && result.code.trim() != ''
                                    && result.message != undefined) {
                                this.showErrorStackHandler(result);
                            }
                        }
                    }, this);

            // 커넥션에서 문제가 일어났을 경우
            this.store.proxy.getConnection()
                    .on(
                            'requestcomplete',
                            function(conn, resp, options) {
                                var jsonData = resp.responseText;
                                var result = (jsonData != undefined && jsonData
                                        .trim() != "") ? Ext.decode('('
                                        + jsonData + ')') : null;
                                if (result != null && result.code != undefined
                                        && result.code.trim() != ''
                                        && result.message != undefined) {
                                    this.showErrorStackHandler(result);
                                }
                            }, this);

            this.store.on('load', function(store, records, opt) {
            });

        },

        showErrorStackHandler : function(result) {
            var code = (result.code != undefined) ? result.code : '';
            var mesg = (result.message != undefined) ? result.message : '';
            var insNm = (result.instanceName != undefined)
                    ? result.instanceName
                    : '';
            var errStack = (result.stack != undefined) ? result.stack : '';
            var occDate = (result.occurDateTime != undefined)
                    ? result.occurDateTime
                    : '';

            var markup = "<div><ul>" + "<li>에러코드 :  " + code + "</li>"
                    + "<li>에러메세지 : " + mesg + "</li>" + "<li>인스턴스명:  " + insNm
                    + "</li>" + "<li>발생시각:  " + occDate + "</li>"
                    + "<li>에러스택 :<br /> " + errStack + "</li>"
            "</ul></div>";

            var win = new Ext.Window( {
                title : 'Error',
                closable : true,
                width : 600,
                height : 350,
                layout : 'border',
                modal : true,
                items : [{
                    region : 'center',
                    title : '에러메세지',
                    border : false,
                    autoScroll : true,
                    html : markup
                }]
            });
            win.show(this);
        }

    }
}();
Ext.EventManager.onDocumentReady(BasicGridClass.init, BasicGridClass, true);


관련소스다운로드


실제 위의 소스중 loadexception에서 발생하는 resp.status=="200"이 FF에서는 잘 작동하나 IE에서 처리가 안될때는 다음과 같이 해준다.
그리고 옵션중 deferRowRender:false 로 설정하고
resp.status=="200" || resp.status=="12030" 로 처리해준다.
12030 ===> 'The connection with the server has been terminated'뜻으로 internal server error와 같다...
IE에서는 xhr.status 코드값이 틀리게 넘어온다.. ㅡ.,ㅡ;
ext-base.js 를 수정해야 하는 경우도 생길듯..

(참조URL : http://support.microsoft.com/default.aspx?scid=kb;EN-US;193625 )


Code Error Message and Description
----- -----------------------------
12001 ERROR_INTERNET_OUT_OF_HANDLES
No more handles could be generated at this time.

12002 ERROR_INTERNET_TIMEOUT
The request has timed out.

12003 ERROR_INTERNET_EXTENDED_ERROR
An extended error was returned from the server. This is
typically a string or buffer containing a verbose error
message. Call InternetGetLastResponseInfo to retrieve the
error text.

12004 ERROR_INTERNET_INTERNAL_ERROR
An internal error has occurred.

12005 ERROR_INTERNET_INVALID_URL
The URL is invalid.

12006 ERROR_INTERNET_UNRECOGNIZED_SCHEME
The URL scheme could not be recognized or is not supported.

12007 ERROR_INTERNET_NAME_NOT_RESOLVED
The server name could not be resolved.

12008 ERROR_INTERNET_PROTOCOL_NOT_FOUND
The requested protocol could not be located.

12009 ERROR_INTERNET_INVALID_OPTION
A request to InternetQueryOption or InternetSetOption
specified an invalid option value.

12010 ERROR_INTERNET_BAD_OPTION_LENGTH
The length of an option supplied to InternetQueryOption or
InternetSetOption is incorrect for the type of option
specified.

12011 ERROR_INTERNET_OPTION_NOT_SETTABLE
The request option cannot be set, only queried.

12012 ERROR_INTERNET_SHUTDOWN
The Win32 Internet function support is being shut down or
unloaded.

12013 ERROR_INTERNET_INCORRECT_USER_NAME
The request to connect and log on to an FTP server could
not be completed because the supplied user name is
incorrect.

12014 ERROR_INTERNET_INCORRECT_PASSWORD
The request to connect and log on to an FTP server could
not be completed because the supplied password is
incorrect.

12015 ERROR_INTERNET_LOGIN_FAILURE
The request to connect to and log on to an FTP server
failed.

12016 ERROR_INTERNET_INVALID_OPERATION
The requested operation is invalid.

12017 ERROR_INTERNET_OPERATION_CANCELLED
The operation was canceled, usually because the handle on
which the request was operating was closed before the
operation completed.

12018 ERROR_INTERNET_INCORRECT_HANDLE_TYPE
The type of handle supplied is incorrect for this
operation.

12019 ERROR_INTERNET_INCORRECT_HANDLE_STATE
The requested operation cannot be carried out because the
handle supplied is not in the correct state.

12020 ERROR_INTERNET_NOT_PROXY_REQUEST
The request cannot be made via a proxy.

12021 ERROR_INTERNET_REGISTRY_VALUE_NOT_FOUND
A required registry value could not be located.

12022 ERROR_INTERNET_BAD_REGISTRY_PARAMETER
A required registry value was located but is an incorrect
type or has an invalid value.

12023 ERROR_INTERNET_NO_DIRECT_ACCESS
Direct network access cannot be made at this time.

12024 ERROR_INTERNET_NO_CONTEXT
An asynchronous request could not be made because a zero
context value was supplied.

12025 ERROR_INTERNET_NO_CALLBACK
An asynchronous request could not be made because a
callback function has not been set.

12026 ERROR_INTERNET_REQUEST_PENDING
The required operation could not be completed because one
or more requests are pending.

12027 ERROR_INTERNET_INCORRECT_FORMAT
The format of the request is invalid.

12028 ERROR_INTERNET_ITEM_NOT_FOUND
The requested item could not be located.

12029 ERROR_INTERNET_CANNOT_CONNECT
The attempt to connect to the server failed.

12030 ERROR_INTERNET_CONNECTION_ABORTED
The connection with the server has been terminated.

12031 ERROR_INTERNET_CONNECTION_RESET
The connection with the server has been reset.

12032 ERROR_INTERNET_FORCE_RETRY
Calls for the Win32 Internet function to redo the request.

12033 ERROR_INTERNET_INVALID_PROXY_REQUEST
The request to the proxy was invalid.

12036 ERROR_INTERNET_HANDLE_EXISTS
The request failed because the handle already exists.

12037 ERROR_INTERNET_SEC_CERT_DATE_INVALID
SSL certificate date that was received from the server is
bad. The certificate is expired.

12038 ERROR_INTERNET_SEC_CERT_CN_INVALID
SSL certificate common name (host name field) is incorrect.
For example, if you entered www.server.com and the common
name on the certificate says www.different.com.

12039 ERROR_INTERNET_HTTP_TO_HTTPS_ON_REDIR
The application is moving from a non-SSL to an SSL
connection because of a redirect.

12040 ERROR_INTERNET_HTTPS_TO_HTTP_ON_REDIR
The application is moving from an SSL to an non-SSL
connection because of a redirect.

12041 ERROR_INTERNET_MIXED_SECURITY
Indicates that the content is not entirely secure. Some of
the content being viewed may have come from unsecured
servers.

12042 ERROR_INTERNET_CHG_POST_IS_NON_SECURE
The application is posting and attempting to change
multiple lines of text on a server that is not secure.

12043 ERROR_INTERNET_POST_IS_NON_SECURE
The application is posting data to a server that is not
secure.

12110 ERROR_FTP_TRANSFER_IN_PROGRESS
The requested operation cannot be made on the FTP session
handle because an operation is already in progress.

12111 ERROR_FTP_DROPPED
The FTP operation was not completed because the session was
aborted.

12130 ERROR_GOPHER_PROTOCOL_ERROR
An error was detected while parsing data returned from the
gopher server.

12131 ERROR_GOPHER_NOT_FILE
The request must be made for a file locator.

12132 ERROR_GOPHER_DATA_ERROR
An error was detected while receiving data from the gopher
server.

12133 ERROR_GOPHER_END_OF_DATA
The end of the data has been reached.

12134 ERROR_GOPHER_INVALID_LOCATOR
The supplied locator is not valid.

12135 ERROR_GOPHER_INCORRECT_LOCATOR_TYPE
The type of the locator is not correct for this operation.

12136 ERROR_GOPHER_NOT_GOPHER_PLUS
The requested operation can only be made against a Gopher+
server or with a locator that specifies a Gopher+
operation.

12137 ERROR_GOPHER_ATTRIBUTE_NOT_FOUND
The requested attribute could not be located.

12138 ERROR_GOPHER_UNKNOWN_LOCATOR
The locator type is unknown.

12150 ERROR_HTTP_HEADER_NOT_FOUND
The requested header could not be located.

12151 ERROR_HTTP_DOWNLEVEL_SERVER
The server did not return any headers.

12152 ERROR_HTTP_INVALID_SERVER_RESPONSE
The server response could not be parsed.

12153 ERROR_HTTP_INVALID_HEADER
The supplied header is invalid.

12154 ERROR_HTTP_INVALID_QUERY_REQUEST
The request made to HttpQueryInfo is invalid.

12155 ERROR_HTTP_HEADER_ALREADY_EXISTS
The header could not be added because it already exists.

12156 ERROR_HTTP_REDIRECT_FAILED
The redirection failed because either the scheme changed
(for example, HTTP to FTP) or all attempts made to redirect

failed (default is five attempts).


Post by 넥스트리소프트 데꾸벅(techbug)
, |

ExtJS에서는(비단, Extjs뿐만 아니라 기존 XHR과 마찬가지로)  같은 도메인일 경우는 HttpProxy를 사용하면 아무런 문제가 되지 않으나 서로 다른 도메인일 경우 ScriptTagProxy로 해당 URL의 Ajax통신을 할수 있게 잘(?) 만들어져 있다.기존 XHR(XMLHttpRequest)를 이용할 시에는 서버쪽에서 Proxy script를 만들어 사용해야 하나 jQuery나 ExtJS의 경우는 제공하는 Proxy를 사용하면 된다.

ScriptTagProxy로 가져온 Datastore파일을 JsonReader로 읽을 때에는 기존의 HttpProxy를 사용할때와 달리 다음과 같이 서버측에 callback 파라미터값을 던지고 아래와 같은 구조로된 Json을 받게 된다.

stcCallback1013(
{
Json형식
}
)

 ExtJS에서  ScriptTagProxy는 아래와 같은 로직으로 구현되어 있다.

boolean scriptTag = false;
String cb = request.getParameter("callback");
if (cb != null) {
scriptTag = true;
response.setContentType("text/javascript");
} else {
response.setContentType("application/x-json");
}
Writer out = response.getWriter();
if (scriptTag) {
out.write(cb + "(");
}
out.print(dataBlock.toJsonString());
if (scriptTag) {
out.write(");");
}


scriptTagProxy 와 Form Submit은  callback 이라는 파라미터 값을 함께 던지므로 서버상에서 callback 파라미터를 받게 만들어 줘야 한다. 그렇게 때문에 서버에서 별도의 작업을 해줘야 하는데 PHP와 JSP의 경우를 비교해서 기술한다.


String callback = request.getParameter("callback");
String jsonData = getJsonData();
if (callback != null) {
out.write(callback + "(");
}
out.write(jsonData);
if (callback != null) {
out.write(");");
}
 
$callBack = isset($_REQUEST["callback"]) ? $_REQUEST["callback"] : '';

if($callBack) {
echo $callBack . "(";
}
echo getJsonData();
if($callBack) {
echo ");";
}

Post by 넥스트리소프트 데꾸벅(techbug)
, |