블로그 이미지

카테고리

데꾸벅 (194)
Publisher (39)
Scripter (97)
Programmer (1)
Designer (30)
Integrator (18)
Pattern Searcher (4)
News (2)
강좌 및 번역 (3)

최근에 올라온 글

최근에 달린 댓글

사용자 삽입 이미지


Jaroslav Benc는 XML을 이용하여 Java 프로젝트용 ExtJS JSP Taglib 생성기를 만들었다.

아직 완변하진 않지만 그의 사이트에 포스트된 로드맵을 보자면

  • Hibernate integration - HibernateStore component
  • DWR integration etc.
  • Eclipse plugin
  • UX Tags: Ext.ux.*, Ext.portal.*, Ext.feedreader.*, Ext.desktop.*
을 지원한다고 하는데 ExtJS의 config 옵션을 모두 xml 어트리뷰트로 처리가능하며 모든 ID값 (ExtJS에서 Ext.getCmp("id") )으로 처리된


참조사이트 : http://www.exttld.com/index.php

Post by 넥스트리소프트 데꾸벅(techbug)
, |
사용자 삽입 이미지
John Le Drew씨의 Simplicity PHP Application Framework은 규모가 크고 트래픽이 많은 사이트에 적합하다.

이번에 facelift된 그의 사이트는 Ajax UI Library인 extjs를 채택함으로써 좀더 Web2.0 애플리케이션의 면모를 갖추고 있다.
Ajax 인터페이스(extjs)를 이용한 관리자콘솔 및 stub controller, 데이타베이스 모델링까지 포함하고 있다.
소스를 함 뜯어볼 가치는 있는것 같네...


출처 : https://launchpad.net/simplicity/
Post by 넥스트리소프트 데꾸벅(techbug)
, |
사용자 삽입 이미지

어도브사는 오늘 AIR v1.0과 Flex3.0 을 릴리즈화면서 RIA세계의 행진을 계속했다.
Ajax개발자로써 어도브의 애플리케이션 개발은 상당히 접근하기 어려운 분야였음을 감안하면 이번 릴리즈는 여타 다른 스크립트를 포용하는 정책을 써 개발자들의 많은 사랑을 받을것 같다는 생각이 드낟.


Adobe AIR
AIR runtime and SDK는 매우 긴 베타버전 기간을 걸쳐 이번에 선보이는 것으로써
구글기어를 써보신 개발자라는 AIR의 강력함을 느낄수 있을것이다.
(데꾸벅도 써보고 놀랐어요.. ^^)
먼저 이번에 릴리즈된 기능을 보자면

데스탑을 기능적으로 향상 :
드래그앤 드랍, 트레이 미니마이징 기능등..

데이타 액세스 :
로컬파일 액세스.. 상당히 강력한 기능이죠..

자바스크립트 라이브러리 지원 :
jQuery, Extjs(이것땜에 데꾸벅도 AIR를 써요..), Dojo, Spry를 지원

보안 :
어차피 인스톨되어 배포되는것이기 때문에 보안에는 문제가...
나름 생각한건데 패킷을 후킹하면?? 흠..UUID값을 써야하는 문제가 생길수 있다고 생각하는 데꾸벅.. ㅠ.,ㅠ;


Flex 3.0
플렉스는 여러분도 다 아시다시피 Flash기반의 RIA 개발 플랫폼입니다.
점점더 발전하고 있고 여러 블로그에서도 많은 기술관련 글들이 포스팅 되기도 하고 개발자에게도 상당히 인기가 있습니다.
비록 아직 써보진 않았지만 2008년 유망 기술중 하나에 꼽히기도 했습니다.
사용자 삽입 이미지


이 참에 한번 Flex를 함 써봐야 겠네요.. ^^


Post by 넥스트리소프트 데꾸벅(techbug)
, |

Extjs v2.02 릴리즈

Scripter/EXTJS / 2008. 2. 26. 09:29
Adobe AIR를 지원해주는 Extjs 2.02버전이 릴리즈 되었다.

Adobe AIR팀과 ExtJS개발팀의 협업으로 탄생한 2.02버전에서는 AIR API를 완벽지원하고 있다.
오래전 Jack Slocum의 블로그에서 봤던 간단한 태스크관리 샘플을 봤을때의 충격이 채가시지 않은채 발표된 이번 버전에서는 AIR API를 패키징하여 Ext.air 형태로 다음과 같이 배포된다.

- 네이티브 윈도우 관리하기
- AIR beta3에서 소개되었던 데이타베이스 동기화
- 네이티브 드래그엔 드롭과 클립보드 접근
- 사운드 새생
- 시스템 트레이에 AIR 애플리케이션 miniming하기(아래소스 참조)

var win = new Ext.air.NativeWindow({
    id: 'mainWindow',
    instance: window.nativeWindow,
 
    // System tray config
    minimizeToTray: true,
    trayIcon: 'ext-air/resources/icons/extlogo16.png',
    trayTip: 'Simple Tasks',
    trayMenu : [{
        text: 'Open Simple Tasks',
        handler: function(){
            win.activate();
        }
    }, '-', {
        text: 'Exit',
        handler: function(){
            air.NativeApplication.nativeApplication.exit();
        }
    }]
});

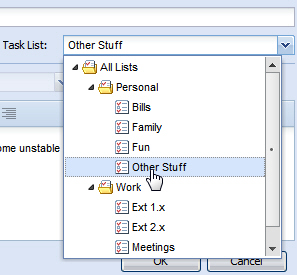
트리뷰(treeview) 콤보박스의 리스트트리 샘플
사용자 삽입 이미지

extjs listtree


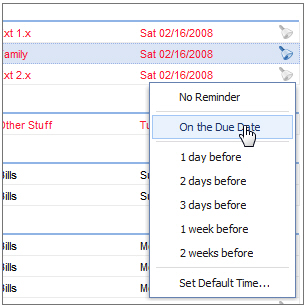
Custom Grid Columns
사용자 삽입 이미지


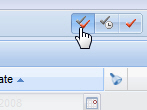
Switch : 버튼 모음 테두리 (메타포어기능)
사용자 삽입 이미지


Ext V2.02 다운로드 : 다운로드하기(http://extjs.com/download)

데꾸벅 블로그에서 바로 다운로드 받기 :

Post by 넥스트리소프트 데꾸벅(techbug)
, |

Basic Concept

이번 장은 이전에 작성해놓은 기본레이아웃잡기 및 기본그리드기리기를 이용하여 레이아웃의 좌측영역(west region)에 그리드를 붙이는 작업을 진행한다.
이전장을 충분히 숙지하였다는 가정하에 Grid를 붙여보자

기본소스 :


<그리드 해부도>

사용자 삽입 이미지


Step 1.  왼쪽 기본 패널을 Grid패널로 변경

basicLayout_AttachedGrid.html

<html>
<head>
<title>Basic Layout</title>
<link rel="stylesheet" type="text/css" href="http://techbug.tistory.com/resources/css/ext-all.css" />
<script type="text/javascript" src="../../adapter/ext/ext-base.js"></script>
<script type="text/javascript" src="../../ext-all.js"></script>
<script type="text/javascript" src="basicLayout_AttachedGrid.js"></script>
</head>
<body id="basicLayoutBody"></body>
</html>


basicLayout_AttachedGrid.js

// 그리드 패널 클래스 시작
LeftArea = function(viewport){ //왼쪽 패널(LeftArea)을 정의한다.
this.viewport = viewport;

this.store = new Ext.data.Store({
proxy: new Ext.data.HttpProxy({
url: 'basicGrid.json'
}),
sortInfo: {
field: 'price',
direction: "DESC"
},
reader: new Ext.data.JsonReader({
root: 'testData'
}, [{
name: 'company',
type: 'string',
mapping: 'company'
}, {
name: 'price',
type: 'float',
mapping: 'price'
}, {
name: 'change',
type: 'float',
mapping: 'change'
}, {
name: 'pctChange',
type: 'float',
mapping: 'pctChange'
}, {
name: 'lastChange',
type: 'date',
dateFormat: 'n/j h:ia',
mapping: 'lastChange'
}])
});
// 왼쪽 패널의 config옵션을 정의한다.
LeftArea.superclass.constructor.call(this, {
region: 'west', // 굵게 표시된 부분은 기본레이아웃을 잡는 config옵션이다.
title: 'WEST',
collapsible: true,
collapsed: false,
width: 250,
split: true,
layout: 'fit',
margins: '5 0 5 5',
cmargins: '5 5 5 5',
store: this.store,
columns: [{
id: 'company',
header: "Company",
width: 160,
sortable: true,
dataIndex: 'company'
}, {
header: "Price",
width: 75,
sortable: true,
renderer: 'usMoney',
dataIndex: 'price'
}, {
header: "Change",
width: 75,
sortable: true,
dataIndex: 'change'
}, {
header: "% Change",
width: 75,
sortable: true,
dataIndex: 'pctChange'
}, {
header: "Last Updated",
width: 85,
sortable: true,
renderer: Ext.util.Format.dateRenderer('m/d/Y'),
dataIndex: 'lastChange'
}],
stripeRows: true,
autoExpandColumn: 'company',
loadMask: {
msg: '데이타 로드중'
},
sm: new Ext.grid.RowSelectionModel({
singleSelect: true
}),
view: new Ext.grid.GridView({
forceFit: true,
enableRowBody: true,
emptyText: 'No Record found'
})
});
};

//기본레이아웃에서는 Ext.Panel을 상속받았지만
//여기서는 그리드패널이므로 Ext.grid.GridPanel을 상속받음.
Ext.extend(LeftArea, Ext.grid.GridPanel, {
});


// 그리드 패널 클래스 끝


// 메인 레이아웃 클래스 시작
BasicLayoutClass = function(){
return {
init: function(){
Ext.QuickTips.init();
this.viewport = new Ext.Viewport({
layout: 'border',
items: [this.WestPanel = new LeftArea(this), this.CenterPanel = new Ext.Panel({
region: 'center',
title: 'CENTER',
layout: 'fit',
margins: '5 5 5 0',
html: '<div id="_CONTENTS_AREA_">컨텐츠 영역입니다.</div>'
})]
});

this.viewport.doLayout();
this.viewport.syncSize();

// 좌측그리드의 데이타 스토어를 화면을 최초 그릴때 데이타를 로드한다.
this.WestPanel.store.load();
}
}
}
();
Ext.EventManager.onDocumentReady(BasicLayoutClass.init, BasicLayoutClass, true);
// 메인 레이아웃 클래스 끝

 기본레이아웃에서 달라진 부분은 왼쪽 패널(LeftArea)이  기본패널(Ext.Panel)에서 그리드패널(Ext.grid.GridPanel)로 바뀌었을 뿐이다. 

위소스중 기본패널의 config옵션( 굵게 표현된 부분)에 Grid 옵션이 더 추가되었을 뿐이다. 대신 왼쪽 그리드패널의 데이타스토어를 메인레이아웃에서 호출(this.WestPanel.store.load();)하였다.
Step2에서는 좌측 그리드패널 클래스를 별도의 파일로 추가하여 정리해보자


Step 2. 좌측그리드패널 클래스 별도 파일로 관리하기

basicLayout_AttachedGrid.html

<html>
<head>
<title>Basic Layout</title>
<link rel="stylesheet" type="text/css" href="http://techbug.tistory.com/resources/css/ext-all.css" />
<script type="text/javascript" src="../../adapter/ext/ext-base.js"></script>
<script type="text/javascript" src="../../ext-all.js"></script>
//좌측 그리드 패널클래스 별도 파일로 분리, 반드시 main 레이아웃 클래스보다 먼저 호출
<script type="text/javascript" src="basicLayout_LeftGrid.js"></script>
<script type="text/javascript" src="basicLayout_AttachedGrid.js"></script>
</head>
<body id="basicLayoutBody"></body>
</html>

basicLayout_AttachedGrid.js

BasicLayoutClass = function(){
    return {
        init: function(){
            Ext.QuickTips.init();
            this.viewport = new Ext.Viewport({
                layout: 'border',
                items: [this.WestPanel = new LeftArea(this),
                //좌측 그리드 클래스 호출
                this.CenterPanel = new Ext.Panel({
                    region: 'center',
                    title: 'CENTER',
                    layout: 'fit',
                    margins: '5 5 5 0',
                    html: '<div id="_CONTENTS_AREA_">컨텐츠 영역입니다.</div>'
                })]
            });
            this.viewport.doLayout();
            this.viewport.syncSize();
            //좌측 패널의 public method호출
            this.WestPanel.loadGridDataSet();
        }
    }
}
();
Ext.EventManager.onDocumentReady(BasicLayoutClass.init, BasicLayoutClass, true);

basicLayout_LeftGrid.js

LeftArea = function(viewport){

    this.viewport = viewport;

    this.store = new Ext.data.Store({
        proxy: new Ext.data.HttpProxy({
            url: 'basicGrid.json'
        }),
        sortInfo: {
            field: 'price',
            direction: "DESC"
        },
        reader: new Ext.data.JsonReader({
            root: 'testData'
        }, [{
            name: 'company',
            type: 'string',
            mapping: 'company'
        }, {
            name: 'price',
            type: 'float',
            mapping: 'price'
        }, {
            name: 'change',
            type: 'float',
            mapping: 'change'
        }, {
            name: 'pctChange',
            type: 'float',
            mapping: 'pctChange'
        }, {
            name: 'lastChange',
            type: 'date',
            dateFormat: 'n/j h:ia',
            mapping: 'lastChange'
        }])
    });

    LeftArea.superclass.constructor.call(this, {
        region: 'west',
        title: 'WEST',
        collapsible: true,
        collapsed: false,
        width: 250,
        split: true,
        layout: 'fit',
        margins: '5 0 5 5',
        cmargins: '5 5 5 5',
        store: this.store,
        columns: [{
            id: 'company',
            header: "Company",
            width: 160,
            sortable: true,
            dataIndex: 'company'
        }, {
            header: "Price",
            width: 75,
            sortable: true,
            renderer: 'usMoney',
            dataIndex: 'price'
        }, {
            header: "Change",
            width: 75,
            sortable: true,
            dataIndex: 'change'
        }, {
            header: "% Change",
            width: 75,
            sortable: true,
            dataIndex: 'pctChange'
        }, {
            header: "Last Updated",
            width: 85,
            sortable: true,
            renderer: Ext.util.Format.dateRenderer('m/d/Y'),
            dataIndex: 'lastChange'
        }],
        stripeRows: true,
        autoExpandColumn: 'company',
        loadMask: {
            msg: '데이타 로드중'
        },
        sm: new Ext.grid.RowSelectionModel({
            singleSelect: true
        }),
        view: new Ext.grid.GridView({
            forceFit: true,
            enableRowBody: true,
            emptyText: 'No Record found'
        })
    });
};

Ext.extend(LeftArea, Ext.grid.GridPanel, {
    //public Method 정의 부분
    loadGridDataSet: function(){
        this.store.load();
    }


});


위의 Step1과 변경된것이라고는 좌측그리드패널 클래스를 별도 파일로 분리하고 클래스내의 public 메쏘드를 메인레이아웃에서 호출한다는것이다.
그러나 이 러한 구조의 클래스는 항상 메인 레이아웃에서 특정 레이아웃일때만 사용된다 예를 들어  좌측그리드패널클래스(LeftArea)의 config option중에 레이아웃에 해당하는 값들이 이미 들어가 있기 때문에 다른 구조의 레이아웃에서는 이 클래스를 호출하여 사용할수 없다는 단점이 있다.


Step 3. 클래스 리팩토링

basicLayout_LeftGrid.js
LeftArea = function(viewport, config){

    this.viewport = viewport;
    Ext.apply(this, config);

    this.store = new Ext.data.Store({
        proxy: new Ext.data.HttpProxy({
            url: 'basicGrid.json'
        }),
        sortInfo: {
            field: 'price',
            direction: "DESC"
        },
        reader: new Ext.data.JsonReader({
            root: 'testData'
        }, [{
            name: 'company',
            type: 'string',
            mapping: 'company'
        }, {
            name: 'price',
            type: 'float',
            mapping: 'price'
        }, {
            name: 'change',
            type: 'float',
            mapping: 'change'
        }, {
            name: 'pctChange',
            type: 'float',
            mapping: 'pctChange'
        }, {
            name: 'lastChange',
            type: 'date',
            dateFormat: 'n/j h:ia',
            mapping: 'lastChange'
        }])
    });
    // 레이아웃과 관련된 부분을 제외하고 순수 그리드 config option 부분만 사용
    LeftArea.superclass.constructor.call(this, {
        store: this.store,
        columns: [{
            id: 'company',
            header: "Company",
            width: 160,
            sortable: true,
            dataIndex: 'company'
        }, {
            header: "Price",
            width: 75,
            sortable: true,
            renderer: 'usMoney',
            dataIndex: 'price'
        }, {
            header: "Change",
            width: 75,
            sortable: true,
            dataIndex: 'change'
        }, {
            header: "% Change",
            width: 75,
            sortable: true,
            dataIndex: 'pctChange'
        }, {
            header: "Last Updated",
            width: 85,
            sortable: true,
            renderer: Ext.util.Format.dateRenderer('m/d/Y'),
            dataIndex: 'lastChange'
        }],
        stripeRows: true,
        autoExpandColumn: 'company',
        loadMask: {
            msg: '데이타 로드중'
        },
        sm: new Ext.grid.RowSelectionModel({
            singleSelect: true
        }),
        view: new Ext.grid.GridView({
            forceFit: true,
            enableRowBody: true,
            emptyText: 'No Record found'
        })
    });
};

Ext.extend(LeftArea, Ext.grid.GridPanel, {
    loadGridDataSet: function(){
        this.store.load();
    }
});


basicLayout_AttachedGrid.js

BasicLayoutClass = function(){
return {
init: function(){
Ext.QuickTips.init();
//레이아웃과 관련된 내용을 메인레이아웃 클래스 밖으로 빼냄
this.WestPanel = new LeftArea(this, {
region: 'west',
title: 'WEST',
collapsible: true,
collapsed: false,
width: 650,
split: true,
layout: 'fit',
margins: '5 0 5 5',
cmargins: '5 5 5 5'
}), this.viewport = new Ext.Viewport({
layout: 'border',
items: [this.WestPanel, this.CenterPanel = new Ext.Panel({
region: 'center',
title: 'CENTER',
layout: 'fit',
margins: '5 5 5 0',
html: '<div id="_CONTENTS_AREA_">컨텐츠 영역입니다.</div>'
})]
});
this.viewport.doLayout();
this.viewport.syncSize();
this.WestPanel.loadGridDataSet();
}
}
}
();
Ext.EventManager.onDocumentReady(BasicLayoutClass.init, BasicLayoutClass, true);

위 와 같이 작성되었을 경우는 별도 파일로 빼낸 BasicLayout_LeftGrid.js 파일은 다른 곳에서도 재사용할수 있다. 그러나 ExtJS Panel특성상 바로 Ext.apply()를 통하여 해당 config option을 LayoutContainer에 적용할수 없다. 위 소스를 실행 시켜 보면  왼쪽 판넬의 collapseMode가  잘못 적용되어 container 속성까지 변경되었다. 이럴 경우에는 NestedLayout Manager를 사용하여 다음과 같이 표현하면 된다.


basicLayout_AttachedGrid.js

BasicLayoutClass = function(){
    return {
        init: function(){
            Ext.QuickTips.init();
            
            this.viewport = new Ext.Viewport({
                layout: 'border',
                items: [{
                    region: 'west', // 일반 Ext.panel로 설정하여 왼쪽
                    title: 'WEST',
                    collapsible: true,
                    collapsed: false,
                    width: 650,
                    split: true,
                    margins: '5 0 5 5',
                    cmargins: '5 5 5 5',
                    layout: 'border',
                    items: [ // 일반 Ext.panel에 Nested된 좌측패널
                        this.WestPanel = new LeftArea(this, {
                        region: 'center',
                        layout: 'fit',
                        border: false
                    })]
                }, this.CenterPanel = new Ext.Panel({
                    region: 'center',
                    title: 'CENTER',
                    layout: 'fit',
                    margins: '5 5 5 0',
                    html: '<div id="_CONTENTS_AREA_">컨텐츠 영역입니다.</div>'
                })]
            });
            this.viewport.doLayout();
            this.viewport.syncSize();
            this.WestPanel.loadGridDataSet();
        }
    }
}
();
Ext.EventManager.onDocumentReady(BasicLayoutClass.init, BasicLayoutClass, true);


Step 4. 그리드 판넬에 새로고침 메뉴넣기

basicLayout_AttachedGrid.js

BasicLayoutClass = function(){
return {
init: function(){
Ext.QuickTips.init();

this.viewport = new Ext.Viewport({
layout: 'border',
items: [{
region: 'west',
title: 'WEST',
collapsible: true,
collapsed: false,
width: 650,
split: true,
margins: '5 0 5 5',
cmargins: '5 5 5 5',
layout: 'border',
items: [this.WestPanel = new LeftArea(this, {
region: 'center',
layout: 'fit',
border: false,
tbar: [{
text: '새로고침',
scope: this,
handler: function(){
this.WestPanel.store.reload();
}
}]
})]
}, this.CenterPanel = new Ext.Panel({
region: 'center',
title: 'CENTER',
layout: 'fit',
margins: '5 5 5 0',
html: '<div id="_CONTENTS_AREA_">컨텐츠 영역입니다.</div>'
})]
});
this.viewport.doLayout();
this.viewport.syncSize();
this.WestPanel.loadGridDataSet();
}
}
}
();
Ext.EventManager.onDocumentReady(BasicLayoutClass.init, BasicLayoutClass, true);

 위의 Toolbar 를 basicLayout_LeftGrid.js를 이용하여 붙일수도 있으나 사용하는곳 마다 툴바가 틀릴수 있으므로 되도록이면 좌측 그리드패널 클래스를 호출하는 메인 클래스에 붙이는것이 재사용성에 좋다. 넥스트리소프트의 경우는 모두 좌측그리드패널 클래스 안에 private로 선언되어 있다. 어느것이 좋을지는 사용하는곳마다 틀리므로 해당 상황을 보면서 붙여보도록 한다.

넥스트리의 경우는 모두 클래스안에 private method로 해당 클래스내에서만 사용하는 메쏘드를 두었으며 필요에 따라 외부클래스에서 호출하는 식으로 되어 있다. 취향에 따라 맞춰 하면 될듯... ^^


Step 5. 선택시 우측컨텐츠 판넬(cente region Basic fit layout)의 body 업데이트하기

basicLayout_AttachedGrid.js

BasicLayoutClass = function(){
return {
init: function(){
Ext.QuickTips.init();

this.viewport = new Ext.Viewport({
layout: 'border',
items: [{
region: 'west',
title: 'WEST',
collapsible: true,
collapsed: false,
width: 650,
split: true,
margins: '5 0 5 5',
cmargins: '5 5 5 5',
layout: 'border',
items: [this.WestPanel = new LeftArea(this, {
region: 'center',
layout: 'fit',
border: false,
tbar: [{
text: '새로고침',
scope: this,
handler: function(){
this.WestPanel.store.reload();
}
}]
})]
}, this.CenterPanel = new Ext.Panel({
region: 'center',
title: 'CENTER',
layout: 'fit',
margins: '5 5 5 0',
html: '<div id="_CONTENTS_AREA_">컨텐츠 영역입니다.</div>'
})]
});
this.viewport.doLayout();
this.viewport.syncSize();
this.WestPanel.loadGridDataSet();
//Row선택시 발생하는 이벤트를 this.updateCenter() 메쏘드에서 실행
this.WestPanel.getSelectionModel().on('rowselect', this.updateCenter, this);
},

// 선택된 Row의 데이타를 가져와서 오른쪽 center Region의 Body에 업데이트한다.
updateCenter: function(selectionModel, index, record){
// 선택된 Row의 데이타를 가져온다.
var data_company = record.get('company');
var data_price = record.get('price');
var data_change = record.get('change');
var data_pctChange = record.get('pctChange');
var data_lastChange = record.get('lastChange');
// update할 HTML생성
var updateHTML = "<table cellpadding=2 cellspacing=1 border=1 width='100%'>" +
"<tr><td>Company</td><td>" +
data_company +
"</td></tr>" +
"<tr><td>Price</td><td>" +
data_price +
"</td></tr>" +
"<tr><td>Change</td><td>" +
data_change +
"</td></tr>" +
"<tr><td>Percentage</td><td>" +
data_pctChange +
"</td></tr>" +
"<tr><td>Last</td><td>" +
data_lastChange +
"</td></tr>" +
"</table>";

Ext.get("_CONTENTS_AREA_").update(updateHTML); //update
},


//다른 방법으로 선택된 데이타 모두 가져오기
updateCenter1: function(selectionModel, index, record){
var updateHTML = "<table cellpadding=2 cellspacing=1 border=1 width='100%'>"
// 선택된 데이타의 컬럼을 모두 가져오기
var cmc = this.WestPanel.getColumnModel().getColumnCount();
for (var i = 0; i < cmc; i++) {
//선택된 데이타의 컬럼Head (그리드 헤더 가져오기)
var columnName = this.WestPanel.getColumnModel().getColumnHeader(i);
//그리드 헤더의 데이타 인덱스 코드 가져오기
var columnCode = this.WestPanel.getColumnModel().getDataIndex(i);
var updateHTML = updateHTML + "<tr><td>" + columnName + "</td><td>" + record.get(columnCode);
+"</td></tr>" //데이타 가져와서 업데이트할 HTML 셋팅하기
}
var updateHTML = updateHTML + "</table>";
Ext.get("_CONTENTS_AREA_").update(updateHTML);

}
}
}
();
Ext.EventManager.onDocumentReady(BasicLayoutClass.init, BasicLayoutClass, true);

위 의 소스에서 updateCenter() 메쏘드는 this.WestPanel의 데이타 및 데이타인덱스 코드값을 모두 알고 있을 경우(대부분 소스까보면 다 나옴.. ㅡ.,ㅡ;) 사용하기 편리하고 아래의 updateCenter1() 메쏘드의 경우는 데이타 인덱스값을 모르거나 동적으로 필드값들이 셋팅 되는 경우에 상당히 유용하게 사용할수 있다. 넥스트리에서는 용어사전에 등록된 용어필드들을 자동으로 가져올때 사용되었던 소스이다.


Post by 넥스트리소프트 데꾸벅(techbug)
, |

이상하게 분류가 형상관리에 들어가 버린 이유는 subversion때문인가 보다..


1. Apache 2.0.xx 버전 설치 (2.0.59 버전 설치 했음)
아래 링크에서 아파치를 다운받아 설치 한다. httpd/binaries/win32/ 에서 받으면 된다. (apache_2.0.59-win32-x86-openssl-0.9.7j.msi)
http://www.apache.org/dyn/closer.cgi
2.0.xx 이상 버전(2.2.x)은 Window Subversion이 지원하지 못한다. 꼭 2.0.xx 버전대를 설치하도록 한다.
(자세한 사항은 링크를 참조한다. http://subversion.tigris.org/project_packages.html)
2007년 1월 25일 Apache 2.2.x 버전을 위한 Subversion 이 build됨. - 아직 테스트 해보지 못함.
버전 또는 다른 사유로 Apache를 재설치 시 3-2. mod_python과 2. Subversion을 재설치하여야 한다.

2. Subversion 최신버전 설치 (1.4.3 설치)
아래의 링크에서 Window용 Subversion을 다운받아 설치한다. (svn-1.4.3-setup)
http://subversion.tigris.org/servlets/ProjectDocumentList?folderID=91&expandFolder=91&folderID=8100
Apache가 설치된후에 설치를 해야 httpd.conf 에 Subversion의 올바른 경로가 설정된다.

3. Python 2.4 설치
아래 링크에서 Python을 다운받아 설치한다.(Python 2.4.4)
http://www.python.org/download/
Python 2.5 버전은 지원하지 모듈이 있으므로 가급적 2.4 버전을 설치한다.(6)
그래도 2.5 버전을 설치하고 싶다면  http://trac.edgewall.org/wiki/TracInstall 페이지를 참조한다.

3-1. svn-win32-1.4.3_py2.4.exe 을 다운받아 설치
아래의 링크에서 Subversion 1.4.3 Win32 Installer for the Python 2.4 bindings 을 다운받아 설치한다.
http://subversion.tigris.org/servlets/ProjectDocumentList?folderID=91&expandFolder=91&folderID=8100 

3-2. mod-python-3.3.1-py2.4 다운받아 설치
Apache의 속도를 빠르게 하기 위해서 아래의 링크에서 mod_python을 다운받아 설치한다. (mod_python-3.3.1.win32-py2.4-Apache2.0.exe)
http://httpd.apache.org/modules/python-download.cgi
* Win32Binaries 라고 중간에 링크가 걸려있다.
* Apache를 재설치할경우 mod_python은 다시 설치해 주어야 한다.

3-3. Docutils 설치
아래의 링크에서 docutils-0.4.tgz 를 다운받아 압축을 푼다음 $ python ./setup.py install 와 같이 실행하여 설치한다.
http://docutils.sourceforge.net/

3-4. PySQLite 설치
아래의 링크에서 Python 버전(2.4)에 맞는 PySQLite를 다운받아 설치
http://initd.org/tracker/pysqlite/wiki/pysqlite
TRAC에서 MySQL을 지원하나 아직 테스트 단계이므로 PySQLite를 설치하도록 하자.

3-5. ClearSilver 설치
아래의 링크에서 Python 버전(2.4)에 맞는 ClearSilver를 다운받아 설치(clearsilver-0.9.14.win32-py2.4.exe) - Python2.5용 버전이 없다.
http://www.clearsilver.net/downloads/

4. TRAC 0.10.3.1 설치
아래의 링크에서 윈도우용 인스톨러 TRAC을 다운받아 설치
http://trac.edgewall.org/wiki/TracDownload

이곳까지 설치를 완료했다면 Apache와 TRAC 그리고 Subversion 이 연동되도록 최소한 설치작업을 모든 마쳤다.
테스트를 해보지는 않았지만 이 모두를 한꺼번에 설치하기위한 웹페이지가 있다.
각 설치파일들의 버전도 가장 최신버전으로 설정되어 있다.
아래의 링크를 참조한다.
http://yeoupooh.us.to:8080/wiki/display/pu/TracOnWindows

 
5. Subversion Repository 생성 및 TRAC의 DB생성
Subversion의 Repository를 생성하는 방법으로 2가지가 있다.
첫번째는 console을 사용하여 text로 생성하는 방법과 TortoiseSVN을 사용하여 생성하는 방법이 있다.
생성하는 방법은 아래의 참고자료의 링크들을 참고하여 생성하도록 한다.
TRAC의 DB는 Python환경에서 console에서 작성하여야 한다.
자세한 방법은 아래의 링크를 참조한다.
http://jongyeob.com/moniwiki/wiki.php/TracInstall

TRAC의 DB와 Subversion의 Repository를 구성한 예시)

d:\SVN  --+- TEST
                +- PROJECTA
               +- PROJECTB
d:\TRAC --+- TEST
              +- PROJECTA
              +- PROJECTB

* 디랙토리 구조는 어디까지 예시이다. 그러나 어떻게 구성할것인가 미리 검토하고 작성하는것이 두번일 안하는 비결이다.
TRAC을 위해서는 Apache config 파일(httpd.conf)에 아래 내용들을 추가한다.

LoadModule python_module modules/mod_python.so
<Location /test>
   SetHandler mod_python
   PythonHandler trac.web.modpython_frontend
   PythonOption TracEnv d:\trac\test
</Location>


http://localhost/test 로 접근해서 TRAC의 첫페이지가 나오면 성공이다.
Subversion의 Repository를 위해서는 아래의 내용을 추가한다.

<Location /svn/test>
   DAV svn
   SVNPath d:\svn\test
</Location>

http://localhost/svn/test 로 접근해서 Repository revision 화면이 나오면 성공이다.

6. login 설치 - 인증
* .htaccess 파일을 생성해서 특정한 폴더에 두고 TRAC의 login시와 Subversion의 login시 같이 사용하도록 하면 계정관리하기도 수월하다.

TRAC의 login을 위해서는 아래와 같은 내용을 httpd.conf에 추가한다.

<Location /test/login>
  Authtype Basic
  AuthName "TEST"
  AuthUserFile d:\.htaccess
  Require valid-user
</Location>


.htaccess 는 Apache의 htpasswd.exe를 실행하여 생성한다.
Subversion에 anonymous가 아닌 인증된 사람만 접근을 허용하려면 아래와 같은 내용을 추가한다.

<Location /svn/test>
  DAV svn
  SVNPath d:\svn\test
 Authtype Basic
 AuthName "TEST"
 AuthUserFile d:\.htaccess
 Require valid-user
</Location>

7. Plugin 설치
TRAC의 admin을 사용하여 관리하기 불편하다면 plugin을 설치하자.
http://trac-hacks.org/wiki
ez_setup.py 를 실행 설치후 python24/scripts/easy_install.exe 생성
easy_install.exe ~.egg 로 설치
trac.db/conf/trac.ini 파일에 [components] 에 webadmin.* = enabled 와 같이 추가하여 사용한다.
trac-hacks 에 있는 Plugin등을 다운받지 않고 svn 경로명(http://test.co.kr/test/trunk/0.10)을 easy_install.exe 경로명 으로도 설치 가능하다.

8. http이외의 보안을 위한 접속프로토콜

https로 접속을 위한 SSL 설치

8-1. ssl 설치
LoadModule ssl_module modules/mod_ssl.so 주석(#)을 해제한다.
Apache Service Monitor 를 열어서 아래에 보면 어떤 모듈이 지금 현재 동작중인지 나온다. 참고하자.
Apache/2.0.59(win32) mod_ssl/2.0.59 OpenSSL/0.9.7.j SVN/1.4.3. DAV/2

8-2 인증키 만들기
OpenSSL.exe 를 사용하여 인증서를 만든다.
openssl req -new -out filename.csr
openssl rsa -in privkey.pem -out filename.key
openssl req -new -x509 -days 365 -key filename.key -out filename.crt
생성된 filename.key와 crt 파일을 Apache의 conf 디렉토리에 복사해 넣는다.

8-3 httpd.conf 설정하기
아래의 내용을 추가한다.

Listen 443
<VirtualHost *:443>
SSLEngine on
SSLCertificateFile "C:\Program Files\Apache Group\Apache2\conf\filename.crt"
SSLCertificateKeyFile "C:\Program Files\Apache Group\Apache2\conf\filename.key"
SSLProtocol all
SSLCipherSuite HIGH:MEDIUM
<Location /svn>
DAV svn
SVNPath d:\svn\test
Authtype Basic
AuthName "TEST"
AuthUserFile d:\trac\.htaccess
Require valid-user
</Location>
</VirtualHost>


Svnserver로 접속을 위한 방법
설치는 아래의 링크를 참조한다.
http://serious-code.net/moin.cgi/SubversionSetup
이재홍님의 SVNmanager를 실행하여 운영한다.
주의할점은 Subversion 디렉토리와 Trac 디렉토리를 구분한다.
TortoiseSVN으로 접속시 Multi Project로 작업이 가능하다.
svn://test.co.kr/test
svn://test.co.kr/projecta

SVN+SSH
Cygwin을 설치
http://ist.uwaterloo.ca/~kscully/CygwinSSHD_W2K3.html
환경변수에 Path=c:\cygwin 와 cygwin=ntsec tty 를 추가

9. 한글화
KLDP의 트랙 한글화 웹페이지를 참조
http://kldp.net/projects/trac-ko/
아래의 링크에서 최신트랙을 다운받아 설치한다.
http://kldp.net/frs/?group_id=724

tarball (tar.gz등 압축된 파일)을 다운받아서 압축을 푼다음 $ python ./setup.py install 와 같이 설치한다.
윈도우용 TRAC이 설치되어 있는 경우 제대로 설치가 되지 않을수 있다. 프로그램 추가삭제에서 TRAC을 삭제후 재설치 해본다.


참고사이트


Subversion
윈도우에 Subversion 설치 - 이재홍님
http://www.pyrasis.com/main/SubversionServerForWindows

SVN manger Utility - 이재홍님
http://www.pyrasis.com/main/SVNSERVEManager

TRAC
Trac 설치 - 종엽님위키
http://jongyeob.com/moniwiki/wiki.php/TracInstall

윈도우XP에 TRAC, Subversion 및 Moniwiki 설치
http://aslongas.pe.kr/tt/index.php?pl=11
http://gaedol.org/resources/wiki/TracGuide

TRAC의 도움말 부분 번역 페이지
http://ai.uos.ac.kr/trac/ailab/wiki/TracInstall

윈도우에 TRAC 설치하기 - TRAC 영문
http://trac.edgewall.org/wiki/TracOnWindows

TRAC에서 Plugin 설치하기 - TRAC 영문
http://trac.edgewall.org/wiki/TracPlugins

WebAdmin Pluging
http://trac.edgewall.org/wiki/WebAdmin

TRAC의 Plugin 이 있는곳 - TRAC Hack 영문
http://trac-hacks.org/wiki

Windows에서 TRAC(StandAlone)과 서브버전 설치 - 영문
http://lazutkin.com/blog/2006/feb/18/setting-tools-windows/

Trac Apache Subversion AllinOne - 모두를 한꺼번에 설치하기
http://yeoupooh.us.to:8080/wiki/display/pu/TracOnWindows

TRAC에서 문서작성을 편하게 하기위한 WikiExporter - CRIZIN님
http://crizin.net/entry/TinyMCE-플러그인-WikiExporter

Subversion과 TRAC연동
Cygwin을 사용한 SVN+SSH 연동
http://hankiya.com/tt/jhk8211/330

Window 2003 server에서 Cygwin SSH daemon 설치 - 영문
http://ist.uwaterloo.ca/~kscully/CygwinSSHD_W2K3.html

SVN+SSH 연동
http://wiki.kldp.org/wiki.php/SubversionTips
http://kwon37xi.egloos.com/2521260

SSH Howto(영문)
http://www.logemann.org/day/archives/000099.html 

서적

서브버전을 이용한 실용적인 버전관리
http://kangcom.com/common/bookinfo/bookinfo.asp?sku=200603080013

보안을 위한 효율적인 방법 PKI
http://kangcom.com/common/bookinfo/bookinfo.asp?sku=200309040006

기타
SSL이란?
http://www.junjaewoo.com/kldp/SSL-Certificates-HOWTO/x70.html

OpenSSL HOWTO 문서  - kldp
http://wiki.kldp.org/wiki.php/DocbookSgml/SSL-Certificates-HOWTO
http://wiki.kldp.org/wiki.php/LinuxdocSgml/ApacheSSL-KLDP
http://wiki.kldp.org/wiki.php/DocbookSgml/SSL-RedHat-HOWTO

tortoiseSVN 다운받기
http://tortoisesvn.net/downloads
tortoiseSVN Howto
http://wiki.kldp.org/wiki.php/TortoiseSVN-USE


TRAC 한글화 프로젝트 : http://kldp.net/projects/trac-ko/

TRAC 설치문서 : http://wiki.kldp.org/wiki.php/trac (*nux)

                        http://jangyeol.wikidot.com/tracinstall  (Windows *)

TRAC 셋팅 : http://daybreaker.springnote.com/pages/39637

TRAC,SVN,SSL 함께 설치하기 : http://kldp.org/node/84957


svn dump 받기

svn 데이터 dump 및 load 방법( Repository 를 MyTest 로 가정)


 1. 해당 Repository 가 생성된 상위 directory 로 이동 한다.


 2. Repository 를 dump 한다.
  command >> svnadmin dump MyTest > MyTest.20006.09.09.dump
     ->  전체 dump
  command >> svnadmin dump MyTest -r 10 > MyTest.20006.09.09.dump
     -> 리비전 10 만 dump
  command >> svnadmin dump MyTest -r 10:20 > MyTest.20006.09.09.dump
     -> 리비전 10 부터 20 까지 만 dump


 3. 새로운 Repository 를 생성 한다. (Repository 를 MyTestNew 로 가정)
  command >> 
svnadmin create MyTestNew


 4. dump 된 데이터를 load 한다. (Repository 를 MyTestNew 로 가정)
  command >> svnadmin load MyTestNew < MyTest.20006.09.09.dump
     -> 새로운 리비전 으로 load (리비전 번호는 1부터 생성)
  command >> svnadmin load MyTestNew --force-uuid < MyTest.20006.09.09.dump
     
-> 기존 dump 했던 리비전 유지


 # 기존 리비전을 유지 하면 좋은점.
   1. 동일한 URL 일 경우 Client 에서는 별도의 작업이 필요 없이 기존에 사용
      하던 그대로 사용 가능.
   2. URL 이 바뀐 경우는 저장소 URL 변경을 수행후 기존에 사용 하던 그대로 사용 가능.


'Integrator > SCM' 카테고리의 다른 글

Trac - project management  (0) 2008.02.21
Post by 넥스트리소프트 데꾸벅(techbug)
, |
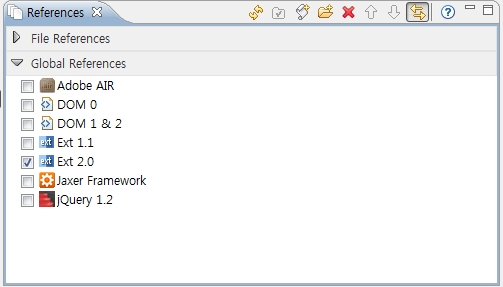
eclipse로 extjs2.0 버전을 사용하고 싶으면 다음과 같이 하면된다.

extjs2.0 버전 플러그인 다운로드 : http://support.aptana.com/asap/browse/STU-547

사용자 삽입 이미지

extjs2.01 최신버전은 아래에서 다운로드 받으세요!
Post by 넥스트리소프트 데꾸벅(techbug)
, |

들어가며

본 포스팅은 사내(넥스트리소프트) 솔루션 개발시 가이드작성했던 문서를 다시 정리하여 올린것입니다.


기본개념

기본적인 Grid 사용법및 DataStore 및 RowSelectionModel에 대해 알아본다.
GridPanel을 이용하여 데이타스토어에 저장된 데이타를 가져오는 법과 기본적인 그리드 렌더링 방법, 각각의 Row에 대한 Model에서 Data를 축출하는 법에 대해서 기술한다.

아래소스다운로드


Step 1. Basic Array Grid

basicGrid.html

<html>
<head>
<title>Basic Grid</title>
<link rel="stylesheet" type="text/css" href="http://techbug.tistory.com/resources/css/ext-all.css" />
<script type="text/javascript" src="../../adapter/ext/ext-base.js"></script>
<script type="text/javascript" src="../../ext-all.js"></script>
<script type="text/javascript" src="basicGrid.js"></script>
</head>
<body id="basicGridBody">
<div id="DIV_GRID_HERE"></div> <!-- Grid를 렌더링 할 위치 -->
</body>
</html>


basicGrid.js

BasicGridClass = function(){
    return {
        init: function(){
            //데이타스토어에 사용할 데이타
            var myData = [
                ['3m Co',71.72,0.02,0.03,'9/1 12:00am'],
                ['Alcoa Inc',29.01,0.42,1.47,'9/1 12:00am'],
                ['Altria Group Inc',83.81,0.28,0.34,'9/1 12:00am'],
                ['American Express Company',52.55,0.01,0.02,'9/1 12:00am'],
                ['American International Group, Inc.',64.13,0.31,0.49,'9/1 12:00am'],
                ['AT&T Inc.',31.61,-0.48,-1.54,'9/1 12:00am'],
                ['Boeing Co.',75.43,0.53,0.71,'9/1 12:00am'],
                ['Caterpillar Inc.',67.27,0.92,1.39,'9/1 12:00am'],
                ['Citigroup, Inc.',49.37,0.02,0.04,'9/1 12:00am'],
                ['E.I. du Pont de Nemours and Company',40.48,0.51,1.28,'9/1 12:00am'],
                ['Exxon Mobil Corp',68.1,-0.43,-0.64,'9/1 12:00am'],
                ['General Electric Company',34.14,-0.08,-0.23,'9/1 12:00am'],
                ['General Motors Corporation',30.27,1.09,3.74,'9/1 12:00am'],
                ['Hewlett-Packard Co.',36.53,-0.03,-0.08,'9/1 12:00am'],
                ['Honeywell Intl Inc',38.77,0.05,0.13,'9/1 12:00am'],
                ['Intel Corporation',19.88,0.31,1.58,'9/1 12:00am'],
                ['International Business Machines',81.41,0.44,0.54,'9/1 12:00am'],
                ['Johnson & Johnson',64.72,0.06,0.09,'9/1 12:00am'],
                ['JP Morgan & Chase & Co',45.73,0.07,0.15,'9/1 12:00am'],
                ['McDonald\'s Corporation',36.76,0.86,2.40,'9/1 12:00am'],
                ['Merck & Co., Inc.',40.96,0.41,1.01,'9/1 12:00am'],
                ['Microsoft Corporation',25.84,0.14,0.54,'9/1 12:00am'],
                ['Pfizer Inc',27.96,0.4,1.45,'9/1 12:00am'],
                ['The Coca-Cola Company',45.07,0.26,0.58,'9/1 12:00am'],
                ['The Home Depot, Inc.',34.64,0.35,1.02,'9/1 12:00am'],
                ['The Procter & Gamble Company',61.91,0.01,0.02,'9/1 12:00am'],
                ['United Technologies Corporation',63.26,0.55,0.88,'9/1 12:00am'],
                ['Verizon Communications',35.57,0.39,1.11,'9/1 12:00am'],
                ['Wal-Mart Stores, Inc.',45.45,0.73,1.63,'9/1 12:00am']
            ];
                      
            this.store = new Ext.data.SimpleStore({
                fields: [{
                    name: 'company'
                }, //1번째 컬럼을 'company'로 정의
                {
                    name: 'price',
                    type: 'float'
                },//2번째 컬럼을 'price'로 정의하며 데이타 타입은 float으로 정의
                {
                    name: 'change',
                    type: 'float'
                }, {
                    name: 'pctChange',
                    type: 'float'
                }, {
                    name: 'lastChange',
                    type: 'date',
                    dateFormat: 'n/j h:ia'
                }]
            });
            //데이타 스토어 로드하기
            this.store.loadData(myData);
            
            //그리드 그리기
            this.grid = new Ext.grid.GridPanel({
                store: this.store, //그리드에 사용될 데이타 스토어 정의
                columns: [ //그리드 헤드 및 데이타 정제(ColumnModel 정의)
                {
                    id: 'company',
                    header: "Company",
                    width: 160,
                    sortable: true,
                    dataIndex: 'company'
                }, {
                    header: "Price",
                    width: 75,
                    sortable: true,
                    renderer: 'usMoney',
                    dataIndex: 'price'
                }, {
                    header: "Change",
                    width: 75,
                    sortable: true,
                    dataIndex: 'change'
                }, {
                    header: "% Change",
                    width: 75,
                    sortable: true,
                    dataIndex: 'pctChange'
                }, {
                    header: "Last Updated",
                    width: 85,
                    sortable: true,
                    renderer: Ext.util.Format.dateRenderer('m/d/Y'),
                    dataIndex: 'lastChange'
                }],
                stripeRows: true, //Row마다 CSS class를 적용하고 싶을때 처리
                autoExpandColumn: 'company', //정의된 ColumnModel에서 자동으로 늘리고 싶은 컬럼
                loadMask: {
                    msg: '데이타 로드중'
                }, //그리드 로드시 화면로딩 indicator설정
                //그리드 선택모델(selectionModel)정의 : RowSelectionMode -> Row별로 처리하겠다.
                sm: new Ext.grid.RowSelectionModel({
                    singleSelect: true //Row 하나만 선택가능하게 하기
                }),
                viewConfig: { //그리드의 Dataview 설정
                    forceFit: true //가로에 그리드의 크기를 맞춘다.
                },
                height: 350,
                width: 800,
                title: '기본기리드'
            });
            //그리드를 DIV_GRID_HERE 라는 ID값을 가진 객체에 렌더링한다.
            this.grid.render('DIV_GRID_HERE');
            //그리드 로드시 첫번째 Row를 자동으로 선택되게 한다.
            this.grid.getSelectionModel().selectFirstRow();
        }
    }
}
();
Ext.EventManager.onDocumentReady(BasicGridClass.init, BasicGridClass, true);


Step 2. How to use HttpProxy & ScriptTagProxy

Step1에서 배열데이타를 사용할때(Ext.data.SimpleStore)와 직접 통신하여 사용할때(Ext.data.Store)를 비교하면서 아래 소스를 보기 바란다.
Simplestore 는 기본적으로 네트웍을 사용하지 않으므로 Proxy를 사용하지 않는다. 그러나 Store, JsonStore, GroupingStore의 경우 Proxy를 사용하여 데이타의 위치를 지정할수 있다.

SimpleStore vs. (Json, Grouping) Store


SimpleStore
(Json, Grouping) Store
Proxy
없음(없을시 HttpProxy사용)
HttpProxy, ScriptTagProxy, MemoryProxy
Reader
ArrayReader
JsonReader, XmlReader, ArrayReader
Load Method
store.loadData(data);
store.load()
Extend
Ext.data.Store
Ext.data.Store


basicGrid.js

BasicGridClass = function(){
    return {
        init: function(){
            ////DataStore를 정의한다. Ext.data.Store
            this.store = new Ext.data.Store({
                // Data를 가져올 Proxy설정
                proxy: new Ext.data.HttpProxy({
                    url: 'basicGrid.json',
                    method: 'POST'
                }),
                // Client쪽에서 Sort할 경우 소트할 항목
                sortInfo: {
                    field: 'price',
                    direction: "DESC"
                },
                reader: new Ext.data.JsonReader({
                    root: 'testData'
                },
                [{
                    name: 'company'
                }, {
                    name: 'price',
                    type: 'float'
                }, {
                    name: 'change',
                    type: 'float'
                }, {
                    name: 'pctChange',
                    type: 'float'
                }, {
                    name: 'lastChange',
                    type: 'date',
                    dateFormat: 'n/j h:ia'
                }])
            });
            this.grid = new Ext.grid.GridPanel({
                store: this.store,
                columns: [{
                    id: 'company',
                    header: "Company",
                    width: 160,
                    sortable: true,
                    dataIndex: 'company'
                }, {
                    header: "Price",
                    width: 75,
                    sortable: true,
                    renderer: 'usMoney',
                    dataIndex: 'price'
                }, {
                    header: "Change",
                    width: 75,
                    sortable: true,
                    dataIndex: 'change'
                }, {
                    header: "% Change",
                    width: 75,
                    sortable: true,
                    dataIndex: 'pctChange'
                }, {
                    header: "Last Updated",
                    width: 85,
                    sortable: true,
                    renderer: Ext.util.Format.dateRenderer('m/d/Y'),
                    dataIndex: 'lastChange'
                }],
                stripeRows: true,
                autoExpandColumn: 'company',
                loadMask: {
                    msg: '데이타 로드중'
                },
                sm: new Ext.grid.RowSelectionModel({
                    singleSelect: true
                }),
                viewConfig: {
                    forceFit: true
                },
                height: 350,
                width: 800,
                title: '기본 그리드'
            });
           
            this.grid.render('DIV_GRID_HERE');
            this.grid.getSelectionModel().selectFirstRow();
            this.store.load(); //데이타를 로드한다.
        }
    }
}
();
Ext.EventManager.onDocumentReady(BasicGridClass.init, BasicGridClass, true);

  HttpProxy나 ScriptTagProxy로 서버 통신을 한다. ScriptTagProxy에 대한 고찰(?) 을 참조하라.

  • HttpProxy : 같은 도에인일 경우
  • ScriptTagProxy: 다른 도메인일 경우
  • MemoryProxy: 메모리에 있는 데이타


basicGrid.json
{
    testData: [{
        'company': '3m Co',
        'price': 71.72,
        'change': 0.02,
        'pctChange': 0.03,
        'lastChange': '9/1 12:00am'
    }, {
        'company': 'Alcoa Inc',
        'price': 29.01,
        'change': 0.42,
        'pctChange': 1.47,
        'lastChange': '9/1 12:00am'
    }, {
        'company': 'Altria Group Inc',
        'price': 83.81,
        'change': 0.28,
        'pctChange': 0.34,
        'lastChange': '9/1 12:00am'
    }, {
        'company': 'American Express Company',
        'price': 52.55,
        'change': 0.01,
        'pctChange': 0.02,
        'lastChange': '9/1 12:00am'
    }, {
        'company': 'American International Group, Inc.',
        'price': 64.13,
        'change': 0.31,
        'pctChange': 0.49,
        'lastChange': '9/1 12:00am'
    }, {
        'company': 'AT&T Inc.',
        'price': 31.61,
        'change': -0.48,
        'pctChange': -1.54,
        'lastChange': '9/1 12:00am'
    }, {
        'company': 'Boeing Co.',
        'price': 75.43,
        'change': 0.53,
        'pctChange': 0.71,
        'lastChange': '9/1 12:00am'
    }, {
        'company': 'Caterpillar Inc.',
        'price': 67.27,
        'change': 0.92,
        'pctChange': 1.39,
        'lastChange': '9/1 12:00am'
    }, {
        'company': 'Citigroup,Inc.',
        'price': 49.37,
        'change': 0.02,
        'pctChange': 0.04,
        'lastChange': '9/1 12:00am'
    }, {
        'company': 'E.I. du Pont de Nemours and Company',
        'price': 40.48,
        'change': 0.51,
        'pctChange': 1.28,
        'lastChange': '9/1 12:00am'
    }, {
        'company': 'Exxon Mobil Corp',
        'price': 68.1,
        'change': -0.43,
        'pctChange': -0.64,
        'lastChange': '9/1 12:00am'
    }, {
        'company': 'General Electric Company',
        'price': 34.14,
        'change': -0.08,
        'pctChange': -0.23,
        'lastChange': '9/1 12:00am'
    }, {
        'company': 'General Motors Corporation',
        'price': 30.27,
        'change': 1.09,
        'pctChange': 3.74,
        'lastChange': '9/1 12:00am'
    }, {
        'company': 'Hewlett-Packard Co.',
        'price': 36.53,
        'change': -0.03,
        'pctChange': -0.08,
        'lastChange': '9/1 12:00am'
    }, {
        'company': 'Honeywell Intl Inc',
        'price': 38.77,
        'change': 0.05,
        'pctChange': 0.13,
        'lastChange': '9/1 12:00am'
    }, {
        'company': 'Intel Corporation',
        'price': 19.88,
        'change': 0.31,
        'pctChange': 1.58,
        'lastChange': '9/1 12:00am'
    }, {
        'company': 'International Business Machines',
        'price': 81.41,
        'change': 0.44,
        'pctChange': 0.54,
        'lastChange': '9/1 12:00am'
    }, {
        'company': 'Johnson & Johnson',
        'price': 64.72,
        'change': 0.06,
        'pctChange': 0.09,
        'lastChange': '9/1 12:00am'
    }, {
        'company': 'JP Morgan & Chase & Co',
        'price': 45.73,
        'change': 0.07,
        'pctChange': 0.15,
        'lastChange': '9/1 12:00am'
    }, {
        'company': 'McDonald\'s Corporation',
        'price': 36.76,
        'change': 0.86,
        'pctChange': 2.40,
        'lastChange': '9/1 12:00am'
    }, {
        'company': 'Merck & Co., Inc.',
        'price': 40.96,
        'change': 0.41,
        'pctChange': 1.01,
        'lastChange': '9/1 12:00am'
    }, {
        'company': 'Microsoft Corporation',
        'price': 25.84,
        'change': 0.14,
        'pctChange': 0.54,
        'lastChange': '9/1 12:00am'
    }, {
        'company': 'Pfizer Inc',
        'price': 27.96,
        'change': 0.4,
        'pctChange': 1.45,
        'lastChange': '9/1 12:00am'
    }, {
        'company': 'The Coca-Cola Company',
        'price': 45.07,
        'change': 0.26,
        'pctChange': 0.58,
        'lastChange': '9/1 12:00am'
    }, {
        'company': 'The Home Depot,Inc.',
        'price': 34.64,
        'change': 0.35,
        'pctChange': 1.02,
        'lastChange': '9/1 12:00am'
    }, {
        'company': 'The Procter & Gamble Company',
        'price': 61.91,
        'change': 0.01,
        'pctChange': 0.02,
        'lastChange': '9/1 12:00am'
    }, {
        'company': 'United Technologies Corporation',
        'price': 63.26,
        'change': 0.55,
        'pctChange': 0.88,
        'lastChange': '9/1 12:00am'
    }, {
        'company': 'Verizon Communications',
        'price': 35.57,
        'change': 0.39,
        'pctChange': 1.11,
        'lastChange': '9/1 12:00am'
    }, {
        'company': 'Wal-Mart Stores, Inc.',
        'price': 45.45,
        'change': 0.73,
        'pctChange': 1.63,
        'lastChange': '9/1 12:00am'
    }]
}


Step 3. Data-Mapping and Renderer

BasicGridClass = function(){
    return {
        init: function(){
            //데이타 스토어 정의
            this.store = new Ext.data.Store({
                proxy: new Ext.data.HttpProxy({
                    url: 'basicGrid.json',
                    method: 'POST'
                }),
                sortInfo: {
                    field: 'price',
                    direction: "DESC"
                },
                reader: new Ext.data.JsonReader({
                    root: 'testData'
                }, [{
                    name: 'company',
                    type: 'string',
                    mapping: 'company',
                    convert: this.convertCompany
                }, //응답받은 JSON의 company와 맵핑된다. 맵핑정보 변경을 converting한다.
                {
                    name: 'price',
                    type: 'float',
                    mapping: 'price'
                }, {
                    name: 'change',
                    type: 'float',
                    mapping: 'change'
                }, {
                    name: 'pctChange',
                    type: 'float',
                    mapping: 'pctChange'
                }, {
                    name: 'lastChange',
                    type: 'date',
                    dateFormat: 'n/j h:ia',
                    mapping: 'lastChange'
                }])
            });
            this.grid = new Ext.grid.GridPanel({
                store: this.store,
                columns: [{
                    id: 'company',
                    header: "Company",
                    width: 160,
                    sortable: true,
                    dataIndex: 'company'
                }, // 맵핑된 company의 name을 dataIndex로 잡는다.
                {
                    header: "Price",
                    width: 75,
                    sortable: true,
                    renderer: 'usMoney',
                    dataIndex: 'price'
                }, {
                    header: "Change",
                    width: 75,
                    sortable: true,
                    dataIndex: 'change'
                }, {
                    header: "% Change",
                    width: 75,
                    sortable: true,
                    renderer: this.pctChange,
                    dataIndex: 'pctChange'
                }, // 화면에 렌더링할때  renderer를 이용해 칼라를 바꿔준다.
                {
                    header: "Last Updated",
                    width: 85,
                    sortable: true,
                    renderer: Ext.util.Format.dateRenderer('m/d/Y'),
                    dataIndex: 'lastChange'
                }],
                stripeRows: true,
                autoExpandColumn: 'company',
                loadMask: {
                    msg: '데이타 로드중'
                },
                sm: new Ext.grid.RowSelectionModel({
                    singleSelect: true
                }),
                viewConfig: {
                    forceFit: true
                },
                height: 350,
                width: 800,
                title: '기본 그리드'
            });
           
            this.grid.render('DIV_GRID_HERE');
            this.grid.getSelectionModel().selectFirstRow();
            this.store.load();
           
        },
        //화면에 렌더링할때 renderer에 의해서 칼라를 바꿔주느 메쏘드
        pctChange: function(val){
            if (val > 0) {
                return '<span>' + val + '%</span>';
            }
            else
                if (val < 0) {
                    return '<span>' + val + '%</span>';
                }
            return val;
        },
        // 데이타 맵핑할때 자식노드가 있을 경우 해당 자식노드로 변환하여 반환한다.
        convertCompany: function(value, p, record){
            return (value.name != undefined) ? value.name : value;
        }
       
    }
}
();
Ext.EventManager.onDocumentReady(BasicGridClass.init, BasicGridClass, true);

위의 convert 와 renderer 옵션을 이용하여 여러가지 다양한 형태의 grid 생성이 가능하다. 또한 JsonReader의 root 노드또한 Json 표기 형식의 . (dot) 연산자로 해당 자식 노드를 가져올수 있다.


추가적으로 extjs의 API Doc에는 rederer에 대해서 다음과 같이 기술하고 있다.

rederer의 파라미터값들
* value : Object - 셀에 들어가는 데이타
* metadata : Object - 정의한 객체 메타데이타
* css : String : 테이블테그에서 td에 먹이는 css
* attr : String : HTML 애트리뷰트 정의
* record : Ext.data.record : 데이타가 압축된 레코드
* rowIndex : Number
* colIndex : Number
* store : Ext.data.Store


Step 4. DataStore Load & Loadexception Handling

 데이타스토어가 모두 로드가 완료됐을 경우 혹은 서버이상으로 로드가 되지 않았을 경우를 예를 들어 설명한다.

BasicGridClass = function(){
return {
init: function(){
//데이타 스토어 정의
this.store = new Ext.data.Store({
proxy: new Ext.data.HttpProxy({
url: 'basicGrid.json'
}),
sortInfo: {
field: 'price',
direction: "DESC"
},
reader: new Ext.data.JsonReader({
root: 'testData'
}, [{
name: 'company',
type: 'string',
mapping: 'company'
}, {
name: 'price',
type: 'float',
mapping: 'price'
}, {
name: 'change',
type: 'float',
mapping: 'change'
}, {
name: 'pctChange',
type: 'float',
mapping: 'pctChange'
}, {
name: 'lastChange',
type: 'date',
dateFormat: 'n/j h:ia',
mapping: 'lastChange'
}])
});
this.grid = new Ext.grid.GridPanel({
store: this.store,
columns: [{
id: 'company',
header: "Company",
width: 160,
sortable: true,
dataIndex: 'company'
}, {
header: "Price",
width: 75,
sortable: true,
renderer: 'usMoney',
dataIndex: 'price'
}, {
header: "Change",
width: 75,
sortable: true,
dataIndex: 'change'
}, {
header: "% Change",
width: 75,
sortable: true,
dataIndex: 'pctChange'
}, {
header: "Last Updated",
width: 85,
sortable: true,
renderer: Ext.util.Format.dateRenderer('m/d/Y'),
dataIndex: 'lastChange'
}],
stripeRows: true,
autoExpandColumn: 'company',
loadMask: {
msg: '데이타 로드중'
},
sm: new Ext.grid.RowSelectionModel({
singleSelect: true
}),
view: new Ext.grid.GridView({
forceFit: true,
enableRowBody: true,
ignoreAdd: true,
emptyText: 'No Record found'
}),
height: 350,
width: 800,
title: '기본 그리드'
});

this.grid.render('DIV_GRID_HERE');
//this.grid.getSelectionModel().selectFirstRow();
this.store.load();


this.grid.on('rowcontextmenu', function(grid, index, e){
alert('오른쪽 버튼 클릭');
}, this);

// Row에서 마우스 오른쪽 클릭시
this.grid.on('rowclick', function(grid, index, e){
alert('클릭');
}, this);

// Row 클릭시
this.grid.on('rowdblclick', function(grid, index, e){
alert('더블클릭');
}, this);

// Row 더블클릭시
this.gsm = this.grid.getSelectionModel();

// 데이타 스토어에서 데이타 로드 완료시 첫번째 Row 선택되게하기
this.store.on('load', this.gsm.selectFirstRow, this.gsm);
this.store.on('load', function(store, records, options){
alert('데이타로드완료')
}, this);

// 데이타 스토어에서 데이타 로드실패시 exception throw
this.store.on('loadexception', function(a, conn, resp){
//alert(resp.status.toString() +'\n'+ resp.statusText);
this.grid.emptyText = 'data load error';
}, this);

// Ext.data.Dataproxy 통신 에러시
this.store.proxy.on('loadexception', function(proxy, dataObj, callbackArgs, e){
if (Ext.gecko)
console.log(e);
});

}
}
}
();
Ext.EventManager.onDocumentReady(BasicGridClass.init, BasicGridClass, true);


Step 5. 선택된 Row에서 값 추출하기

BasicGridClass = function(){
return {
init: function(){
//데이타 스토어 정의
this.store = new Ext.data.Store({
proxy: new Ext.data.HttpProxy({
url: 'basicGrid.json'
}),
sortInfo: {
field: 'price',
direction: "DESC"
},
reader: new Ext.data.JsonReader({
root: 'testData'
}, [{
name: 'company',
type: 'string',
mapping: 'company'
}, {
name: 'price',
type: 'float',
mapping: 'price'
}, {
name: 'change',
type: 'float',
mapping: 'change'
}, {
name: 'pctChange',
type: 'float',
mapping: 'pctChange'
}, {
name: 'lastChange',
type: 'date',
dateFormat: 'n/j h:ia',
mapping: 'lastChange'
}])
});
this.grid = new Ext.grid.GridPanel({
store: this.store,
columns: [{
id: 'company',
header: "Company",
width: 160,
sortable: true,
dataIndex: 'company'
}, // DataIndex정의
{
header: "Price",
width: 75,
sortable: true,
renderer: 'usMoney',
dataIndex: 'price'
}, {
header: "Change",
width: 75,
sortable: true,
dataIndex: 'change'
}, {
header: "% Change",
width: 75,
sortable: true,
dataIndex: 'pctChange'
}, {
header: "Last Updated",
width: 85,
sortable: true,
renderer: Ext.util.Format.dateRenderer('m/d/Y'),
dataIndex: 'lastChange'
}],
stripeRows: true,
autoExpandColumn: 'company',
loadMask: {
msg: '데이타 로드중'
},
//RowSelectionModel 이거나 CellSelectionModel일 경우만 데이타 가져오기
sm: new Ext.grid.RowSelectionModel({
singleSelect: true
}),
view: new Ext.grid.GridView({
forceFit: true,
enableRowBody: true,
emptyText: 'No Record found'
}),
height: 350,
width: 800,
title: '기본 그리드'
});

this.grid.render('DIV_GRID_HERE');
this.store.load();
this.gsm = this.grid.getSelectionModel();
this.store.on('load', this.gsm.selectFirstRow, this.gsm);

// ① Row에서 오른쪽 마우스 클릭했을 경우
this.grid.on('rowcontextmenu', this.getRowData, this);
// ① Row 클릭했을 경우
this.grid.on('rowclick', this.getRowData, this);
// ① Row 더블클랙했을 경우
this.grid.on('rowdblclick', this.getRowData, this);
// ① Row가 선택됐을 경우
this.gsm.on('rowselect', this.rowSelect, this);
},

getRowData: function(thisGrid, rowIndex, eventObject){
// ② 클릭,컨텍스트,더블클릭시 해당 이벤트가 일어난 Row의 Record가져오기
var record = this.store.getAt(rowIndex) || this.gsm.getSelected();
// ③ 선택된 레코드에서 데이타 가져오기
alert(record.data.company + '\n' + record.get('company'));
},
// ④ rowSelectionModel에서 선택된 Row의 데이타 가져오기
rowSelect: function(selectionModel, index, record){
alert(record.data.company + '\n' + record.get('company'));
}

}
}
();
Ext.EventManager.onDocumentReady(BasicGridClass.init, BasicGridClass, true);

  • ① : Ext.grid.GridPanel에 등록된 Event  사용법에 유의할것
    this.grid.on('rowclick',this.getRowData(), this );
    잘못된표현  - argument가 없이 ()로만 사용하였을 경우 closure로 인식하여 바로 실행된다.

    this.grid.on('rowclick',this.getRowData(grid,rowIdex,eventObject), this);
    정확한 표현 - argument가 있을시는 closure로 인식하지 않음

    this.grid.on('rowclick',this.getRowData, this);
    정확한 표현

    this.grid.on('rowclick',function(grid,rowIndex,eventObject){this.getRowData(grid,rowIndex,evnetObjt);},this);
    정확한 표현


  • ② 선택된 Row에서 Record를 가져오는 방법에는 위오 같이 두가지 방법이 있다. 
    데이터스토어.getAt(Row의 Index Number) - 데이타 스토어의 인덱스에서 가져오는 방법
    셀렉션 모델.getSelected() - RowSelectionModel이나 CellSelectionModel에서 가져오는 방법

  • ③ Record에서 해당 데이타셋 가져오기 : 아래의 가져올DataIndex는 Columns에서 정의한 DataIndex를 가져온다.
    레코드.data.가져올DataIndex텍스트 
    레코드.get('가져올DataIndex텍스트)

  • ④ rowSelectionModel일 경우 rowselect 이벤트를 이용하여 선택된 Row의 값을 가져올수 있다.  클릭이나 더블클릭, 컨텍스트 메뉴와 달리 사용자로 부터 이벤트를 받는것이 아니라 데이터 스토어가 최초 로드 되거나 하였을 경우 해당 이벤트를 바로 자아 처리해줄 로직이 있을 경우에는 상당히 유용하다. 만약 예를 들어 초기 데이타 로드시 첫번째 Row가 선택된지 선택된 Row의 상세정보를 오른쪽 패널에 보여줄 경우 선택된 Row의 정보를 사용자의 어떠한 액션 없이 해당 레코드의 값을 받아 올수 있다. 데이타 스토어의 'load'이벤트를 사용할때 첫번째 Row를 선택하여 해당 선택된 row의 데이타를 뽑아내는 방법으로도 가능하다.


Post by 넥스트리소프트 데꾸벅(techbug)
, |

기본적으로 ExtJS의 레이아웃을 잡을때 Center Region은  Hide/show 및 Collapse/Expand가 되지 않으나 해당 Center Region을 감추는 방법에 대해서 기술한다. (꼼수). 단, 해당 꼼수(^^)는 fullscreen이거나 전체 사이즈가 고정되어 있다고 전제하에 동작한다.  만약 좌측패널이 전체 화면으로 center region을 감췄을때 브라우저 사이즈를 줄이거나 한다면 다시 syncSize해줘야 한다.


basicLayout.html

<html>
<head>
<title>Basic Layout</title>
<link rel="stylesheet" type="text/css" href="http://techbug.tistory.com/resources/css/ext-all.css" />
<script type="text/javascript" src="../../adapter/ext/ext-base.js"></script>
<script type="text/javascript" src="../../ext-all.js"></script>
<script type="text/javascript" src="basicLayout.js"></script>
</head>
<body id="basicLayoutBody"></body>
// body container의 id(basicLayoutBody)를 이용하여 전체 화면사이즈를 가져온다.
</html>


basicLayout.js

LeftArea = function(viewport) {

    this.viewport = viewport;

    LeftArea.superclass.constructor.call(this, {
        region : 'west',
        title : 'WEST',
        width : 250,
        layout : 'fit',
        margins : '5 5 5 5',
        html : '좌측',
        tbar : [{
            text : 'CenterPanel 없애기',
            tooltip : {
                title : '전체화면',
                text : '화면을 전체/축소합니다.'
            },
            pressed : false,
            enableToggle : true,
            scope : this,
            toggleHandler : this.showHideCenterRegion
        }]
    })
};

Ext.extend(LeftArea, Ext.Panel, {
    // toggleHandler는 2개의 arguments를 가지고 있다. pressed는 클릭시 true , 그렇지 않을시 false반환
        showHideCenterRegion : function(btn, pressed) {
            if (pressed) {
                var fullWidth = this.viewport.getFullBody('width') - 10;
                this.setWidth(fullWidth);
                this.viewport.CenterPanel.hide();
                this.viewport.CenterPanel.ownerCt.doLayout();
            } else {
                this.setWidth(250);
                this.viewport.CenterPanel.show();
                this.viewport.CenterPanel.ownerCt.doLayout();
            }
        }

    });

BasicLayoutClass = function() {
    return {
        init : function() {
            Ext.QuickTips.init();
            this.viewport = new Ext.Viewport( {
                layout : 'border',
                items : [this.WestPanel = new LeftArea(this),
                        this.CenterPanel = new Ext.Panel( {
                            region : 'center',
                            title : 'CENTER',
                            layout : 'fit',
                            margins : '5 5 5 0',
                            html : '<div id="_CONTENTS_AREA_">컨텐츠 영역입니다.</div>'
                        })]
            });

            this.viewport.doLayout();
            this.viewport.syncSize();
        },

        getFullBody : function(wh) {
            if (wh == 'width')
                return Ext.get('basicLayoutBody').getWidth();
            else if (wh == 'height')
                return Ext.get('basicLayoutBody').getHeight();
            else
                return Ext.get('basicLayoutBody').getWidth();
        }

    }
}();
Ext.EventManager.onDocumentReady(BasicLayoutClass.init, BasicLayoutClass, true);


Post by 넥스트리소프트 데꾸벅(techbug)
, |
Extjs를 사용하다가 각 그리드 row에 각각의 프로세스바를 구현하게 되었다.
각 grid의 node 마다 프로세스 클래스를 재선언하였더니 너무 페이지자체가 무거워져
taskMgr를 이용하여 CSS로 구현하기로 하였다.
아래 소스는 넥스트리 사내프로젝트에서 구현되었던 일부소스이다.


[Extjs 소스중 일부] 기밀이므로 요기 까지만... ^^
// 타스크매니저로 autorefresh한다.
this.showTask = Ext.TaskMgr.start({
    run: this.store.reload,
    scope: this.store,
    interval:1000,
    args:[{params:{'appId':appId, 'deployId':deployId}, add:false}]
});

// 배포상태를 가져오는것을 멈춘다.
 Ext.TaskMgr.stop(this.showTask);


// 데이타가 모두 로드되었을 경우 해당 데이타값을 비교하여 계속
// autoRefresh할것인가를 결정한다.
this.store.on('load',function(store,records,opts){
    this.loadCompleteStatus(store,records,opts);
},this);


/**
 * 데이타가 모두 로드되었을 경우 해당 데이타값을 비교하여 계속 autoRefresh할것인가를 결정한다.
 * this.store.on('load',fn) 에 해당하는 메쏘드 실제 그리드안의
 * record에 해당하는 내용들을 모두 update한다.
 */
loadCompleteStatus : function(store,records,opts){
    var totalSize = store.getCount();
    var totalStop = 0;


    for(var i=0; i < totalSize; i++){
        var record = store.getAt(i);
        var pid = '_PROGRESSING_'+record.data.instsId;
        var lastMessage = (record.data.lastMessage) ? record.data.lastMessage : '';
        var progressRate= (record.data.progressRate)? parseInt(record.data.progressRate) : 0;
        var curStop = (record.data.isStop) ? parseInt(record.data.isStop) : 0 ;
       
        totalStop = totalStop + curStop;
        // 성공+실패 횟수가 전체 갯수와 같을 경우 autorefresh를 멈춘다.
        if(totalStop == totalSize) this.stopDeployStatus();


    }// for end
}

/**
 * 각 인스턴스마다의 정보(인스턴스명, 인스턴스Id, IP,port)를 그리드Row에 모두 표현한다.
 */
rendererDeployStatus : function(value, metadata, record,rowIndex,colIndex,store) {
return String.format(
        '<div class="_DEPLOYSTATUS_ROW_"><b>{0}</b><span class="_INSTANCE_IP_">{1}</span>'
        +'<div class="_PROGRESSBAR_CLASS_">'
        +'<div class="_PROGRESSBAR_" style="background-position-x:{2}%">{2}% : {3}</div>'
        +'<div id="_PROGRESSING_{4}" class="_PROGRESSBAR_COM_" '
        +'style="top:0;width:{2}%">{2}% : {3}</div></div></div>',
        value
        ,'http://'+record.data.ip +':'+record.data.port
        , record.data.progressRate
        , record.data.lastMessage
        , record.data.instanceId
        );
},


스타일시트
/* Progress bar 만들기 시작*/
DIV._DEPLOYSTATUS_ROW_ { padding-left:20px; }
DIV._DEPLOYSTATUS_ROW_ B {
    display:block;
    color:#333;
}
DIV._DEPLOYSTATUS_ROW_ SPAN._INSTANCE_IP_ { color:#333; }
._PROGRESSBAR_CLASS_LEFT_ {text-align:left !important}
DIV._PROGRESSBAR_CLASS_ {
    text-align:left !important;
    vertical-align:middle !important;
    padding:0 !important;
    height:18px !important;
    overflow:hidden !important;
    margin:7px 20px 10px 0 !important;
    background : transparent url(../img/progressbgwhite.png) 0 0 repeat-x !important;
    border:#6593CF solid 1px !important;
    position:relative;
}

DIV._PROGRESSBAR_ {
    text-align:left !important;
    vertical-align:middle !important;
    padding:0 3px 0 10px !important;
    margin:0 !important;
    height:18px !important;
    line-height:18px !important;
    white-space:nowrap !important;
    overflow:hidden !important;
    font-family:'segoe ui',verdana,arial;
    color:#396095;
    background-image : url(../img/progressbgwhite.png) !important;
    background-repeat : no-repeat ;
    background-position-y : 0;
    border:0 !important;
}

DIV._PROGRESSBAR_COM_ {
    text-align:left !important;
    vertical-align:middle !important;
    padding:0 3px 0 10px !important;
    margin:0 !important;
    height:18px !important;
    line-height:18px !important;
    white-space:nowrap !important;
    overflow:hidden !important;
    font-family:'segoe ui',verdana,arial;
    color:white;
    background: url(../img/progressbarbg.png) 0 0 repeat-x !important;
    border:0 !important;
    position:absolute;left:0;
    z-index:10;
}


.failrow DIV._PROGRESSBAR_COM_ {
    background-image: url(../img/progressbarfail.png) !important;
    background-color:#EFF39B !important;
}

/*프로그레스바 만들기 끝 */


Post by 넥스트리소프트 데꾸벅(techbug)
, |
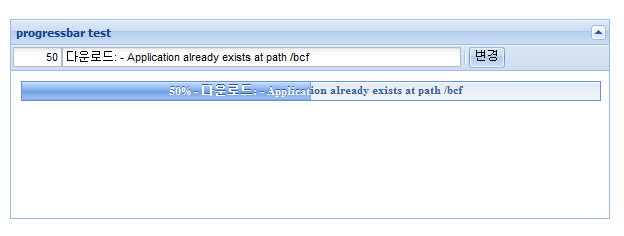
아래와 같은 상태진행(progress)바를 생성할때 사용합니다.

사용자 삽입 이미지


Ext.onReady(function() {

    var percent;
    var textfield;

    var testPanel = new Ext.Panel( {
        title : 'progressbar test',
        collapsible : true,
        renderTo : document.body,
        width : 600,
        height : 200,
        bodyStyle : 'padding:10px',
        html : '<div id="_progress_"></div>',
        tbar : [
                percent = new Ext.form.NumberField( {
                    id : '_1_',
                    maxValue : 100,
                    minValue : 0,
                    width : 50,
                    value : '20'
                }),
                textfield = new Ext.form.TextField( {
                    id : '_2_',
                    width : 400,
                    value : '다운로드: - Application already exists at path /bcf'
                }),
                '-',
                {
                    text : '변경',
                    handler : function() {
                        // 상태바의 값을 입력한 값으로 계산하여 뿌려준다.
                        pbar.updateProgress(parseInt(percent.getValue()) / 100,
                                percent.getValue() + '% - '
                                        + textfield.getValue());
                    }
                }]
    });
    // 실제 프로그래스바를 생성하는 컴포넌트
        var pbar = new Ext.ProgressBar( {
            text : 'Initializing...',
            autoWidth : false,
            width : '100%',
            cls : 'left-align',
            renderTo : '_progress_'
        });
    });
}

<body><div id="techbugbar" ></div>

Post by 넥스트리소프트 데꾸벅(techbug)
, |

특정 CSS Object 값에 이벤트를 걸어주는 방법에 대해서 소개한다.

아래의 소스에는 "menu"라는 id값을 가진 객체에 클릭이벤트를 걸어주는 소스이다.

 
        Ext.select('#menu').on('click', function(e){
            alert(e.target)
            text = Ext.get(e.target); //이벤트 타겟을 찾는다.
            text.puff(); //텍스트에 fade효과를 준다.
            e.stopEvent() //Event bubble효과를 막기위해서 event를 멈춘다.
        });

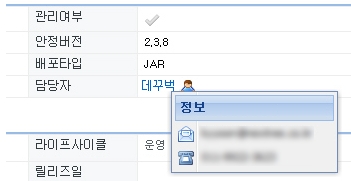
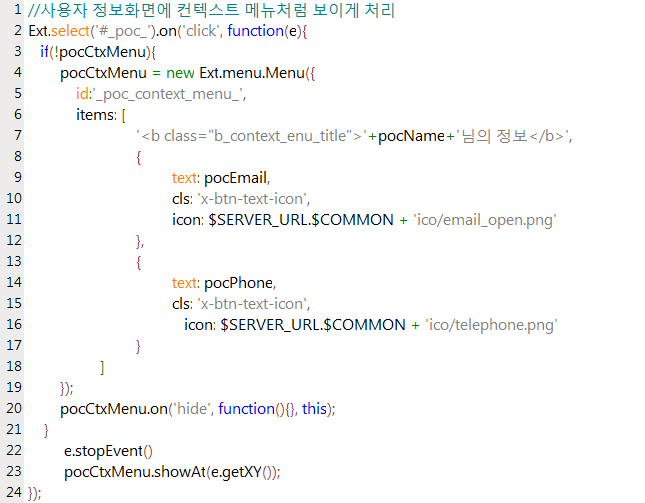
위의 소스는 어플리케이션 기본정보나 컴포넌트 기본정보에서 담당자 클릭시 나오는 컨텍스트 메뉴를 구현하는데 사용되었다.


사용자 삽입 이미지


사용자 삽입 이미지

Post by 넥스트리소프트 데꾸벅(techbug)
, |