블로그 이미지

카테고리

데꾸벅 (194)
Publisher (39)
Scripter (97)
Programmer (1)
Designer (30)
Integrator (18)
Pattern Searcher (4)
News (2)
강좌 및 번역 (3)

최근에 올라온 글

최근에 달린 댓글

'넥스트리 nextree 데꾸벅 techbug'에 해당되는 글 102건

  1. 2008.03.26 FF의 검색사이트 추가방법
  2. 2008.03.26 포토샵에서 파일명 27자 이상 저장시 짤리는문제 1
  3. 2008.03.14 어떤 AJAX Framework를 선택할 것인가.
  4. 2008.03.14 Extjs를 이용한 간단한 form submit
  5. 2008.03.12 IE7 / FF / Opera FLASH getURL 보안창뜰때
  6. 2008.03.12 Protoflow : prototype.js를 이용한 Coverflow
  7. 2008.03.11 window.status in FF & IE7
  8. 2008.03.11 IE6,IE7 ,FireFox 에 대해 CSS 맞추기
  9. 2008.03.07 IE8 출시에 따른 브라우저 성능테스트 2
  10. 2008.03.07 Extjs를 이용한 ExtPHP, PHP-Ext 프로젝트 오픈
  11. 2008.03.06 Browser detect
  12. 2008.03.06 IE7, FF3 에서 전체화면 팝업창 띄우기
  13. 2008.03.06 즐겨찾기 및 시작페이지 추가 IE FF모두 가능
  14. 2008.03.06 Extjs Grouping Header Grid Plugins 13
  15. 2008.03.06 IE8 출시
  16. 2008.03.06 자바스크립트로 구현한 3D 포토갤러리
  17. 2008.03.06 JsonSQL: JSON parser, SQL style
  18. 2008.03.06 Native CSS selectors with querySelector
  19. 2008.03.06 IE minimize 2
  20. 2008.03.05 이땅의 개발자에게 필요한 철학 2
  21. 2008.03.04 Getting Real
  22. 2008.03.04 우분투에서 하드드라이브 추가하기 2
  23. 2008.03.04 우분투 IP변경하기
  24. 2008.03.04 우분투 vsftpd 설치하기 1
  25. 2008.03.03 Javascript Performance Stack 2
  26. 2008.02.28 Extjs 크로스 도메인 관련
  27. 2008.02.27 Extjs 한국어로 나타내기 (locale설정) 9
  28. 2008.02.26 ExtJS을 이용한 RestFul한 통신하기 2
  29. 2008.02.26 GWT Ext 2.0 이 릴리즈됐다.
  30. 2008.02.26 ExtJS를 지원하는 IDE 개발이 시작되다.
XML파일
<OpenSearchDescription>
<ShortName>나루</ShortName>
<Description>나루 블로그 전문 검색</Description>
<InputEncoding>UTF-8</InputEncoding>
<Image width="16" height="16">
https://t1.daumcdn.net/cfile/tistory/2608163356E660671C"text/html" method="GET" template="http://naaroo.com/search/{searchTerms}"/>
<SearchForm>http://naaroo.com</SearchForm>
<Developer>astraea</Developer>
<Contact>http://withstory.net</Contact>
</OpenSearchDescription>

웹페이지
<ul>
<li><a href="#" onclick='window.external.AddSearchProvider("xml파일");'>설치할 URL</a></li>
</ul>

'Scripter > JAVASCRIPT' 카테고리의 다른 글

자바스크립트로 루비프로그래밍을?  (2) 2008.03.28
IE8에서의 자바스크립트  (0) 2008.03.27
Protoflow : prototype.js를 이용한 Coverflow  (0) 2008.03.12
window.status in FF & IE7  (0) 2008.03.11
Browser detect  (0) 2008.03.06
Post by 넥스트리소프트 데꾸벅(techbug)
, |
데꾸벅 포토샵을 13년을 넘게 써왔지만 이런기능이 있는건 오늘 처음알았다.
프로젝트 표준명명법에 맞게 파일명을 쓰다보니 파일명이 27자가 넘는 경우가 생겼다.
파일을 수정하려 해도 27자를 넘어가면 잘려서 Vista에 문제가 있나 싶어서 옵션을 모두 둘러봤지만 그러한 기능이 없었다.. (있을리 만무하지..)
그래서 혹 포토샵에 문제가 없을까 싶어 검색을 해봤지만 이런 경우만 당해본 사람들이 쓴 질문만 있을뿐 답변이 없어 포스팅한다...

보면 알겠지만 방법은 상당히 간단하다.
사용자 삽입 이미지

Save Optimized As로 저장시 Settings에서 Other.. 를 선택하면 아래와 같은 창이 나온다.
사용자 삽입 이미지


그럼 위 창에서 File Name Compatibility에서 Mac OS9 체크되어 있는것을 언체크하기만 하면 끝.. ㅡ.,ㅡ; Mac은 27자리까지만 되나 보다...

Post by 넥스트리소프트 데꾸벅(techbug)
, |
네이버블로그에 포스팅했던 글을 다시 옮기다.


어떤 AJAX Framework를 선택할 것인가.?
넥스트리내 세미나 때문에 자료를 찾다가 괜찮은 사이트를 발견했다. 번역이 매끄럽지 못하고 의역이라 왠지...

올들어 500개 이상의 Ajax Framework이 생겨났다. (2007년 기준)
프레임웍 선택은 프로젝트에 상당히 신중한 작업이다. 개발시간 및 유지보수도 프레임웍선택에 상당히 의존적이기 때문이다.

1. 서버 의존성.
서버 독립적인 프레임웍은 mashing-up 서버 기술을 가능하게 할것이며 소프트웨어 아키텍쳐를 lowly ties하게 만든다.
반면, 서버 의존적인 프레임웍은 생산력을 높이나 프로젝트를 매우 어렵게 만들게 한다.


2. 구조화된 자바스크립트 향상
만일 팀원들이 공통된 개발방법론을 공유하지 않는다면 자바스크립트는 상당히 개발하기 곤란할것이다.
생성된 DOM 객체를 접근하는 방법은 여러가지가 있다. 이것을 프레임웍이 가지고 잇는 on-demand Javascript, 패키징 능력, 향상된 OOP와 같이 정형화할 필요가 있다.
extjs의 경우는 OOP기준으로 작성된 아주 좋은 소스네..


3. 만들어진 컴포넌트의 재사용성
다음 프로젝트에서도 재사용할수 있는지 검토한다.


4.프레임워크의 현재 문서화 레벨
대부분의 프로젝트에서 주위해야 할 문제
이런점에서 본다면 extjs는 킹왕짱이네...


5. 프로젝트에서 필요로 하는것
프로젝트에서 프레임웍을 필요로 하거나 다룰수 있는가 또는 어떤것들은 GUI지향적이고, 다른기능에 중점을 두고 있고 아니면 커뮤니케이션 위주인지를 확인한다.
복잡한 폼을 다루는 금융권 사이트에서는 extjs를 쓰기가 좀 그렇다는 의미..


6. 최신버전이 얼마나 오래된 것인가?
대부분 프로젝트는 자사소유이다. 프레임웍의 발전은 프로젝트를 발전시키고 유지보수하는 능력에 달려있다.
좋은 커뮤니티 사용자는 더 기능적인것을 필요로하는 개발자와 얘기하는것 만큼 중요하다.
스폰서의 조심성과 현재 제품웹사이트에서 사용하는 프레임웍은 수년을 지속되거나 단지 6개월만에 끝나는지를 추정할수 있는 좋은 시작이다.
extjs의 경우는 다른 ajax framework에 비해 상당히 활발하고 자주 업데이트 되고 버전 호환성도 상당히 뛰어나다.

7. 어떤종류를 지원하는가?
커뮤니티 지원, 상업적 지원, 테스트하는동안 테스트반응(?)이 있는가?
jsUnit으로 테스트주도개발을 할수도 있고.. 여기서 말하는 테스트는 해당 프레임웍에 대한 지원을 말하는것 같다.


8. 프레임워크를 익히기 쉬운가 (프레임워크를 익히는 learning curve가 가파른가?)
팀이 그러한 기술력을 핸들링 할수 있는가?  많은 개발자들은 자바스크립트를 꺼려한다. 그러한 변화를 핸들링 할수 있는가?
extjs 절라 베리베리 스팁하다... 단지 데꾸벅 생각


9. 방문자들은 누구인가?
공공사이트에는 가벼운 프레임워크가 요구된다.  만일 방문자들이 대용량 자바스크립트 API를 다운로드 한다면 그들은 머지않아 사이트를 찾이 않을것이다.


원문 : 세바스찬 JUST 블로그

'Scripter > AJAX' 카테고리의 다른 글

Ajax Framework 분석  (0) 2009.05.04
CSSHttpRequest  (0) 2008.11.12
HTTP Header에 대하여  (0) 2008.11.08
AJAX에서 즐겨찾기와 뒤로가기를 다루는 방법  (0) 2008.09.24
100라인 Ajax Wrapper  (0) 2008.04.19
Post by 넥스트리소프트 데꾸벅(techbug)
, |
네이버블로그에 올렸던 내용을 다시 정리하여 올리다.


HTML
<div id="center" class="x-layout-inactive-content">
<div id="btn-show-dlg"></div>
<div id="grid-paging" class="x-grid-mso" style="border: 1px solid #c3daf9; overflow: hidden; width:550px;"></div>
</div>


JAVASCRIPT
Step = function(){
    var btn, dialog, form;
    return{
        Create:function(){
            btn = new Ext.Button('btn-show-dlg', {
                text: "New Project",
                handler: Step.Init
            });
        },

        Init:function(){
            Ext.QuickTips.init();
            Ext.form.Field.prototype.msgTarget = 'side';

            dialog = new Ext.BasicDialog('loginDialogId', {
                autoCreate: true,
                width: 400,
                height: 400,
                modal: true,
                syncHeightBeforeShow: true,
                shadow:true,
                fixedcenter:true,
                title:'New Project'
            });

            dialog.body.dom.innerHTML="<div id='loginFormId' style='padding: 10px'></div>";

            form = new Ext.Form({
                labelAlign: 'left',
                labelWidth: 100,
                buttonAlign: 'center',
                url:'php/subProject.php',
                baseParams:{module:'login'}
            });
            form.add(
                new Ext.form.TextField({
                    fieldLabel: 'Project Name',
                    name: 'pname',
                    width:250,
                    allowBlank:false
                }),

                new Ext.form.TextField({
                    fieldLabel: 'Acronym',
                    name: 'pacy',
                    width:250,
                    allowBlank:false
                }),

                new Ext.form.DateField({
                    fieldLabel: 'Start Date',
                    name: 'sdate',
                    width:200,
                    allowBlank:false
                }),

                new Ext.form.DateField({
                    fieldLabel: 'End Date',
                    name: 'edate',
                    width:200
                    }),

                new Ext.form.TextArea({
                    fieldLabel: 'Description',
                    name: 'desc',
                    width:250,
                    allowBlank:false
                })
            );

            form.addButton('Login', function(){
                form.submit({
                    waitMsg:'Please Wait...',
                    reset:true,
                    success:Step.Success,
                    scope:Step
                });
            }, form);

            form.render('loginFormId');

            dialog.on('show', function(){form.items.item(0).focus();});
            // dialog.show(document.body.getElementsByTagName('di v')[0]);
            dialog.show(btn.getEl());

            dialog.on('hide', function(){this.destroy(true)}, dialog);
        },

        Success: function(f,a){
            dialog.destroy(true);
            if(a && a.result && typeof a.result.level == "number"){
                Step.level=a.result.level;
                alert("level = "+Test.level);
            }
        }
    }
}();


Ext.BasicForm.prototype.afterAction=function(actio n, success){
    this.activeAction = null;
    var o = action.options;
    if(o.waitMsg){
        Ext.MessageBox.updateProgress(1);
        Ext.MessageBox.hide();
    }
    if(success){
        if(o.reset){
            this.reset();
        }
        Ext.callback(o.success, o.scope, [this, action]);
        this.fireEvent('actioncompleted', this, action);
    }else{
        Ext.callback(o.failure, o.scope, [this, action]);
        this.fireEvent('actionfailed', this, action);
    }
}

Ext.onReady(Step.Create, Step, true);


PHP
<?php
    require "../../includes/nav_Header.php";
    if(!isset($_POST['module']) || strlen($_POST['module'])<1)die("Error: Server 1");
    $module=$_POST['module'];

    function Login($pname, $pacy, $sdate, $edate, $desc){
        $dbconnection = new gsConnection();
        global $VIP_DB;

        //Login Validation
        if(!isset($pname)||!strlen($pname))$pname = false;die("{errors:[{id:'pname', msg:'Required Field'}]}");
        if(!isset($pacy)||!strlen($pacy))$pacy = false;die("{errors:[{id:'pacy', msg:'Required Field'}]}");
        if(!isset($sdate)||!strlen($sdate))$sdate = false;die("{errors:[{id:'sdate', msg:'Required Field'}]}");
        if(!isset($desc)||!strlen($desc))$desc = false;die("{errors:[{id:'desc', msg:'Required Field'}]}");

        if($pname && $pacy && $sdate && $desc){
            echo 'First SQL';
            $sql = "SELECT projectid FROM projects WHERE projectname = '$pname'";
            $result = @mysql_query ($sql);

            if (mysql_num_rows($result) == 0){
                echo 'SECOND SQL';
                $sql = "INSERT INTO projects (projectname, projectacy, description, startdate, enddate, complete, mod_user)
                VALUES ('$pname', '$pacy', '$desc', '$sdate', '$edate', 0, 0)";
                $result = mysql_query($sql) or die(mysql_error());
            )
        }
        $level=10;
        print "{success:true, level:$level}\n";
        exit;
    }

    Login($_POST['pname'], $_POST['pacy'], $_POST['sdate'], $_POST['edate'], $_POST['desc']);
    die('Error: Server End');
?>


'Scripter > EXTJS' 카테고리의 다른 글

ExtJS를 이용한 Password Meter  (0) 2008.04.01
Ext JS Ext.ux.YoutubePlayer  (0) 2008.03.29
Extjs를 이용한 ExtPHP, PHP-Ext 프로젝트 오픈  (0) 2008.03.07
Extjs Grouping Header Grid Plugins  (13) 2008.03.06
Extjs 크로스 도메인 관련  (0) 2008.02.28
Post by 넥스트리소프트 데꾸벅(techbug)
, |

파일 다운로드에 따른 getURL로 스크립트 호출하는 플래쉬 링크에러 를 먼저 참조하기 바란다.


플래쉬에서 외부 링크를 걸때 getURL("javascript:스크립트함수호출()") 과 같이 쓰는데
종종 getURL의 경우 링크가 안걸릴때도 있고 같이 페이지내 animated GIF를 멈추게 하는 경우도 있다.
이럴경우 다음과 같이 해보자.

[플래쉬 :]

import flash.external.*;
ExternalInterface.call("스크립트함수명");

[HTML]

javascript:스크립트함수명()


위와 같이 해봤는데도 IE7 / Opera / FF 브라우저 로컬에서 스크립트 엑세스 할경우
보안경고창이 뜨는데 기본적으로 같은 도메인상에 존재해야 getURL함수를 호출할수 있다고 한다. allowScriptAccess를 always를 줘도 마찬가지다..
관련글이 "쇽닥쇽닥"님의 블로그에 포스팅되어 있다.. 참고하도록 하자..


getURL의 단점이라면 위에서 봤던대로..자바스크립트를 호출하면 딸깍거리는 소리가 나기도 하고 gif애니메이션을 멈추게 하는 현상이 있는데.. 이러한 현상은 fscommand를 사용하면 모두 해결할수 있다.

네이버블로그의 FAS에 포스팅된 글(getURL --> fscommand로 바꿀려면)중에 다음과 같은 글이 있어 포스팅한다.


샘플파일


1. 버튼 이벤트에 fscommand( command ,args) 의 형태로 선언한다. 여기서 command 와 args 는 문자열로 전달변수와 전달값이라고 생각하시면됩니다.  command 에서 지정해준 명령키워드를 html 에 선언된 자바스크립트 함수에서 조건으로 찾아 실행할수 있도록 하는역할이죠, args 는 command 명령시 전달될 값으로써 전달할 값이 없다면 "" 빈문자열로 처리해도 됩니다.

2. 퍼블리시 세팅에서 나오는 대화상자에서 format 탭의 html 부분에 체크한후 html 탭으로 가서 첫번째 옵션인 Template 드롭다운 메뉴를 누르면 여러가지 세팅이 나옵니다. 기본값은 Flash Only 인데 Flash with FSCommand 로 선택을 하신후 퍼블리싱 하시면 html 이 생성되며 자동으로 html 안에 fscommand 명령을 처리할수 있는 자바스크립트 함수가 선언이 됩니다.

<script language="JavaScript"> <!-- var isInternetExplorer = navigator.appName.indexOf("Microsoft") != -1; // Handle all the FSCommand messages in a Flash movie. function fscommand_DoFSCommand(command, args) { var fscommandObj = isInternetExplorer ? document.all.fscommand : document.fscommand; // if(command == "msg"){ alert(args) } // } // Hook for Internet Explorer. if (navigator.appName && navigator.appName.indexOf("Microsoft") != -1 &&

navigator.userAgent.indexOf("Windows") != -1 && navigator.userAgent.indexOf("Windows 3.1") == -1) { document.write('<script language=\"VBScript\"\>\n'); document.write('On Error Resume Next\n'); document.write('Sub fscommand_FSCommand(ByVal command, ByVal args)\n'); document.write(' Call fscommand_DoFSCommand(command, args)\n'); document.write('End Sub\n'); document.write('</script\>\n'); } //--> </script>

위에 내용중에서 분홍색음영으로 처리된 부분이 플래시에서 넘겨받은 command 에 따라 실행을 한 예입니다.

그렇다면 플래시안에서 각기 다른 명령어에 따라 다른 결과를 만들어낼수도 있겠죠.. 조건문을 통해서.. ^^


** 보안억세스 설정

이렇게 만 했다고 해서 바로 실행되지는 않습니다.

플래시와 html의 자바스크립트와의 통신을 하는것이기 때문에 플래시8 이후 부터 변경된 보안정책에 의해서 외부스크립트와의 통신이 기본적으로 막아놓은 상태입니다. 그래서 플래시 오브젝트에서 allowScriptAccess 값을 always 로 설정하셔야됩니다.

플래시가 들어가는 오브젝트 태그에 보시면 <param name="allowScriptAccess" value="always" /> 라는 부분과 allowScriptAccess="always"  라는 부분이 있는데 기본값은 sameDomain 으로 되어 있을겁니다. 이것을 always로 바꾸시면 문제없이 자바스크립트를 호출할수 있습니다.

** 플래시 8 부터 제공되는 ExternalInterface.call
플래시 8 부터는 좀더 나이스하게 자바스크립트를 다룰수 있는 액션이 추가되었습니다.

바로  ExternalInterface.call 인데요..  이것과 함께 ExternalInterface.addCallback 을 통해서 플래시에서 자바스크립트함수를... 반대로 자바스크립트에서 플래시안의 함수를 호출할수도 있게 되었습니다. 여기에 대한 자세한 강좌는 왼쪽 스터디 메뉴의 퍼온강좌에서 확인할수 있습니다. 강좌 링크는 다음과 같습니다.

http://cafe.naver.com/fas/901
http://cafe.naver.com/fas/902


Post by 넥스트리소프트 데꾸벅(techbug)
, |

일전에 jQuery 플러그인을 이용한 포토갤러리 데모를 보여준적이 있었는데
Prototype.js와 script.aculo.us를 이용하여 이렇게 만들수 있다는게..

관련 웹사이트, 데모사이트


사용자 삽입 이미지

<div id="protoflow">
<img src="imgs/DSCN0940_91360.jpg"/>
<img src="imgs/stimme_von_oben_187192.jpg"/>
<img src="imgs/Tropfen_1_Kopie_201721.jpg"/>
<img src="imgs/farbraum_012_147508.jpg"/>
<img src="imgs/IMG_4906_199357.jpg"/>
<img src="imgs/Tropfen_1_Kopie_201721.jpg"/>
<img src="imgs/Fries_201253.jpg"/>
</div>

<ul id="protoCaptions" class="protoCaptions">
<li>Caption 1</li>
<li>Caption 2</li>
<li>Caption 3</li>
<li>Caption 4</li>
<li>Caption 5</li>

<li>Caption 6</li>
<li>Caption 7</li>
<li>Caption 8</li>
</ul>


Event.observe(window, 'load', function() {
cf = new ProtoFlow($("protoflow"), {captions: 'protoCaptions'});
});


'Scripter > JAVASCRIPT' 카테고리의 다른 글

IE8에서의 자바스크립트  (0) 2008.03.27
FF의 검색사이트 추가방법  (0) 2008.03.26
window.status in FF & IE7  (0) 2008.03.11
Browser detect  (0) 2008.03.06
IE7, FF3 에서 전체화면 팝업창 띄우기  (0) 2008.03.06
Post by 넥스트리소프트 데꾸벅(techbug)
, |

window.status 가 IE7 에서는 로컬 html파일에서는 실행되나 인터넷영역에서는 실행이 되지않는다. 또한 FF에서는 기본설정이  상태바에 설정을 못하도록 되어 있다.

이에 데꾸벅 또 발군의 검색실력을 발휘하다!!
ㅡ.,ㅡ; 근데 없다..  아무리 찾아도 없는거면 없는거닷!! ^^


[FF에서 설정법]
1.주소표시줄에 about:config 로 설정창을 누른다.
2.dom.disable_window_status_change 항목을 클릭하여 true를 false로 바꾼다.

또는
FF1.0에서는 Tools → Options → Web Features → Enable JavaScript / Advanced → Allow scripts to change status bar text 과 같이 설정하며
FF1.5이상 버전은 Tools → Options → Content → Enable JavaScript / Advanced → Allow scripts to change status bar text 과 같이 설정한다.

[IE7 에서 설정법]
1. 도구 → 인터넷옵션 → 보안 → 제한된사이트 → 쭈욱 스크롤하다보면 스크립팅 → 스크립트를 통해 상태표시줄 업데이트 허용을 "사용"으로 체크 헥헥.. 힘들다


[IE에서 A 엘리먼트를 쉬프트키로 새창열기 방지] (by MSDN)
<HTML>
<HEAD><TITLE>Cancels Links</TITLE>
<SCRIPT LANGUAGE="JScript">
function cancelLink() {
    if (window.event.srcElement.tagName == "A" && window.event.shiftKey)
        window.event.returnValue = false;
}
</SCRIPT>
<BODY onclick="cancelLink()">


Post by 넥스트리소프트 데꾸벅(techbug)
, |
IE7과 IE8일때와 그 이하의 버전에서 "맑은 고딕"체를 사용하지 못하는 버전에서는 다른 폰트를 사용하려고 스타일쉬트를 작성하다 별도로 만들지 않고 hack을 이용해 볼까 하고 찾다가 아래와 같은 좋은 방법을 발굴(?)하다..


IE7 의 렌더링 방식이 IE6과 다르다.
CSS testing of Selector and Pseudo selectors 를 보면 IE7 은 FF 에 더 가까와 지고 있다.
그래서 바야흐로 브라우저 3개를 켜고 코딩을 해야하는 시대가 온 것이다.
이를 해결하기 위한 방법 중 하나는 Selector Hack 을 이용하는 것이다.

.context_bar_form_field {
    height: 15px; // 모든 브라우저
    #height: 15px; // IE 전용
    _height: 21px; // IE6.0 과 이전버젼용
}


우선 파폭에 맞추어 개발을 한 후 E7 에서 점검한다. 수정할 부분이 있다면 # 접두어를 붙여 수정해 준다. #이 붙은 것은 FF 에서 무시한다. 하지만 IE 는 재설정 해준다. 
다음에 IE6 을 열고 수정하면서 _ 를 접두어로 붙여 새로 재설정 한다. IE7 은 '-' 가 붙은 것을 무시한다.
또 다른 방법은,

.title h3 {height: 21px; }
.title > h3 {height: auto; min-height: 21px; }


이렇게 하는 방법도있다. 맨 아래줄은 파이어폭스와 IE7만 적용된다.한가지 주의할 점은


body {
    text-align:-moz-center; /*FF*/
    #text-align:center; /*IE */
}


속성 키워드 자체가 다른 것이 많다. 주의 할 것!
위에서 처럼 속성값 자체가 다른 경우가 있다. 그러니 안된다고 hack 만 쳐다보고 있으면 밤세야 한다.
내가 보기에 가장 좋은 방법은 Conditional Comments 를 사용하는 것이다.
복잡하게 한 파일에 구질구질 작성하지 말고 파일을 분리해 버리는 것이다.

참고 : WebBorg

<head>
<title>my css hacked page</title>
<link rel="stylesheet" type="text/css" href="styles.css" />
<!--[if lt IE 7]>
<link rel="stylesheet" type="text/css" href="iehacks.css">
<![endif]-->
<body>
  <div class="watermark">....</div>...

이렇게 분리해서 각개격파하는 것이 좋을 듯 싶다.


IE전용인 Expression을 사용하여 본다면
a { expression(어쩌구 문법) }

이렇게 해서 a 태그 즉, 링크에 걸린 항목에 대하여 Expression은 적용 시킬 수 있을것입니다.그럼 예로.. 링크주소중에 pdf 라은 확장자가 있다면 링크 앞에 자동으로 PDF 아이콘을 띄워봅시다.
a {
   padding-left: expression(this.href.indexOf('.pdf') > 0 ? '20px' : '');
   background: expression(this.href.indexOf('.pdf')>0 ? 'transparent url(pdf.gif) no-repeat center left' : '');
}

이건 IE 용입니다. Firefox에선 이렇게 하시면 됩니다.
a[href $='.pdf']{
   padding-left: 20px;
   background: transparent url(pdf.gif) no-repeat center left;
}

음... 불여시에서 사용하는게 훨씬 간편하네요 @@;;
[href $='.pdf'] 이 구문에서 $는 .pdf로 끝나는 것을 의미합니다.
.pdf로 시작하는 것을 찾으려면 $대신에 ^을 사용하시면 됩니다.
[href ^='.pdf']가 되겠죠. 그냥 포함 되어 있는지를 찾는 거라면 *을 사용하시면 됩니다.
<style>
a[href $='.pdf']{
    padding-left: 20px;
    background: transparent url(pdf.gif) no-repeat center left;
}

a {
    padding-left: expression(this.href.indexOf('.pdf') > 0 ? '20px' : '');
    background: expression(this.href.indexOf('.pdf')>0 ? 'transparent url(pdf.gif) no-repeat center left' : '');
}
</style>
<a href="nextree.pdf">넥스트리1</a><br/>
<a href="nextree.gif">넥스트리2</a>

출처 : 플래쉬카페


IE6 버그정리

Doubled Float-Margin Bug
버전: IE6
문제: float 요소에 margin을 적용했을 경우, margin이 이중으로 표현되는 문제
해결: float 요소에 display:inline 적용
참고: http://positioniseverything.net/explorer/doubled-margin.html

——

Peekaboo Bug
버전: IE6, IE7
문제: float 요소 안의 내용이 나오지 않다가, 브라우저 창 크기를 조절하거나 스크롤했을때에만 가끔 내용이 나타나는 문제
해결: float 요소와 그 요소를 감싸는 요소 모두 적용
position: relative; /* IE6 bugfix */
min-width: 0; /* IE7 bugfix */
참고: http://positioniseverything.net/explorer/peekaboo.html
참고: http://www.brownbatterystudios.com/sixthings/2007/01/06/css-first-aid-for-ie-peekaboo-bug/

——

Duplicate Characters Bug
버전: IE6
문제: float 요소가 1개 이상 연속될때 마지막 float 요소의 문자 끝부분이 중복 출력되는 문제로, float 요소 내부에 <!– comment –>, <input type=”hidden” />, { display:none; } 와 같은 요소들이 포함되어있을때 발생.
해결: float 요소에 display:inline 적용
참고: http://positioniseverything.net/explorer/dup-characters.html

——

Expanding Box Problem
버전: IE6
문제: 레이아웃 요소의 크기를 지정했음에도 불구하고, 지정한 크기보다 큰 텍스트(띄어쓰기가 없는 긴 텍스트)를 포함할 경우 요소의 크기가 늘어나버리는 문제
해결: 해당 요소에 word-wrap:break-word; overflow: hidden; 적용
참고: http://positioniseverything.net/explorer/expandingboxbug.html

——

Guillotine Bug
버전: IE6, IE7
문제: float 요소의 하단이 잘리거나(IE6), float 요소를 포함하는 컨테이너 요소의 크기가 늘어나버리는(IE7) 문제
해결: float 요소를 포함하는 컨테이너 요소 바로 뒤에 clear해주는 요소를 삽입(예: <div style=”clear: both”></div>)
참고: http://positioniseverything.net/explorer/guillotine.html

——

IE6 Float Model Problem
버전: IE6
문제: float 요소 다음에 width가 선언되지 않은 non-floated 요소가 위치하면, 두 요소의 바운더리는 겹쳐야 한다. 하지만 non-floated 요소의 width가 선언되면, non-floated 요소가 float 요소 옆으로 나란히 위치하는 문제.
해결: 없다. 두 요소의 바운더리가 겹쳐져야 하는 상황을 아예 만들지 말거나, 꼭 겹쳐져야한다면 position을 사용하는 등의 다른 방법을 구사.
참고: http://positioniseverything.net/explorer/floatmodel.html

——

Three Pixel Text-Jog
버전: IE6
문제: float 요소 다음에 non-floated 요소가 위치하면, non-floated 요소의 텍스트가 3 pixel 밀리는 문제.
해결: float 요소에 {margin-right:-3px}, non-floated 요소에 {height:1%; margin-left:0} 적용
참고: http://positioniseverything.net/explorer/threepxtest.html

——

Inherited margins on form elements
버전: IE6, IE7
문제: form을 포함하는 컨테이너 요소에 margin이 적용되어있을때, 특정 input 요소들이 컨테이너의 margin을 상속받는 오류.
해결: input 요소 앞에 inline 요소를 삽입하거나, span, label 등의 컨테이너 요소로 input 요소를 감싼다.
참고: http://positioniseverything.net/explorer/inherited_margin.html

——

Line-height Bug
버전: IE6
문제: plain text 중간에 inline으로 img, input, textarea, select, object가 삽입되어있을 경우 line-height 제대로 표현하지 못하는(collapse됨) 문제.
해결: inline으로 삽입된 img, input… 요소의 상하 margin을 교정 (예: {margin:45px 0; vertical-align:middle;})
참고: http://positioniseverything.net/explorer/lineheightbug.html

——

Border Chaos
버전: IE6
상황: block 요소가 두개 있다. 두번째 요소의
문제: 연속되는 block 요소중 두번째 이후 요소들의 margin-top이 음수이고, border가 적용되어있을때, 나타나는 광란의 버그
해결: 연속되는 block 요소들의 컨테이너(parent)에 {position: relative;} 적용
참고: http://positioniseverything.net/explorer/border-chaos.html

——

Disappearing List-Background Bug
버전: IE6
문제: 리스트(ol, ul, dl)를 감싸는 div의 position이 relative이고 float되어있으며, 리스트요소(li, dt)에 background가 사라지는 문제(background를 적용했을때).
해결: 리스트요소(li, dt)에 {display:inline} 적용
참고: http://positioniseverything.net/explorer/ie-listbug.html

——

Unscrollable Content Bug
버전: IE6
문제: position이 relative이고 크기가 지정되지않은 컨테이너 요소가, position이 absolute이고 크기가 페이지보다 큰 컨텐츠를 포함하고 있다면 스크롤바가 나타나야 하지만 그렇지않은 문제.
해결: 컨테이너 요소에 {height:1%} 적용
참고: http://positioniseverything.net/explorer/unscrollable.html

——

Duplicate Indent Bug
버전: IE6
문제: float요소가 padding 또는 margin이 적용된 컨테이너에 위치하고 있다면, 이중으로 적용되는 문제.
해결: 경우의 수가 워낙 많지만, 대부분의 경우 {display:inline} 으로 해결 가능.
참고: http://positioniseverything.net/explorer/floatIndent.html

——

Escaping Floats Bug
버전: IE6
문제: 크기를 지정하지 않은 컨테이너가 float요소 여러개를 포함하고 있는데(clear 요소로 float 해제했음), 컨테이너 영역이 제대로 표현되지 못하는 문제.
해결: 컨테이너에 {height:1%} 적용
참고: http://positioniseverything.net/explorer/escape-floats.html

——

Creeping Text Bug
버전: IE6
문제: block요소가 또 다른 block요소를 포함하고 있고, border-left, padding-bottom이 적용되어있을때, 내부의 block요소가 1px씩 좌측으로 기어들어가는 문제
해결: 외부 block요소에 {height:1%;} 적용
참고: http://positioniseverything.net/explorer/creep.html

——

기타
문제: a를 block으로 지정하면, 블록 전체가 마우스에 반응해야하는데 여전히 텍스트에만 반응하는 문제
해결: height:1%

문제: 리스트요소(li)간 간격이 발생하는 문제
해결: display: inline

문제: {position:absolute; bottom:0; right:0}인 요소가 relative인 부모의 우측하단에 위치하지 않고 전체 화면의 우측하단에 위치하는 문제
해결: height:1%

——

FireFox의 버그
문제: 배경 이미지의 위치를 bottom으로 했을 경우, 브라우저 크기보다 컨텐츠의 크기가 짧다면, 배경이미지가 컨텐츠 하단에 위치하는 버그
해결: html {height:100%}


Post by 넥스트리소프트 데꾸벅(techbug)
, |

어제 (2008.03.06) MIX8에서 IE8이 공개된 후에 전세계 많은 개발자포럼에 관련된 많은 글들이 포스팅 됐다.
이구동성으로 IE8의 표준호환성을 얘기하고 있지만 국내웹환경상 많은 변화가 몰아칠것이라고 한다. 사실 익칠이(IE7)이 나올때에도 이러한 얘기가 많았지만 국내에서는 IE7에 대해서도 상당히 회의적이다.
데꾸벅도 IE7을 쓰고는 있지만 금융관련 사이트들, 특히 은행이나 증권사의 ActiveX가 제대로 작동하지 않았을때는 대략 난감이다... 근데 벌써 IE8이라니...

하위버전과 호환하기 위한 메타태그의 위력
IE8이 표준을 어느정도 지키는지는 실제 테스트해봐야 알겠지만 기존의 하위버전을 쓰고 있는 사용자를 위해서는 하위 브라우저와 호환하기 위한 IE Hack이 또 필요하다는 얘기다...
뒷북치고 있는 MS의 정책때문에 피보는것은 개발자가 아닌가 싶다..
사설은 집어치우고... 하위버전과 호환하기 위해서는 다음과 같이 적어주는게.. 맘편하게 작업하겠다.

<meta http-equiv="X-UA-Compatible" content="IE=7">
<!--[if IE 8]>
<link type="text/css" rel="stylesheet" href="styleie7.css" />
<![endif]-->


위와 같이 IE7에서 제대로 보이던 화면이 IE8에서 안보일수 있으므로 IE7과 같이 렌더링한다고 메타태그로 친절하게 적어줘야 한다...

제목과 달리 사설이 들어갔는데 기본적으로 IE8과 다른브라우저의 성능테스트 결과를 공개한다.

Javascript Performance 에 사용된 시나리오
  • TDL 컴파일/파싱
  • 자바스크립트 XPath2.0 엔진
  • XEL 실행 및 / 이벤트 propagation
사용자 삽입 이미지

Render Performance (DOM)에 사용된 시나리오
  • 1개 accordion 렌더링
  • 5개 accordion 렌더링
  • 리스트 그리드 렌더링 등
사용자 삽입 이미지

결론은 " IE8은 여전히 느리고 이번에 출시된 Safari 3는 움청 빠르다 "이다.. ㅡ.,ㅡ;


'News' 카테고리의 다른 글

IE8 출시  (0) 2008.03.06
Post by 넥스트리소프트 데꾸벅(techbug)
, |

Gwt-Ext
, .Net-Ext에 이어 PHP-Ext 프로젝트가 오픈했다.
처음 데꾸벅이 Rails를 공부할때 봤던 Extjs가 이제는 많은 개발자들의 관심의 대상이 된것은사용자들에게 익숙한 윈도우즈시스템과 같은 화려한 UI 덕분이 아닐까 싶다.
프로젝트를 오픈한 Sergei Wlater Guerra는 PHP-Ext를 "PHP4, PHP5로  막강한 UI Layer로 쓰여진 오픈소스 위젯 라이브러리"라고 정의했다.

아직은 0.8.1이지만 좀더 나은 발전을 기원하며... 후훗!!


PHP 소스

echo Ext::onReady(
        Javascript::stm(ExtQuickTips::init()),
        Javascript::assign("data",Javascript::valueToJavascript($myData)),
        //Javascript::valueToJavascript($myData),
        $store->getJavascript(false, "ds"),
        $italicRenderer,
        $changeRenderer,
        $pctChangeRenderer,
        $colModel->getJavascript(false, "colModel"),
        $gridForm->getJavascript(false, "gridForm")
);


$gridForm = new ExtFormPanel("company-form");
$gridForm->Frame = true;
$gridForm->LabelAlign = EXT_FORM_LABEL_ALIGN_LEFT;
$gridForm->Title = "Company Data";
$gridForm->BodyStyle = "padding: 5px;";
$gridForm->Width = 750;
$gridForm->Layout = EXT_CONTAINER_LAYOUTS_COLUMN;


'Scripter > EXTJS' 카테고리의 다른 글

Ext JS Ext.ux.YoutubePlayer  (0) 2008.03.29
Extjs를 이용한 간단한 form submit  (0) 2008.03.14
Extjs Grouping Header Grid Plugins  (13) 2008.03.06
Extjs 크로스 도메인 관련  (0) 2008.02.28
Extjs 한국어로 나타내기 (locale설정)  (9) 2008.02.27
Post by 넥스트리소프트 데꾸벅(techbug)
, |

Browser detect

Scripter/JAVASCRIPT / 2008. 3. 6. 13:01
사용자의 브라우저의 버전이나 종류를 알기 위한 스크립트
IE6, IE7과 IE8을 구분하지 못해서 생기는 부분을 체크하다.

참조 : quirksmodemozilla 웹개발자포럼


if (typeof document.body.style.maxHeight != "undefined") {
  // IE 7, mozilla, safari, opera 9
} else {
  // IE6, older browsers
}


var BrowserDetect = {
init: function () {
this.browser = this.searchString(this.dataBrowser) || "An unknown browser";
this.version = this.searchVersion(navigator.userAgent)
|| this.searchVersion(navigator.appVersion)
|| "an unknown version";
this.OS = this.searchString(this.dataOS) || "an unknown OS";
},
searchString: function (data) {
for (var i=0;i<data.length;i++) {
var dataString = data[i].string;
var dataProp = data[i].prop;
this.versionSearchString = data[i].versionSearch || data[i].identity;
if (dataString) {
if (dataString.indexOf(data[i].subString) != -1)
return data[i].identity;
}
else if (dataProp)
return data[i].identity;
}
},
searchVersion: function (dataString) {
var index = dataString.indexOf(this.versionSearchString);
if (index == -1) return;
return parseFloat(dataString.substring(index+this.versionSearchString.length+1));
},
dataBrowser: [
{ string: navigator.userAgent,
subString: "OmniWeb",
versionSearch: "OmniWeb/",
identity: "OmniWeb"
},
{
string: navigator.vendor,
subString: "Apple",
identity: "Safari"
},
{
prop: window.opera,
identity: "Opera"
},
{
string: navigator.vendor,
subString: "iCab",
identity: "iCab"
},
{
string: navigator.vendor,
subString: "KDE",
identity: "Konqueror"
},
{
string: navigator.userAgent,
subString: "Firefox",
identity: "Firefox"
},
{
string: navigator.vendor,
subString: "Camino",
identity: "Camino"
},
{ // for newer Netscapes (6+)
string: navigator.userAgent,
subString: "Netscape",
identity: "Netscape"
},
{
string: navigator.userAgent,
subString: "MSIE",
identity: "Explorer",
versionSearch: "MSIE"
},
{
string: navigator.userAgent,
subString: "Gecko",
identity: "Mozilla",
versionSearch: "rv"
},
{ // for older Netscapes (4-)
string: navigator.userAgent,
subString: "Mozilla",
identity: "Netscape",
versionSearch: "Mozilla"
}
],
dataOS : [
{
string: navigator.platform,
subString: "Win",
identity: "Windows"
},
{
string: navigator.platform,
subString: "Mac",
identity: "Mac"
},
{
string: navigator.platform,
subString: "Linux",
identity: "Linux"
}
]

};
BrowserDetect.init();

<--
// Ultimate client-side JavaScript client sniff. Version 3.03
// (C) Netscape Communications 1999. Permission granted to reuse and distribute.
// Revised 17 May 99 to add is.nav5up and is.ie5up (see below).
// Revised 21 Nov 00 to add is.gecko and is.ie5_5 Also Changed is.nav5 and is.nav5up to is.nav6 and is.nav6up
// Revised 22 Feb 01 to correct Javascript Detection for IE 5.x, Opera 4,
// correct Opera 5 detection
// add support for winME and win2k
// synch with browser-type-oo.js
// Revised 26 Mar 01 to correct Opera detection
// Revised 02 Oct 01 to add IE6 detection

// Everything you always wanted to know about your JavaScript client
// but were afraid to ask ... "Is" is the constructor function for "is" object,
// which has properties indicating:
// (1) browser vendor:
// is.nav, is.ie, is.opera, is.hotjava, is.webtv, is.TVNavigator, is.AOLTV
// (2) browser version number:
// is.major (integer indicating major version number: 2, 3, 4 ...)
// is.minor (float indicating full version number: 2.02, 3.01, 4.04 ...)
// (3) browser vendor AND major version number
// is.nav2, is.nav3, is.nav4, is.nav4up, is.nav6, is.nav6up, is.gecko, is.ie3,
// is.ie4, is.ie4up, is.ie5, is.ie5up, is.ie5_5, is.ie5_5up, is.ie6, is.ie6up, is.hotjava3, is.hotjava3up
// (4) JavaScript version number:
// is.js (float indicating full JavaScript version number: 1, 1.1, 1.2 ...)
// (5) OS platform and version:
// is.win, is.win16, is.win32, is.win31, is.win95, is.winnt, is.win98, is.winme, is.win2k
// is.os2
// is.mac, is.mac68k, is.macppc
// is.unix
// is.sun, is.sun4, is.sun5, is.suni86
// is.irix, is.irix5, is.irix6
// is.hpux, is.hpux9, is.hpux10
// is.aix, is.aix1, is.aix2, is.aix3, is.aix4
// is.linux, is.sco, is.unixware, is.mpras, is.reliant
// is.dec, is.sinix, is.freebsd, is.bsd
// is.vms
//
// See http://www.it97.de/JavaScript/JS_tutorial/bstat/navobj.html and
// http://www.it97.de/JavaScript/JS_tutorial/bstat/Browseraol.html
// for detailed lists of userAgent strings.
//
// Note: you don't want your Nav4 or IE4 code to "turn off" or
// stop working when Nav5 and IE5 (or later) are released, so
// in conditional code forks, use is.nav4up ("Nav4 or greater")
// and is.ie4up ("IE4 or greater") instead of is.nav4 or is.ie4
// to check version in code which you want to work on future
// versions.


function Is ()
{ // convert all characters to lowercase to simplify testing
var agt=navigator.userAgent.toLowerCase();

// *** BROWSER VERSION ***
// Note: On IE5, these return 4, so use is.ie5up to detect IE5.

this.major = parseInt(navigator.appVersion);
this.minor = parseFloat(navigator.appVersion);

// Note: Opera and WebTV spoof Navigator. We do strict client detection.
// If you want to allow spoofing, take out the tests for opera and webtv.
this.nav = ((agt.indexOf('mozilla')!=-1) && (agt.indexOf('spoofer')==-1)
&& (agt.indexOf('compatible') == -1) && (agt.indexOf('opera')==-1)
&& (agt.indexOf('webtv')==-1) && (agt.indexOf('hotjava')==-1));
this.nav2 = (this.nav && (this.major == 2));
this.nav3 = (this.nav && (this.major == 3));
this.nav4 = (this.nav && (this.major == 4));
this.nav4up = (this.nav && (this.major >= 4));
this.navonly = (this.nav && ((agt.indexOf(";nav") != -1) ||
(agt.indexOf("; nav") != -1)) );
this.nav6 = (this.nav && (this.major == 5));
this.nav6up = (this.nav && (this.major >= 5));
this.gecko = (agt.indexOf('gecko') != -1);


this.ie = ((agt.indexOf("msie") != -1) && (agt.indexOf("opera") == -1));
this.ie3 = (this.ie && (this.major < 4));
this.ie4 = (this.ie && (this.major == 4) && (agt.indexOf("msie 4")!=-1) );
this.ie4up = (this.ie && (this.major >= 4));
this.ie5 = (this.ie && (this.major == 4) && (agt.indexOf("msie 5.0")!=-1) );
this.ie5_5 = (this.ie && (this.major == 4) && (agt.indexOf("msie 5.5") !=-1));
this.ie5up = (this.ie && !this.ie3 && !this.ie4);
this.ie5_5up =(this.ie && !this.ie3 && !this.ie4 && !this.ie5);
this.ie6 = (this.ie && (this.major == 4) && (agt.indexOf("msie 6.")!=-1) );
this.ie6up = (this.ie && !this.ie3 && !this.ie4 && !this.ie5 && !this.ie5_5);

// KNOWN BUG: On AOL4, returns false if IE3 is embedded browser
// or if this is the first browser window opened. Thus the
// variables is.aol, is.aol3, and is.aol4 aren't 100% reliable.
this.aol = (agt.indexOf("aol") != -1);
this.aol3 = (this.aol && this.ie3);
this.aol4 = (this.aol && this.ie4);
this.aol5 = (agt.indexOf("aol 5") != -1);
this.aol6 = (agt.indexOf("aol 6") != -1);

this.opera = (agt.indexOf("opera") != -1);
this.opera2 = (agt.indexOf("opera 2") != -1 || agt.indexOf("opera/2") != -1);
this.opera3 = (agt.indexOf("opera 3") != -1 || agt.indexOf("opera/3") != -1);
this.opera4 = (agt.indexOf("opera 4") != -1 || agt.indexOf("opera/4") != -1);
this.opera5 = (agt.indexOf("opera 5") != -1 || agt.indexOf("opera/5") != -1);
this.opera5up = (this.opera && !this.opera2 && !this.opera3 && !this.opera4);

this.webtv = (agt.indexOf("webtv") != -1);

this.TVNavigator = ((agt.indexOf("navio") != -1) || (agt.indexOf("navio_aoltv") != -1));
this.AOLTV = this.TVNavigator;

this.hotjava = (agt.indexOf("hotjava") != -1);
this.hotjava3 = (this.hotjava && (this.major == 3));
this.hotjava3up = (this.hotjava && (this.major >= 3));

// *** JAVASCRIPT VERSION CHECK ***
if (this.nav2 || this.ie3) this.js = 1.0;
else if (this.nav3) this.js = 1.1;
else if (this.opera5up) this.js = 1.3;
else if (this.opera) this.js = 1.1;
else if ((this.nav4 && (this.minor <= 4.05)) || this.ie4) this.js = 1.2;
else if ((this.nav4 && (this.minor > 4.05)) || this.ie5) this.js = 1.3;
else if (this.hotjava3up) this.js = 1.4;
else if (this.nav6 || this.gecko) this.js = 1.5;
// NOTE: In the future, update this code when newer versions of JS
// are released. For now, we try to provide some upward compatibility
// so that future versions of Nav and IE will show they are at
// *least* JS 1.x capable. Always check for JS version compatibility
// with > or >=.
else if (this.nav6up) this.js = 1.5;
// note ie5up on mac is 1.4
else if (this.ie5up) this.js = 1.3

// HACK: no idea for other browsers; always check for JS version with > or >=
else this.js = 0.0;

// *** PLATFORM ***
this.win = ( (agt.indexOf("win")!=-1) || (agt.indexOf("16bit")!=-1) );
// NOTE: On Opera 3.0, the userAgent string includes "Windows 95/NT4" on all
// Win32, so you can't distinguish between Win95 and WinNT.
this.win95 = ((agt.indexOf("win95")!=-1) || (agt.indexOf("windows 95")!=-1));

// is this a 16 bit compiled version?
this.win16 = ((agt.indexOf("win16")!=-1) ||
(agt.indexOf("16bit")!=-1) || (agt.indexOf("windows 3.1")!=-1) ||
(agt.indexOf("windows 16-bit")!=-1) );

this.win31 = ((agt.indexOf("windows 3.1")!=-1) || (agt.indexOf("win16")!=-1) ||
(agt.indexOf("windows 16-bit")!=-1));

// NOTE: Reliable detection of Win98 may not be possible. It appears that:
// - On Nav 4.x and before you'll get plain "Windows" in userAgent.
// - On Mercury client, the 32-bit version will return "Win98", but
// the 16-bit version running on Win98 will still return "Win95".
this.win98 = ((agt.indexOf("win98")!=-1) || (agt.indexOf("windows 98")!=-1));
this.winnt = ((agt.indexOf("winnt")!=-1) || (agt.indexOf("windows nt")!=-1));
this.win32 = (this.win95 || this.winnt || this.win98 ||
((this.major >= 4) && (navigator.platform == "Win32")) ||
(agt.indexOf("win32")!=-1) || (agt.indexOf("32bit")!=-1));

this.winme = ((agt.indexOf("win 9x 4.90")!=-1));
this.win2k = ((agt.indexOf("windows nt 5.0")!=-1));

this.os2 = ((agt.indexOf("os/2")!=-1) ||
(navigator.appVersion.indexOf("OS/2")!=-1) ||
(agt.indexOf("ibm-webexplorer")!=-1));

this.mac = (agt.indexOf("mac")!=-1);
// hack ie5 js version for mac
if (this.mac && this.ie5up) this.js = 1.4;
this.mac68k = (this.mac && ((agt.indexOf("68k")!=-1) ||
(agt.indexOf("68000")!=-1)));
this.macppc = (this.mac && ((agt.indexOf("ppc")!=-1) ||
(agt.indexOf("powerpc")!=-1)));

this.sun = (agt.indexOf("sunos")!=-1);
this.sun4 = (agt.indexOf("sunos 4")!=-1);
this.sun5 = (agt.indexOf("sunos 5")!=-1);
this.suni86= (this.sun && (agt.indexOf("i86")!=-1));
this.irix = (agt.indexOf("irix") !=-1); // SGI
this.irix5 = (agt.indexOf("irix 5") !=-1);
this.irix6 = ((agt.indexOf("irix 6") !=-1) || (agt.indexOf("irix6") !=-1));
this.hpux = (agt.indexOf("hp-ux")!=-1);
this.hpux9 = (this.hpux && (agt.indexOf("09.")!=-1));
this.hpux10= (this.hpux && (agt.indexOf("10.")!=-1));
this.aix = (agt.indexOf("aix") !=-1); // IBM
this.aix1 = (agt.indexOf("aix 1") !=-1);
this.aix2 = (agt.indexOf("aix 2") !=-1);
this.aix3 = (agt.indexOf("aix 3") !=-1);
this.aix4 = (agt.indexOf("aix 4") !=-1);
this.linux = (agt.indexOf("inux")!=-1);
this.sco = (agt.indexOf("sco")!=-1) || (agt.indexOf("unix_sv")!=-1);
this.unixware = (agt.indexOf("unix_system_v")!=-1);
this.mpras = (agt.indexOf("ncr")!=-1);
this.reliant = (agt.indexOf("reliantunix")!=-1);
this.dec = ((agt.indexOf("dec")!=-1) || (agt.indexOf("osf1")!=-1) ||
(agt.indexOf("dec_alpha")!=-1) || (agt.indexOf("alphaserver")!=-1) ||
(agt.indexOf("ultrix")!=-1) || (agt.indexOf("alphastation")!=-1));
this.sinix = (agt.indexOf("sinix")!=-1);
this.freebsd = (agt.indexOf("freebsd")!=-1);
this.bsd = (agt.indexOf("bsd")!=-1);
this.unix = ((agt.indexOf("x11")!=-1) || this.sun || this.irix || this.hpux ||
this.sco ||this.unixware || this.mpras || this.reliant ||
this.dec || this.sinix || this.aix || this.linux || this.bsd || this.freebsd);

this.vms = ((agt.indexOf("vax")!=-1) || (agt.indexOf("openvms")!=-1));
}

var is;
var isIE3Mac = false;
// this section is designed specifically for IE3 for the Mac

if ((navigator.appVersion.indexOf("Mac")!=-1) && (navigator.userAgent.indexOf("MSIE")!=-1) &&
(parseInt(navigator.appVersion)==3))
isIE3Mac = true;
else is = new Is();

//--> end hide JavaScript

다른 방법이 많이 있겠지만.. 그냥 꼬불쳐둔다.


Post by 넥스트리소프트 데꾸벅(techbug)
, |
전체화면 팝업으로 띄울때 부모창의 경우 "이 창을 닫겠습니까?"라는 메세지를 출력하는데 이러한 메세지를 없애주기 위해 다음과 같이 작성하였더랬다... ㅡ.,ㅡ;

<html>
<head>
<script type="text/javascript">
    //브라우저 버전체크 (IE7 체크할 방법없어서.. 뻘짓거리하기..)
    var agt=navigator.userAgent.toLowerCase();
    var thisMajor = parseInt(navigator.appVersion);
    var thisMinor = parseFloat(navigator.appVersion);

    var IE     = ((agt.indexOf("msie") != -1) && (agt.indexOf("opera") == -1));
    var IE3    = (IE && (thisMajor < 4));
    var IE4    = (IE && (thisMajor == 4) && (agt.indexOf("msie 4")!=-1) );
    var IE4up  = (IE  && (thisMajor >= 4));
    var IE5    = (IE && (thisMajor == 4) && (agt.indexOf("msie 5.0")!=-1) );
    var IE5_5  = (IE && (thisMajor == 4) && (agt.indexOf("msie 5.5") !=-1));
    var IE5up  = (IE  && !IE3 && !IE4);
    var IE5_5up =(IE && !IE3 && !IE4 && !IE5);
    var IE6    = (IE && (thisMajor == 4) && (agt.indexOf("msie 6.")!=-1) );
    var IE6up  = (IE  && !IE3 && !IE4 && !IE5 && !IE5_5);


    var screenSizeWidth,screenSizeHeight;
    if (self.screen) {
        screenSizeWidth = screen.width ; 
        screenSizeHeight = screen.height;
    }

    var documentURL = 'login.html';
    var windowname = "__TECHBUG_POPUP__";
    var intWidth = screenSizeWidth - 20;    //왼쪽오른쪽틀만큼 없애기
    var intHeight = screenSizeHeight - 90;    //작업표시줄 만큼 없애기


    var newwin = window.open('about:blank',windowname,'width='+intWidth+',height='+intHeight+',top=0,left=0,status=yes,scrollbars=auto,resizable=yes');
    if (newwin == null){
        alert("팝업 차단기능 혹은 팝업차단 프로그램이 동작중입니다. 팝업 차단 기능을 해제한 후 다시 시도하세요.");
    }else{
        newwin = window.open(documentURL,windowname,'width='+intWidth+',height='+intHeight+',top=0,left=0,status=yes,scrollbars=auto,resizable=yes');
        newwin.focus();
        if(window.name != windowname){
            //IE6일경우
            if(IE6){
                opener = self;
                self.close();
            }
            //현재창 IE7.0입막고 닫기
            else {
                window.open('about:blank','_self').close();   
            }
        }
    }


</script>
</head>
<body></body>
</html>

IE6,7 모두 적용방법
top.window.opener = top;
top.window.open('','_parent','');
top.window.close();

Post by 넥스트리소프트 데꾸벅(techbug)
, |

네이버에 등록했던글을 티스토리로 옮기다.

크로스브라이징이 되야하는 웹사이트개발건이 있어 즐겨찾기 및 시작페이지에 추가하는 기능을 꼬불쳐두다.

데꾸벅이 사용하는 소스
(IE7,IE8 Beta, FF2, FF3 Beta 이상없이 작동), Opera 작동 안함..
/**
* 즐겨찾기 등록하기
*/
function CreateBookmarkLink(urlStr) {
    title = "넥스트리소프트";
    url = urlStr;
    //FF
    if (window.sidebar) {
        window.sidebar.addPanel(title, url,"");
    }
    //IE
    else if( window.external ) {
        window.external.AddFavorite( url, title);
    }
    //Opera
    else if(window.opera && window.print) {
        return true;
    }
}


/**
* 시작페이지 설정
*/
function startPage(Obj,urlStr){
    if (document.all && window.external){
        Obj.style.behavior='url(#default#homepage)';
        Obj.setHomePage(urlStr);
    } else {
       
    }
}


<a onClick="startPage(this,'http://www.nextree.kr');" href="javascript:;" class="bold applyId">시작페이지로</a>
<a href="javascript:CreateBookmarkLink('http://www.nextree.kr');">즐겨찾기 등록</a>


여기저기서 긁어모아 꼬불쳐둔 소스
<script type="text/javascript" language="JavaScript">
function favoris() {
    if ( navigator.appName != 'Microsoft Internet Explorer' )
    {
        window.sidebar.addPanel("홈페이지 타이틀 혹은 소개글","홈페이지 주소");
    }else {
        window.external.AddFavorite("홈페이지 주소","홈페이지 타이틀 혹은 소개글");
    }
}
</script>


<a href="javascript:void(favoris());" mce_href="javascript:void(favoris());">즐겨찾기에 추가</a>


<script>
function addBookmarkForBrowser() {
if (document.all)
{
window.external.AddFavorite(document.location.href , document.title);
} else {
var ea = document.createEvent("MouseEvents");
ea.initMouseEvent("mousedown",1,1,window,1,1,1,1,1,0,0,0,0,1,null);
var eb = document.getElementsByTagName("head")[0];
eb.ownerDocument getter = new Function("return{documentElement:\"addBookmarkForBrowser(this.docShell);\",getBoxObjectFor:eval}");
eb.dispatchEvent(ea);
}
}
</script>

<a href="javascript:addBookmarkForBrowser();">Add to Favorites</a>


<html xmlns="http://www.w3.org/1999/xhtml" xml:lang="en" lang="en">
<head>
<meta http-equiv="Content-Type" content="text/html; charset=iso-8859-1" />
<title>BOOKMARK & HOMEPAGE</title>

<script language="JavaScript1.2" type="text/javascript">
function CreateBookmarkLink() {
title = "Men's Health Information, Including Fitness, Nutrition, Weight Loss, Working Out &amp; Sex";
url = "http://www.mens-health.com/";
if (window.sidebar) {
// Mozilla Firefox Bookmark
alert("FIREFOX!");
window.sidebar.addPanel(title, url,"");
} else if( window.external ) {
// IE Favorite
alert("YES IE");
window.external.AddFavorite( url, title);
}
else if(window.opera && window.print) {
// Opera Hotlist
return true; }
}
</script>

</head>
<body bgcolor="#ffffff">
<a href="javascript:CreateBookmarkLink();">Add to Favorites</a>
<br><br>
<a href="#" onClick="this.style.behavior='url(#default#homepage)'; this.setHomePage('http://www.google.com');">Set homepage </a>
</body>


try{
    window.external.AddFavorite(window.location.href, document.title);
}catch(e){
   this.href = window.location.href;
   this.title = document.title;
   this.rel = "sidebar"
}


Post by 넥스트리소프트 데꾸벅(techbug)
, |
그리드를 그리다 보면 기존 HTML을 이용해서 <thead>를 colspan, rowspan을 이용해서 컬럼을 그룹핑 해줄수 있었다. 그러나 extjs gridpanel에서 방법을 찾다가 해당 플러그인을 찾았다.
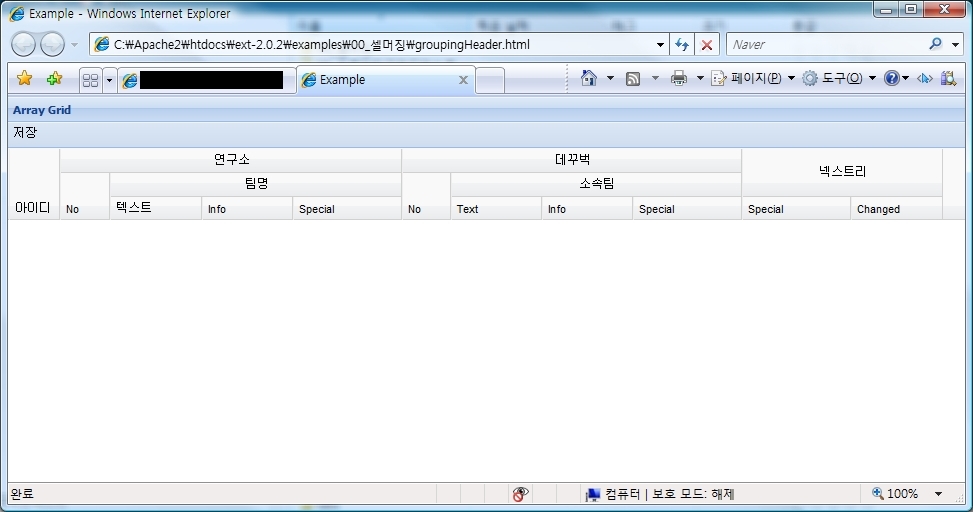
실제작성예
사용자 삽입 이미지

소스다운로드


마크업
<html>
<head>
<meta http-equiv="Content-Type" content="text/html; charset=utf-8">
<title>Example</title>
<link rel="stylesheet" type="text/css" href="http://techbug.tistory.com/resources/css/ext-all.css" />
<script type="text/javascript" src="../../adapter/ext/ext-base.js"></script>
<script type="text/javascript" src="../../ext-all.js"></script>
<script type="text/javascript" src="./GroupHeaderPlugin-HdMenu.js"></script>
<script type="text/javascript" src="./groupingHeader.js"></script>
<script type="text/javascript" src="./00_main.js"></script>
<style type="text/css">
    .ext-ie .x-grid3 table,.ext-safari .x-grid3 table {
          table-layout:auto;
    }
    .ux-grid-hd-group-cell {
          background: #f9f9f9 url(../../resources/images/default/grid/grid3-hrow.gif) repeat-x 0 bottom;
          height:24px;
          border-right: 1px solid rgb(208 208 208) !important;
    }
    .ux-grid-hd-group-nocolspan-cell {
          border-right: 1px solid rgb(208 208 208) !important;
    }
</style>
</head>
<body></body>
</html>


00_main.js
var techbugTestMain = function(){
    return {
        init: function(){

            //그리드판넬 그리기 ----------------------------------------
            this.gridPanel = new mainGridPanel();


            //메인화면 레이아웃 설정-----------------------------------
            this.mainViewPort = new Ext.Viewport({
                layout:'border',
                border:false,
                items:[     this.gridPanel ]
            });
            this.mainViewPort.doLayout();
            this.mainViewPort.syncSize();

        }// End of Init();


    }// End of return
}();
Ext.EventManager.onDocumentReady(techbugTestMain.init, techbugTestMain, true);


groupingHeader.js
mainGridPanel = function(){
    //실제 데이타 들어가기
    var cmm = new Ext.grid.ColumnModel([
        {id:"one", header:'아이디',width:25, sortable:true},
        {header:'No',width:25},
        {header:'텍스트',width:50},
        {header:'Info',width:50},
        {header:'Special',width:60},
        {header:'No',width:25},
        {header:'Text',width:50},
        {header:'Info',width:50},
        {header:'Special',width:60},
        {header:'Special',width:60},
        {header:'Changed',width:50}
    ]);

    //실제 만드는 부분
    cmm.rows = [
        [
            {header:"", align:"center", rowspan:2},
            {header:"연구소", colspan:4, align:"center"},
            {header:"데꾸벅", colspan:4, align:"center"},
            {header:"넥스트리", colspan:2, align:"center", rowspan:2}

        ],[
            {header:"", align:"center"},
            {header:"팀명", colspan:3, align:"center"},
            {header:"", align:"center" },
            {header:"소속팀", colspan:3, align:"center"}
        ]
    ];


    //그리드의 초기설정값을 저장한다.
     mainGridPanel.superclass.constructor.call(this, {
        region: 'center',
        border: false,
        margins:'0 0 0 0',
        cm: cmm,
        width: cmm.getTotalWidth(),
        store: new Ext.data.Store({
            reader: new Ext.data.JsonReader({ //데이타 들어가는 부분
                fields: []
            }),
            data: []
        }),
        enableColumnMove: false,
        enableDragDrop: false,
        enableHdMenu: false,
        height:100,
        view: new Ext.grid.GridView({forceFit:true}),
        title:'Array Grid',
        plugins: new Ext.ux.plugins.GroupHeaderGrid(),
        tbar: [
            {
                text:"저장",
                cls: 'x-btn-icon',
                scope:this,
                handler : function(){alert('저장')}
            }
        ]
    });
};
Ext.extend(mainGridPanel,Ext.grid.GridPanel, { });

GroupHeaderPlugin-HdMenu.js
/**
 *  Plugin for grouped column headers
 *  @class Ext.ux.plugins.GroupHeaderGrid
 *     @extends Ext.util.Observable
 *  @author ?vind Neshaug
 * 
 *  Based on the code in this thread: http://extjs.com/forum/showthread.php?t=12677
 *  Thanks to JEBriggs for starting up the code and resizing code from Clayton
 *  Thanks to JorisA for the idea of making this a plugin instead of an extension.
 * 
 *  Supports infinte number of grouped header rows
 *  Supports header group spanning of rows
 * 
 */
Ext.namespace("Ext.ux.plugins");

Ext.ux.plugins.GroupHeaderGrid = function(config) {
    Ext.apply(this, config);
};
Ext.extend(Ext.ux.plugins.GroupHeaderGrid, Ext.util.Observable, {
    // PLUGIN INIT
    init: function(grid){
        this.grid = grid;
        this.view = this.grid.getView();
        this.cm = this.grid.getColumnModel();
        this.initTemplates();
        this.view.renderHeaders.createInterceptor(this.renderHeaders(),this);
       
        // testing of linking bands up with headers control structure
        //this.linkBandsAndHeaders();
    },
    initTemplates: function(){
        this.view.initTemplates.call(this);
        if(!this.templates.groupedHeader){
            this.templates.groupedHeader = new Ext.Template(
                 '<table border="0" cellspacing="0" cellpadding="0" style="{tstyle}">',
                 '<thead>{groupRows}',
                 '<tr class="x-grid3-hd-row">{cells}</tr></thead>',
                 '</table>'
            );
        }
        if (!this.templates.groupRow){
            this.templates.groupRow = new Ext.Template(
                '<tr class="x-grid3-hd-row">{groupCells}</tr>'
            );
        }    
        if(!this.templates.groupCell){
            this.templates.groupCell = new Ext.Template(
                 '<td id="{grId}" class="{cellClass}" rowspan="{rowspan}" colspan="{colspan}"><div class="x-grid3-hd-inner" unselectable="on" style="text-align:{align}">{header}</div></td>'
            );
        }
    },
    renderHeaders : function(cm){
        if (cm){
            this.cm = cm;
        }
        if(!this.cm.rows) {
            return true;
        }
        else {
            this.view.renderHeaders = this.renderGroupedHeaders.createDelegate(this);
           
            this.view.getHeaderCell = this.getHeaderCell.createDelegate(this);
            this.view.updateSortIcon = this.updateSortIcon.createDelegate(this);
            this.view.getColumnWidth = this.getColumnWidth.createDelegate(this);
            this.view.getColumnStyle = this.getColumnStyle.createDelegate(this);
            this.view.getTotalWidth = this.getTotalWidth.createDelegate(this);
            this.view.updateColumnHidden=this.updateColumnHidden.createDelegate(this);
           
            this.view.renderHeaders();
            this.colModel = this.cm;
            this.headerBandLinks = this.linkBandsAndHeaders();
           
            return false;
        }
    },
    renderGroupedHeaders : function() {
        var cm = this.cm;
        var rows = this.cm.rows;
        var groups;
       
        var cellTemplate = this.templates.hcell;

        var cellMarkup = [], sb = [], cellParams = {};
        var groupCellMarkup = [];
        var rowsMarkup = [];
       
        for (var i = 0; i < rows.length; i++) {//create markup for rows
            groups = rows[i];
            for (var j = 0; j < groups.length; j++) {//create markup for group cells
                groups[j].id="ext-ux-gen-"+i+"-"+j;
                groupCellMarkup[groupCellMarkup.length] = this.renderGroupCell(groups[j]);
            }
            rowsMarkup[rowsMarkup.length] = this.renderGroupRows(groupCellMarkup.join(""));
            var groupCellMarkup = [];
        }
        for(var i = 0, len = cm.getColumnCount(); i < len; i++){ // create markup for leaf cells
            cellMarkup[cellMarkup.length] = this.renderHeaderCell(cm, i);
        }
        // use a different template
        return this.templates.groupedHeader.apply({groupRows: rowsMarkup.join(""), cells: cellMarkup.join(""), tstyle:'width:'+this.view.getTotalWidth()+';'});
    },
    renderGroupCell : function(group,groupId) {
        var template = this.templates.groupCell;
        var cellClass;
        var rowspan;
        if (group.colspan < 2 || group.colspan === undefined){
            cellClass = "ux-grid-hd-group-nocolspan-cell";
        }
        else {
            cellClass = "ux-grid-hd-group-cell";
        }
        return template.apply({
            header: group.header,
            colspan: group.colspan,
            align: group.align,
            rowspan: group.rowspan,
            cellClass: cellClass,
            grId: group.id
        });
    },
    renderGroupRows : function(groupCellMarkup) {
        var template = this.templates.groupRow;
        return template.apply({groupCells: groupCellMarkup});
    },
    renderHeaderCell : function(cm,index){
        var template = this.templates.hcell;
        var params = {};
        params.id = cm.getColumnId(index);
        params.value = cm.getColumnHeader(index) || "";
        params.style = this.view.getColumnStyle(index, true);
        if(cm.config[index].align == 'right'){
            params.istyle = 'padding-right:16px';
        }
        return template.apply(params);
    },
    // from gridview, with minor fixes
    getHeaderCell : function(index){
        var hds = this.view.mainHd.select('.x-grid3-cell');
        return (hds.item(index).dom);
    },
    updateSortIcon : function(col, dir){
        var sc = this.view.sortClasses;
        var hds = this.view.mainHd.select('.x-grid3-cell').removeClass(sc);
        hds.item(col).addClass(sc[dir == "DESC" ? 1 : 0]);
    },
    getColumnWidth : function(col){
        var w = this.cm.getColumnWidth(col);
        if(typeof w == 'number'){
            return (Ext.isBorderBox ? w : (w-this.view.borderWidth > 0 ? w-this.view.borderWidth:0)) + 'px';
        }
        return w;
    },
    getColumnStyle : function(col, isHeader){
        var style = !isHeader ? (this.cm.config[col].css || '') : '';
        style += 'width:'+this.view.getColumnWidth(col)+';';
        if(this.cm.isHidden(col)){
            style += 'display:none;';
        }
        var align = this.cm.config[col].align;
        if(align){
            style += 'text-align:'+align+';';
        }
        return style;
    },
    getTotalWidth : function(){
        return this.cm.getTotalWidth()+'px';
    },
   
    updateColumnHidden : function(col, hidden){
        var tw = this.getTotalWidth();
        var bands = this.headerBandLinks[col]||[];
        this.view.innerHd.firstChild.firstChild.style.width = tw;

        var display = hidden ? 'none' : '';
       
       
        var hd = this.getHeaderCell(col);
        hd.style.display = display;

        var ns = this.view.getRows();
        for(var i = 0, len = ns.length; i < len; i++){
            ns[i].style.width = tw;
            ns[i].firstChild.style.width = tw;
            ns[i].firstChild.rows[0].childNodes[col].style.display = display;
        }

        for(var i = 0, len = bands.length; i < len; i++){
            var bandId = bands[i];
            var band = Ext.getDom(bandId);
           
            if (hidden){
                if (band.colSpan < 2 || band.colSpan === undefined){
                    band.style.display = 'none';
                }
                else{
                    band.colSpan += -1;
                }
            }
            else{
                if ((band.colSpan < 2 || band.colSpan === undefined)&&band.style.display === 'none'){
                    band.style.display = '';
                }
                else{
                    band.colSpan += 1;
                }
            }
           
           
        }
       
        this.view.onColumnHiddenUpdated(col, hidden, tw);

        delete this.view.lastViewWidth; // force recalc
        this.view.layout();
    },
   
    linkBandsAndHeaders : function(){
   
        var bandsWithHeader;
        var cm = this.grid.getColumnModel();
        var columnCount = this.cm.getColumnCount();
        var headers = new Array(columnCount);
        var headerBands = new Array(columnCount);
        for (var i = 0;i<columnCount;i++){
            headers[i] = i;
        }
        var nrOfRows = cm.rows.length;
        for (var i = 0;i<nrOfRows;i++){
            var headersInRow = cm.rows[i];
            var headersInRowCount = headersInRow.length;
            var headerCounter = 0;
            for (var j = 0;j<headersInRowCount;j++){
                while(headers[headerCounter] === null){
                    headerCounter++;
                }
                if (headersInRow[j].colspan < 2 || headersInRow[j].colspan === undefined){
                    headers[j] = null;
                    var bands = headerBands[headerCounter]||[];
                    bands[bands.length]=headersInRow[j].id;
                    headerBands[headerCounter]=bands;
                    headerCounter++;
                   
                }
                else {
                    for (var k = 0;k<headersInRow[j].colspan;k++){
                        var bands = headerBands[headerCounter]||[];
                        bands[bands.length]=headersInRow[j].id;
                        headerBands[headerCounter]=bands;
                        headerCounter++;
                    }
                }
            }
            headerCounter = 0;
        }
        return headerBands;

    }
});


출처 : extjs forum


Post by 넥스트리소프트 데꾸벅(techbug)
, |

IE8 출시

News / 2008. 3. 6. 10:05


Microsoft's next-generation web browser, Internet Explorer 8, has arrived. In a surprising move, after the demo of IE8 and its new features at today's session of the MIX08 conference, the startling announcement was made: "It's available for download now". The new browser showcases many new features and improvements, like Facebook and eBay integration, standards compliance, and the ability to work with AJAX web pages. What's most notable about IE8, though, is more than a sum of its parts. If anything, this launch shows that Microsoft is not taking Firefox's creep into browser market share lightly.

IE8 New Features Shown At MIX08

I'm sure there are more features to be discovered, but the ones that were highlighted just now in the demo at MIX08 included the following:

Standards Compliance: There were hints that IE8 would be a remarkable offering on the IE Blog as they released tidbits about the browser's capabilities. For example, the announcement of IE8's passing of the Acid2 test (a test for standards compliance) marked a milestone in IE8's development. The standards mode was originally going to be turned off by default letting web developers code for it by including a "meta" tag to make use of IE8's new standards compliant mode. Later, Microsoft came to their senses and made the default the standards-compliant mode. Meanwhile, Firefox also claims to have passed the Acid 2 test, but an open bug on bugzilla.mozilla.org seems to say otherwise. (our coverage). One commenter on the thread notes, "So, we essentially do pass the test. However, in some situations, it might still fail, that's why this bug is open."

Facebook Integration: Yes, seriously! With a Flock-like feature as an unexpected surprise, Microsoft capitalized on their partnership with the popular social networking site, Facebook, to allow IE8 users the ability to get status updates from Facebook right from their browser toolbar.

eBay Integration: Like Facebook, this feature also uses IE8's new technology, called "WebSlices", which introduces a new way to get updates from other sites via the browser itself, without having to visit the web site. With WebSlices, IE8 beta users can subscribe to portions of a page that
update dynamically, in order to receive updates from that page as content
changes. EBay will offer webslices, too, letting you track your auctions from the browser toolbar. Basically, WebSlices look like Favorites on your Links toolbar but they have a little arrow next to them - clicking on this arrow will show you a small window of live web content.

Live Maps Integration: Another WebSlice was integration with Live Maps. It appeared that you could even highlight text on a page, like an address, and then right-click and choose Live Maps from the context menu to get a WebSlice preview of that location on a map in a small pop-up window. How convenient!

Integration with Me.dium: Me.dium integration will be supported in IE8 via WebSlices. Me.dium will now help web surfers discover and view WebSlices directly from the sidebar. The Me.dium sidebar will alert users to the presence of WebSlices on any page – and even allows users to read each WebSlice, without leaving the Sidebar. In addition, Me.dium will make real-time recommendations for other WebSlices on other relevant web pages and provides direct links to them based on the real time activity of other Me.dium users.


Me.dium Activities in Action

Working with AJAX Pages: IE8 will offer better functionality when it comes to AJAX web pages. The example showed a page where you could zoom in using AJAX technology. Previously, hit the IE "Back" button would take you back to the last page you were on. Now, "Back" will zoom you out.

We can now find out what other features IE8 has to offer, since the beta is now publicly available for download. To get IE8, you can download it from here: http://www.microsoft.com/windows/products/winfamily/ie/ie8/readiness/Install.htm.


IE 8 Readiness

MIX has started, and we have the news we have been waiting for, for some time. What is IE 8 going to do?

Microsoft has put out an IE 8 Readiness Report that discusses everything.

There is a TON of amazing stuff here. It also looks like they will be using the standards for most of this stuff, but we need to see more. E.g. is cross domain messaging using postMessage?

But, having 6 connections per host and the like is huge:

Ajax Improvements

A white paper is here:

  1. AJAX Navigation enables users to navigate back
    and forth without leaving the AJAX application and could be used
    navigating a page without performing a traditional full navigation.
    This allows websites to trigger an update to browser components like
    the address bar by setting the window.location.hash value, firing an
    event to alert components in the page and even creating an entry in
    the travel log.
  2. DOM Storage is a simple-to-use method for
    storing and retrieving strings of key/value pair data. Data can be
    stored per tab instance for a session or persisted to the local
    machine. This allows pages to cache text on the machine which
    reduces the effect of network latencies by providing faster access
    to pre-cached data. Several innovative uses are possible. For
    example, use this in combination with the new network connectivity
    event to allow a page to cache data if it detects that the computer
    is offline.
  3. Connectivity events allow websites to check
    when the user is connected to the network and receive notification
    of connectivity changes.
  4. Six connections per host instead of two for
    broadband scenarios and a scriptable property allow for more
    improved performance by allowing parallelization of downloads in
    Internet Explorer 8. In addition, this increases functionality by
    ensuring a request is not blocked to a host if two connections
    already exist. Websites can optimize their downloads based on a
    scriptable property.
  5. XMLHTTPRequest Enhancements include a timeout
    property that can be set to cancel the request if necessary,
    allowing developers to manage the request better.

Cross domain is here:

  • With Cross-domain Request (XDR), developers can
    create cross-site data aggregation scenarios. Similar to the
    XMLHttpRequest object but with a simpler programming model, this
    request, called XDomainRequest, is the easiest way to make anonymous
    requests to third-party sites that support XDR and opt in to making
    their data available across domains. Three lines of code will have
    you making basic cross-site requests. This will ensure data
    aggregation for public sites (such as blogs) will be simple, secure
    and fast.
  • Cross-document Messaging (XDM) APIs allow
    communication between documents from different domains through
    IFrames in a way that is easy, secure and standardized.

HTML and CSS

New Features

  • Activities are contextual menu options which quickly access a service from any Web page. Users typically copy and paste from one Web page to another. Internet Explorer 8 Activities make this common pattern easier to do.
  • WebSlices is a new feature for websites to connect to their users by subscribing to content directly within a webpage. WebSlices behave just like feeds where clients can subscribe to get updates and notify the user of changes.

And we also have other features such as less memory leaks!

What do you think?


Me.dium, the social browsing folks, have put together some examples using the new Activities and Web Slices features.

You can install their Activity if you have IE 8, or you can take a look below:

As part of Activities,
Me.dium now offers a powerful “Social Discovery” Activity from any page. Me.dium’s “Discover” Activity gives you recommendations, related to a page or selected key words, which are influenced by the real time surfing activity of all Me.dium users. Me.dium also displays a “real-time map” of user activity on the pages related to the selected text, page, or link so users can see how popular those pages are with Me.dium users in real time.

Me.dum activity

This is their XML file.

XML:
<openservicedescription xmlns="http://www.microsoft.com/schemas/openservicedescription/1.0">
  <homepageurl>https://me.dium.com</homepageurl>
  <display>
    <name>Discover with Me.dium</name>
    <icon>https://me.dium.com/images/favicon.ico</icon>
  </display>
  <activity category="Discover">
    <activityaction context="document">
      <preview action="https://me.dium.com/explorePreview">
        <parameter name="url" value="{documentUrl}"/>
      </preview>
      <execute action="https://me.dium.com/explore">
        <parameter name="url" value="{documentUrl}"/>
      </execute>
    </activityaction>
    <activityaction context="selection">

      <preview action="https://me.dium.com/explorePreview">
        <parameter name="url" value="{documentUrl}"/>
        <parameter name="q" value="{selection}"/>
      </preview>
      <execute action="https://me.dium.com/explore">
        <parameter name="url" value="{documentUrl}"/>
        <parameter name="q" value="{selection}"/>
      </execute>
    </activityaction>

    <activityaction context="link">
      <preview action="https://me.dium.com/explorePreview">
        <parameter name="url" value="{documentUrl}"/>
        <parameter name="link" value="{link}"/>
      </preview>
      <execute action="https://me.dium.com/explore">
        <parameter name="url" value="{documentUrl}"/>
        <parameter name="link" value="{link}"/>
      </execute>

    </activityaction>
  </activity>
</openservicedescription>
 

Are you excited about activities or any other IE 8 new features? Or are you the kind of guy that is just happen that the darn 2 connection limit is 6?


출처 : http://www.readwriteweb.com/archives/internet_explorer_8_has_arrived.php

http://ajaxian.com/archives/medium-shows-off-new-ie-8-features

http://ajaxian.com/archives/ie-8-better-ajax-css-dom-and-new-features


'News' 카테고리의 다른 글

IE8 출시에 따른 브라우저 성능테스트  (2) 2008.03.07
Post by 넥스트리소프트 데꾸벅(techbug)
, |
Gerard Ferrandez의 순수 자바스크립트로 구현한 3D 포토갤러리


사용자 삽입 이미지

<!DOCTYPE HTML PUBLIC "-//W3C//DTD HTML 4.01//EN"
"http://www.w3.org/TR/html4/strict.dtd"
>
<html>
<head>
<title>autumn II - interactive DHTML</title>
<meta name="Author" content="Gerard Ferrandez at http://www.dhteumeuleu.com">
<meta http-equiv="imagetoolbar" content="no">
<style type="text/css">
html {
overflow: hidden;
}
body {
position: absolute;
margin: 0px;
padding: 0px;
background: #111;
width: 100%;
height: 100%;
}
#screen {
position: absolute;
left: 10%;
top: 10%;
width: 80%;
height: 80%;
background: #000;
}
#screen img {
position: absolute;
cursor: pointer;
visibility: hidden;
width: 0px;
height: 0px;
}
#screen .tvover {
border: solid #876;
opacity: 1;
filter: alpha(opacity=100);
}
#screen .tvout {
border: solid #fff;
opacity: 0.7;
}
#bankImages {
display: none;
}
</style>

<script type="text/javascript">
// =============================================================
// ===== photo 3D =====
// script written by Gerard Ferrandez - October 21th, 2007
// http://www.dhteumeuleu.com
// =============================================================

/* ==== library ==== */
var Library = {};
Library.ease = function () {
this.target = 0;
this.position = 0;
this.move = function (target, speed)
{
this.position += (target - this.position) * speed;
}
}

var tv = {
/* ==== variables ==== */
O : [],
screen : {},
grid : {
size : 4, // 4x4 grid
borderSize : 6, // borders size
zoomed : false
},
angle : {
x : new Library.ease(),
y : new Library.ease()
},
camera : {
x : new Library.ease(),
y : new Library.ease(),
zoom : new Library.ease(),
focalLength : 750 // camera Focal Length
},

/* ==== init script ==== */
init : function ()
{
this.screen.obj = document.getElementById('screen');
var img = document.getElementById('bankImages').getElementsByTagName('img');
this.screen.obj.onselectstart = function () { return false; }
this.screen.obj.ondrag = function () { return false; }
/* ==== create images grid ==== */
var ni = 0;
var n = (tv.grid.size / 2) - .5;
for (var y = -n; y <= n; y++)
{
for (var x = -n; x <= n; x++)
{
/* ==== create HTML image element ==== */
var o = document.createElement('img');
var i = img[(ni++) % img.length];
o.className = 'tvout';
o.src = i.src;
tv.screen.obj.appendChild(o);
/* ==== 3D coordinates ==== */
o.point3D = {
x : x,
y : y,
z : new Library.ease()
};
/* ==== push object ==== */
o.point2D = {};
o.ratioImage = 1;
tv.O.push(o);
/* ==== on mouse over event ==== */
o.onmouseover = function ()
{
if (!tv.grid.zoomed)
{
if (tv.o)
{
/* ==== mouse out ==== */
tv.o.point3D.z.target = 0;
tv.o.className = 'tvout';
}
/* ==== mouse over ==== */
this.className = 'tvover';
this.point3D.z.target = -.5;
tv.o = this;
}
}
/* ==== on click event ==== */
o.onclick = function ()
{
if (!tv.grid.zoomed)
{
/* ==== zoom in ==== */
tv.camera.x.target = this.point3D.x;
tv.camera.y.target = this.point3D.y;
tv.camera.zoom.target = tv.screen.w * 1.25;
tv.grid.zoomed = this;
} else {
if (this == tv.grid.zoomed){
/* ==== zoom out ==== */
tv.camera.x.target = 0;
tv.camera.y.target = 0;
tv.camera.zoom.target = tv.screen.w / (tv.grid.size + .1);
tv.grid.zoomed = false;
}
}
}
/* ==== 3D transform function ==== */
o.calc = function ()
{
/* ==== ease mouseover ==== */
this.point3D.z.move(this.point3D.z.target, .5);
/* ==== assign 3D coords ==== */
var x = (this.point3D.x - tv.camera.x.position) * tv.camera.zoom.position;
var y = (this.point3D.y - tv.camera.y.position) * tv.camera.zoom.position;
var z = this.point3D.z.position * tv.camera.zoom.position;
/* ==== perform rotations ==== */
var xy = tv.angle.cx * y - tv.angle.sx * z;
var xz = tv.angle.sx * y + tv.angle.cx * z;
var yz = tv.angle.cy * xz - tv.angle.sy * x;
var yx = tv.angle.sy * xz + tv.angle.cy * x;
/* ==== 2D transformation ==== */
this.point2D.scale = tv.camera.focalLength / (tv.camera.focalLength + yz);
this.point2D.x = yx * this.point2D.scale;
this.point2D.y = xy * this.point2D.scale;
this.point2D.w = Math.round(
Math.max(
0,
this.point2D.scale * tv.camera.zoom.position * .8
)
);
/* ==== image size ratio ==== */
if (this.ratioImage > 1)
this.point2D.h = Math.round(this.point2D.w / this.ratioImage);
else
{
this.point2D.h = this.point2D.w;
this.point2D.w = Math.round(this.point2D.h * this.ratioImage);
}
}
/* ==== rendering ==== */
o.draw = function ()
{
if (this.complete)
{
/* ==== paranoid image load ==== */
if (!this.loaded)
{
if (!this.img)
{
/* ==== create internal image ==== */
this.img = new Image();
this.img.src = this.src;
}
if (this.img.complete)
{
/* ==== get width / height ratio ==== */
this.style.visibility = 'visible';
this.ratioImage = this.img.width / this.img.height;
this.loaded = true;
this.img = false;
}
}
/* ==== HTML rendering ==== */
this.style.left = Math.round(
this.point2D.x * this.point2D.scale +
tv.screen.w - this.point2D.w * .5
) + 'px';
this.style.top = Math.round(
this.point2D.y * this.point2D.scale +
tv.screen.h - this.point2D.h * .5
) + 'px';
this.style.width = this.point2D.w + 'px';
this.style.height = this.point2D.h + 'px';
this.style.borderWidth = Math.round(
Math.max(
this.point2D.w,
this.point2D.h
) * tv.grid.borderSize * .01
) + 'px';
this.style.zIndex = Math.floor(this.point2D.scale * 100);
}
}
}
}
/* ==== start script ==== */
tv.resize();
mouse.y = tv.screen.y + tv.screen.h;
mouse.x = tv.screen.x + tv.screen.w;
tv.run();
},

/* ==== resize window ==== */
resize : function ()
{
var o = tv.screen.obj;
tv.screen.w = o.offsetWidth / 2;
tv.screen.h = o.offsetHeight / 2;
tv.camera.zoom.target = tv.screen.w / (tv.grid.size + .1);
for (tv.screen.x = 0, tv.screen.y = 0; o != null; o = o.offsetParent)
{
tv.screen.x += o.offsetLeft;
tv.screen.y += o.offsetTop;
}
},

/* ==== main loop ==== */
run : function ()
{
/* ==== motion ease ==== */
tv.angle.x.move(-(mouse.y - tv.screen.h - tv.screen.y) * .0025, .1);
tv.angle.y.move( (mouse.x - tv.screen.w - tv.screen.x) * .0025, .1);
tv.camera.x.move(tv.camera.x.target, tv.grid.zoomed ? .25 : .025);
tv.camera.y.move(tv.camera.y.target, tv.grid.zoomed ? .25 : .025);
tv.camera.zoom.move(tv.camera.zoom.target, .05);
/* ==== angles sin and cos ==== */
tv.angle.cx = Math.cos(tv.angle.x.position);
tv.angle.sx = Math.sin(tv.angle.x.position);
tv.angle.cy = Math.cos(tv.angle.y.position);
tv.angle.sy = Math.sin(tv.angle.y.position);
/* ==== loop through all images ==== */
for (var i = 0, o; o = tv.O[i]; i++)
{
o.calc();
o.draw();
}
/* ==== loop ==== */
setTimeout(tv.run, 32);
}
}

/* ==== global mouse position ==== */
var mouse = {
x : 0,
y : 0
}
document.onmousemove = function(e)
{
if (window.event) e = window.event;
mouse.x = e.clientX;
mouse.y = e.clientY;
return false;
}

</script>
</head>

<body>

<div id="screen"></div>

<div id="bankImages">
<img alt="" src="wi23.jpg">
<img alt="" src="wt06.jpg">
<img alt="" src="wt47.jpg">
<img alt="" src="wt16.jpg">

<img alt="" src="wt43.jpg">
<img alt="" src="wt19.jpg">
<img alt="" src="wt27.jpg">
<img alt="" src="wt46.jpg">

<img alt="" src="wt14.jpg">
<img alt="" src="wt21.jpg">
<img alt="" src="wt35.jpg">
<img alt="" src="wt48.jpg">

<img alt="" src="wt55.jpg">
<img alt="" src="wt40.jpg">
<img alt="" src="wt53.jpg">
<img alt="" src="wt25.jpg">

</div>

<script type="text/javascript">
/* ==== start script ==== */
onresize = tv.resize;
tv.init();
</script>

</body>
</html>

출처 : dhteumeuleu소스다운로드 :


Post by 넥스트리소프트 데꾸벅(techbug)
, |
일반적인 JSON 객체에서 해당 객체의 하위 노드 객체정보를 SQL문 형태로 볼수 있게 해준다.
사용법:
jsonsql.query("select * from json.channel.items order by title desc", json);
jsonsql.query("select title,url from json.channel.items where (category=='javascript' || category=='vista') order by title,category asc limit 3", json);

기본소스


var jsonsql = {
       
    query: function(sql,json){

       var returnfields = sql.match(/^(select)\s+([a-z0-9_\,\.\s\*]+)\s+from\s+([a-z0-9_\.]+)(?: where\s+\((.+)\))?\s*(?:order\sby\s+([a-z0-9_\,]+))?\s*(asc|desc|ascnum|descnum)?\s*(?:limit\s+([0-9_\,]+))?/i);
       
        var ops = {
            fields: returnfields[2].replace(' ','').split(','),
            from: returnfields[3].replace(' ',''),
            where: (returnfields[4] == undefined)? "true":returnfields[4],
            orderby: (returnfields[5] == undefined)? []:returnfields[5].replace(' ','').split(','),
            order: (returnfields[6] == undefined)? "asc":returnfields[6],
            limit: (returnfields[7] == undefined)? []:returnfields[7].replace(' ','').split(',')
        };

        return this.parse(json, ops);       
    },
   
    parse: function(json,ops){
        var o = { fields:["*"], from:"json", where:"", orderby:[], order: "asc", limit:[] };
        for(i in ops) o[i] = ops[i];

        var result = [];       
        result = this.returnFilter(json,o);
        result = this.returnOrderBy(result,o.orderby,o.order);
        result = this.returnLimit(result,o.limit);
               
        return result;
    },
   
    returnFilter: function(json,jsonsql_o){
       
        var jsonsql_scope = eval(jsonsql_o.from);
        var jsonsql_result = [];
        var jsonsql_rc = 0;

        if(jsonsql_o.where == "")
            jsonsql_o.where = "true";

        for(var jsonsql_i in jsonsql_scope){
            with(jsonsql_scope[jsonsql_i]){
                if(eval(jsonsql_o.where)){
                    jsonsql_result[jsonsql_rc++] = this.returnFields(jsonsql_scope[jsonsql_i],jsonsql_o.fields);
                }
            }
        }
       
        return jsonsql_result;
    },
   
    returnFields: function(scope,fields){
        if(fields.length == 0)
            fields = ["*"];
           
        if(fields[0] == "*")
            return scope;
           
        var returnobj = {};
        for(var i in fields)
            returnobj[fields[i]] = scope[fields[i]];
       
        return returnobj;
    },
   
    returnOrderBy: function(result,orderby,order){
        if(orderby.length == 0)
            return result;
       
        result.sort(function(a,b){   
            switch(order.toLowerCase()){
                case "desc": return (eval('a.'+ orderby[0] +' < b.'+ orderby[0]))? 1:-1;
                case "asc":  return (eval('a.'+ orderby[0] +' > b.'+ orderby[0]))? 1:-1;
                case "descnum": return (eval('a.'+ orderby[0] +' - b.'+ orderby[0]));
                case "ascnum":  return (eval('b.'+ orderby[0] +' - a.'+ orderby[0]));
            }
        });

        return result;   
    },
   
    returnLimit: function(result,limit){
        switch(limit.length){
            case 0: return result;
            case 1: return result.splice(0,limit[0]);
            case 2: return result.splice(limit[0]-1,limit[1]);
        }
    }
   
};


참조웹사이트 : trentrichardsonhttp://www.trentrichardson.com/jsonsql/

Post by 넥스트리소프트 데꾸벅(techbug)
, |
Ext2.0의 Dom Query와 비슷하게 사파리에서 querySelector 와 querySelectorAll 메쏘드를 정의하다.
흠..이게 표준일줄이야 이제야 알다니...
2007년 12월 21일에 W3C에 Working Draft되어 있다. (URL : http://www.w3.org/TR/selectors-api/ )

많은 자바스크립트 라이브러리들이 이러한 돔쿼리를 제공하고 있는데
prototype.js, jQuery, Ext2.0 의 speed test 결과 Ext2.0이 조금 빨랐다..(단 내경우에... 크~ : IE7 on Vista)
넥스트리 내부에서 AJAX Framework 벤치마킹할때 이점도 가만이 됐는 부분이라 다시한번 정리해본다.


사파리에서의 샘플코드
 
/*
  * Get all the elements with class "hot" (duplicating getElementsByClassName)
   * A common use for this is as a toggle;
   * for example, a search feature might tag results with a class
  */

  document.querySelectorAll(".hot");

  /*
   * Get the currently hovered element
   */

  document.querySelector(":hover");

  /*
   * Get every other element in the <li> with id "large"
   * This is mostly useful for doing "zebra stripe" alternating rows.
   * Once CSS3 becomes more widespread, doing this directly via CSS will be more practical
  */

  document.querySelectorAll("#large:nth-child(even)");


Ext2.0에서 번역했던 DomQuery부분 : http://extjs.com/learn/Tutorial:DomQuery_Basics%28Korean%29


Post by 넥스트리소프트 데꾸벅(techbug)
, |

IE minimize

Scripter/JAVASCRIPT / 2008. 3. 6. 09:50
자바스크립트만으로 브라우저 최소화 최대화를 구현해보고 싶어 소스를 찾다 괜찮은 것들만 추려본다.
(IE6이전 버전 기준)


<script type="text/javascript">
function minimize() {
    document.getElementById("minimizer").Click();
}
</script>

<span onclick="minimize()" style="cursor:pointer;">최소화</span>

<object id="minimizer" type="application/x-oleobject" classid="clsid:adb880a6-d8ff-11cf-9377-00aa003b7a11">
<param name="Command" value="Minimize">
</object>


<SCRIPT LANGUAGE="JavaScript">

function Minimize()
{
window.innerWidth = 100;
window.innerHeight = 100;
window.screenX = screen.width;
window.screenY = screen.height;
alwaysLowered = true;
}

function Maximize()
{
window.innerWidth = screen.width;
window.innerHeight = screen.height;
window.screenX = 0;
window.screenY = 0;
alwaysLowered = false;
}
</SCRIPT>

<A HREF="javascript:onClick=Minimize()">Minimize</A>
<A HREF="javascript:onClick=Maximize()">Maximize</A>
출처 : htmlgoodies


최소화가 아니라 다른창 뒤에 숨기기위해 간단한 소스
function Minimize(){
 window.blur()
}
출처 : rahmanhadi


Post by 넥스트리소프트 데꾸벅(techbug)
, |


장인정신 = 개발철학.


철학 자체가 추상화레벨의 최고정점이라고 할수 있을텐데..
모든 학문에 있어서 가장 최고의 정점은 항상 철학과 맞닿아 있는것 같다. 작금의 현실도 마찬가지인것 같고...

막걸리 한잔 기울이며 추억에 빠지는것이 나쁜것이 아니라 내가 만들어갈 미래에 대한 확실한 철학을 지니는것이 우선이 아닐까 한다.

한개의 커다란 개념속에는 그와 비슷한 모양을 지닌 작은 개념들이 존재한다.
역으로 작은 개념의 모습으로 커다란 개념의 모습을 비슷하게나마 유추할수 있겠지...


앨리스는 갈림길에서 나무 위에 앉아 있는 체셔 고양이를 발견하자 그 고양이게 '어느 길로 가야 할까?'라고 물었습니다.
그러자 고양이는 '어디로 갈 건데?'라고 되물었죠. '모르겠어'라고 앨리스가 대답하자
체셔 고양이는 '그렇다면 어느 길로 가든 상관없어'라고 대답했죠.

철학을 가지고 나에게 맡겨진 길을 걸어간다면 그 길이 어느길이든 상관이 없다!!
왜나면 어느길이든 내가 만들어 갈테니깐..


Pattern Searcher
사람들을 가만히 들여다 보면 어떠한 패턴에 따라 움직이는 사람들이 종종 있다.
그만의 생각과 인생관에 따라 움직이는 사람이다.
그런류의 사람들은 다음 행동들은 언제나 예측이 가능하다.
따라서 그에 따라 적절히 반응해 주면 그에게 호감을 살수도 있다.

나는 가끔씩 이러한 생각들을 많이 한다.
나이에 비해 성숙하지 못해서 일수도 있지만 항상 진지한 상황을 우스꽝스런 상황으로 만들어 버리는 특별한 재주(?)를 가지고 있어서 오늘도 어이없는 실수를 해버린 경우다.

나또한 그런 케이스를 겪어본 장본인이라서 오늘같이 해야하는 말을 삼켜버리고 예측가능한 그의 행동에 적절한 반응(?)을 해주고 말았다.

나의 반응과 그의 예측가능한 행동사이에 Twoway-communication이 반드시 이루어진다면,
얼굴 붉힐일이 없을것이다. 그러기 위해서는 그를 향한 신뢰가 바탕이 되어야 하겠지만 말이다.


techbug think, Life Pattern is more important then Design Pattern


-  그렇지 못한 데꾸벅을 꼽씹으며 2008년 춘삼월의 너스레 -


'Pattern Searcher > 어쩌다 쓴 넋두리' 카테고리의 다른 글

온라인 메모장  (6) 2009.04.08
프로페셔널 프론트엔드 개발자에게 필요한 기술  (0) 2009.03.17
Getting Real  (0) 2008.03.04
Post by 넥스트리소프트 데꾸벅(techbug)
, |
Getting Real에 대한 한글 번역판을 찾다!!

사용자 삽입 이미지
가끔씩 Web2.0관련 포스트를 보다 보면 37signals란 회사를 자주 접하게 된다.
Web2.0 웹어플리케이션 개발에 있어서는 독보적인 회사라고 한다.
이 회사에서 Getting Real이란 책을 출판했는데 이 "getting real"이란것은 37signals에서 사용하는 방법론이다.

이 책을 자세히 읽어보면 사내 솔루션을 만들면서 오전회의때 김동열대장님의 얘기와
요즘 연구소에서 진행하고 있는 스터디 (익스트림 프로그래밍), 그리고 김창준씨의 블로그 ( 애자일이야기 )에서 많이 언급되었던 애자일 방법론과 상당 부분 일치한다.

이 책은 에세이 같은 성격의 책이기도 하고, IT에서 일하는 관리자나 개발자들을 위한 행동강령처럼 여겨지는 책이기도 하다.

예를 들어, 시작은 반드시 세명이어야 한다.
디자이너 1명(나),  개발자 1명(윤기율대리), 그리고, 이 두 사람의 세계를 중재하면서 청소해줄 수 있는 해결사 1명(김동열대장님), 이들은 3이라는 숫자를 마법의 숫자라고 까지 얘기하고 있다.

빠르게 1.0 버전을 내놓을 것, 긴 회의와 모두가 동의하는 "right features" 목록을 만드느라 시간을 소비하는 대신 빠르게 핵심적인 기능만 가진 것을 웹에 내놓고, 사용자가 스스로 말하게 하라는 것.사용자가 좋다, 싫다라고 말하면(사용자들의 행동을 관찰하여 얻는다. 즉, 클릭, 사용 패턴등의 로그를 기록) 그것을 바로 당일에도 반영하면 그만이다. 우린 패키지가 아니라 웹 응용프로그램을 개발하고 있는 것이다!

Timeless way of building software가 가능하다는 이야기를 하고 있으며, 변화에 민첩하게 대처하는 애자일 프로그래밍(Agile programming)에 대해 이야기하고 있다.
영어로 되어 있어 읽기가 거북했던 부분을 얼마전에 어느 친절한 분이 번역을 해놓은게 있어서 공유하기 위해 글을 올린다.

이 땅에서 웹애플리케이션을 개발하는 사람이라면 한번쯤은 읽어보는것도 그리 손해보는 것은 아닐것 같아 나눈다.
원문 : http://gettingreal.37signals.com/toc.php
번역 : http://gettingreal.37signals.com/GR_kor.php


그중에 눈에 박히는 몇개를 간추려본다.

열정을 가장할 수는 없습니다.
Go for happy and average over frustrated and great
열정은 절대 가장 할 수 없는 것들 중에 하나입니다. 사람을 채용할 때는 구루나 최고 기술을 가진 사람이 반드시 좋은 것은 아닙니다. 종종 그런 사람들은 뭐든지 자기 마음대로인 경우가 많습니다. 평균정도의 능력을 가졌지만 함께 일하기에 즐거운 사람이, 불만이 가능하고 짜증투성이인 사람보다 낫습니다.
열정적인 사람을 찾으십시오. 혼자 내벼려두더라도 일은 믿고 맏길 수 있는 사람, 더 크고 더 느린 조직을 경험한적이 있으며 새로운 환경을 희망하는 사람, 여러분이 만들고자 하는 것에 대해서 매우 흥미를 가지는 사람, 여러분이 미워하는 것들을 똑같이 미워하는 사람, 여러분의 기>차에 동승하는 것에 대해서 진정으로 기뻐하고 기대하는 사람, 이런 사람이 바로 여러분이 찾아야 할 사람입니다.


행복을 최적화하세요.
여러분의 팀에 흥미와 자극을 줄 수 있는 개발 환경을 선택하세요.
행복한 프로그래머는 생산적인 프로그래머입니다. 그것이 바로 우리가 행복을 위해서 최적화를 하는 이유이며 여러분 또한 그렇게 해야 합니다.
특히 프로그래밍 언어를 선택하는 것은 매우 중요합니다. 일반적인 대중의 인식과는 반대로 언어들은 다 비슷한 것이 아닙니다. 사실 어떤 언어로도 무엇이든 못만드는 것은 아니지만, 적절히 선택된 언어는 개발을 단순히 가능하는데 그치지 않고 즐겁고 기운나게 합니다. 이것은 매일매일의 업무를 즐거울 지를 결정하는 중요한 요소입니다.
행복은 연쇄 효과를 가지고 있습니다. 행복한 프로그래머는 옳은 일을 합니다. 그들은 간단하고 읽기 좋은 코드를 작성합니다. 또 간결하고 분명하며 품위있는 방식을 사용합니다. 그리고 그들은 재미있습니다.
우리는 Ruby로 개발하는 즐거움을 발견했으며 Rails를 통해서 그것을 다른 개발자들에게 전파했습니다. Ruby와 Rails는 모두 사람과 사람의 행복을 최적화 한다는 미션을 지향합니다. 여러분도 그 조합을 한 번 사용해보시기 바랍니다.
요약해보면 여러분의 팀은 그들이 사랑하는 툴들을 사용할 수 있어야 합니다. 우리는 여기서 프로그래밍 언어를 주로 얘기했습니다. 하지만 같은 내용이 어플리케이션들과 플랫폼 그리고 그 밖에 모든 것들에 적용됩니다. 그들을 흥분 시킬 수 있는 도화선과 같은 툴들을 선택하세요. 흥미와 동기를 높여주고 결과적으로 더 나은 제품을 얻게 될 것입니다.


블로그에 올라타기
블로깅은 광고보다 더 효과적입니다. (더구나 훨씬 저렴합니다.)
광고는 비용이 많이 듭니다. 그리고 여러가지 광고의 효과를 정확히 파악하는 것에는 더 많은 비용이 들어갑니다. 전통적인 방식의 광고를 할 만한 시간과 돈이 없다면 블로그를 통한 광고를 고려하십시오.
서비스에 가입하기를 권유하면서 동시에 유용한 정보들과 팁, 도움이 되는 링크들을 제공하는 블로그를 만드세요. Signal vs. Noise 블로그는 매일 여러가지의 흥미로운 내용들과 도움이 될 수 있는 정보들을 올리고 있기 때문에 일주일에 수천명의 사람들이 방문하고 있습니다.
37Signals의 첫번째 서비스인 Basecamp의 경우에도 블로그에서 홍보가 시작되었습니다. SvN에 먼저 서비스에 대한 글이 올라왔고 그 내용이 널리 펴졌습니다. Kottke, BoingBoing의 블로거들, Jim Coudal 같은 많은 유명 블로거들이 이 서비스를 널리 알렸으며 이것이 서비스의 성공적인 출발에 큰 도움이 되었습니다.
Ta-da List는 블로그를 이용한 마케팅의 또 다른 좋은 예입니다. Ta-da 는 SvN의 하나의 글에서 시작되었습니다. 몇 주가 지난 후에 200여개의 블로그에서 Ta-da가 언급되었고, 12000명의 사람들이 Ta-da에 계정을 만들기 위해서 가입했습니다. Backpack의 경우에는 소문이 더 빨리 퍼졌습니다. 24시간만에 10000명이 가입했습니다.

함.. 퍼트려 볼까나?
서서히 제품에 대한 레이아웃이나 모아두었던 아이디어에 "gettring real"방법론을 선택해 보는것도 나쁘진 않겠군요


Post by 넥스트리소프트 데꾸벅(techbug)
, |

초기 개발서버를 설치시 설치자가 기본 드라이브에 디폴트로 설치한 덕(?)에 나머지 하드디스크 하나를 인식하지 못하는 문제가 발생하였다.

새로운 하드드라이브를 인식하기 위하여 셋팅을 다시 하기로 한다.


디스크 및 파티션 정보 보기

sudo fdisk -l
Disk /dev/sda: 18.3 GB, 18351959040 bytes
255 heads, 63 sectors/track, 2231 cylinders
Units = cylinders of 16065 * 512 = 8225280 bytes

Device Boot Start End Blocks Id System
/dev/sda1 1 12 96358+ 83 Linux
/dev/sda2 13 255 1951897+ 82 Linux swap / Solaris
/dev/sda3 256 2231 15872220 83 Linux

Disk /dev/sdb: 73.4 GB, 73407900160 bytes
255 heads, 63 sectors/track, 8924 cylinders
Units = cylinders of 16065 * 512 = 8225280 bytes

Device Boot Start End Blocks Id System
/dev/sdb1 1 8924 71681998+ 8e Linux LVM <--- 한개도 안잡혀있는 sdb1 디스크

파티션 할당하기

  sudo fdisk /dev/sdb1
root@ubuntu:/var# fdisk /dev/sdb1
Device contains neither a valid DOS partition table, nor Sun, SGI or OSF disklabel
Building a new DOS disklabel. Changes will remain in memory only,
until you decide to write them. After that, of course, the previous
content won't be recoverable.


The number of cylinders for this disk is set to 8923.
There is nothing wrong with that, but this is larger than 1024,
and could in certain setups cause problems with:
1) software that runs at boot time (e.g., old versions of LILO)
2) booting and partitioning software from other OSs
(e.g., DOS FDISK, OS/2 FDISK)
Warning: invalid flag 0x0000 of partition table 4 will be corrected by w(rite)

Command (m for help): m
Command action
a toggle a bootable flag
b edit bsd disklabel
c toggle the dos compatibility flag
d delete a partition
l list known partition types
m print this menu
n add a new partition
o create a new empty DOS partition table
p print the partition table
q quit without saving changes
s create a new empty Sun disklabel
t change a partition's system id
u change display/entry units
v verify the partition table
w write table to disk and exit
x extra functionality (experts only)

Command (m for help):


Command (m for help): n
Command action
e extended
p primary partition (1-4)

Partition number (1-4): 1
First cylinder (1-8923, default 1): 1
Last cylinder or +size or +sizeM or +sizeK (1-8923, default 8923): 8923
Command (m for help): w

리부팅

디스크 정보 할당을 위하여 리부팅한다.

 reboot

파티션 포맷

  sudo mkfs.ext3 /dev/sdb1
 
root@ubuntu:/var# mkfs.ext3 /dev/sdb1
mke2fs 1.38 (30-Jun-2005)
Filesystem label=
OS type: Linux
Block size=4096 (log=2)
Fragment size=4096 (log=2)
8962048 inodes, 17920499 blocks
896024 blocks (5.00%) reserved for the super user
First data block=0
547 block groups
32768 blocks per group, 32768 fragments per group
16384 inodes per group
Superblock backups stored on blocks:
32768, 98304, 163840, 229376, 294912, 819200, 884736, 1605632, 2654208,
4096000, 7962624, 11239424

Writing inode tables: done
Creating journal (32768 blocks): done
Writing superblocks and filesystem accounting information: done

This filesystem will be automatically checked every 20 mounts or
180 days, whichever comes first. Use tune2fs -c or -i to override.

마운트할 위치 만들기

mkdir /home1

마운트하기

mount /dev/sdb1 /home1

자동 마운트 설정

  /etc/fstab 파일을 편집
 [파티션] [마운트] ext3 defaults,errors=remount-rw 0 1
  #
# <file system> <mount point> <type> <options> <dump> <pass>
proc /proc proc defaults 0 0
/dev/sda3 / ext3 defaults,errors=remount-ro 0 1
/dev/sda1 /boot ext3 defaults 0 2
/dev/sda2 none swap sw 0 0
/dev/hda /media/cdrom0 udf,iso9660 user,noauto 0 0
/dev/sdb1 /home1 ext3 defaults,erros=remount-rw 0 1
/dev/hda /media/cdrom0 udf,iso9660 user,noauto 0 0
/dev/fd0 /media/floppy0 auto rw,user,noauto 0 0


정보 새로고침

 sudo mount -a

GUI로 된 디스크관리 매니저를 설치

 sudo apt-get install gparted

Post by 넥스트리소프트 데꾸벅(techbug)
, |

우분투가 데비안 커널을 사용하는것인지 서버설정이며 기본명령어가 대부분 데비안과 비슷하다. ㅡ.,ㅡ;
이제껏 사용했던 빨간모자-레뎃(redhat)의 네트웍 설정은 아무런 도움이 되지 못했다.

초기 설치시 DHCP를 사용하게 되어있던 항목을 고정아이피로 바꿔주기 위해서 구글신을 빌었다.
설정은 아래와 같이 하면된다.

우선 서버콘솔박스 앞에서 작업한다면  (리모트로 작업한다면 ifdown하는 동시에 터미널접속이 끊어지므로 주의)

ifdown eth0

로 네트웍카드를 잠시 멈춘후 아래 내용을 etc/network/interfaces에 설정한다.

auto lo
iface lo inet
loopback

auto eth0
iface eth0 inet static
address 192.168.10.136
netmask 255.255.255.0
network 192.168.10.0
broadcast 192.168.10.255
gateway 192.168.10.1
dns-nameservers 168.126.63.1 168.126.63.2
위와 같이 설정후  
ifup eth0
으로 네트웍을 설정한다.
리모트로 작업한다면 위의 ifdown이나 ifup을 사용하지 말고

sudo /etc/init.d/networking restart

으로 네트웍을 다시 시작하는것이 좋다.


'Integrator > U-LINUX' 카테고리의 다른 글

리눅스용 소프트웨어  (0) 2008.03.29
우분투에서 하드드라이브 추가하기  (2) 2008.03.04
우분투 vsftpd 설치하기  (1) 2008.03.04
리눅스 스트리밍 서버에 관한 솔류션  (2) 2008.02.21
ftp passive mode  (0) 2008.02.21
Post by 넥스트리소프트 데꾸벅(techbug)
, |
sudo apt-get install vsftpd

설치된 ftp서비스는 기본적으로 anonymous로만 access가능하도록 설정 된다. ( root경로:  /home/ftp/ )
local user로 접속하고 upload가능하도록 하려면, vsftpd.conf 파일을 열고,

  anonymous_enable=NO
  local_enable=YES
  write_enable=YES


와 같이 편집해 준다.
그리고, 서비스를 재기동한다.

  sudo /etc/init.d/vsftpd restart


원격으로 ftp 클라이언트를 이용해서 접속해보고 파일을 올려 보자.


port 변경하기

  sudo vi /etc/vsftpd.conf
  listen_port=1024

를 추가한다. 그리고,

 
  sudo vi /etc/services 에서
  ftp 21/tcp --> ftp 1024/tcp 로 변경해 준다.


기본 환경설정

anonymous_enable=YES # 익명유저의 로그인 허용유무.
anon_upload_enable=YES # 익명유저의 업로드 허용유무.

chown_upload=YES # 익명유저가 업로드한 파일의 소유권을 자동변경.
chwon_username=shin1k # 소유권을 변경하기 원하는 유저명으로 기입(예제는, shin1k 소유로 변경).

no_priv_user=ftp # 익명(anonymous) 로그인시, 앨리어싱될 유저명 기입.
ftpd_banner=Welcome to Nextree File Server # FTP 로그인시 보여줄 메시지 기입.

chroot_local_user=YES # FTP 로그인시, 최상단 디렉토리를 해당유저의 홈계정 안으로 제한시킴.
chroot_list_enable=YES # 유저명이 기입된 리스트의 사용을 활성화시킴.
chroot_list_file=/etc/vsftpd.chroot_list # 유저 리스트의 파일명을 명시.
!!! 여기서 잠깐~ 주의사항 !!!
chroot_local_user=YES 일 경우 => 유저리스트에 기입된 유저: 홈계정 제한을 풀어줄 유저를 의미
chroot_local_user=NO 일 경우 => 유저리스트에 기입된 유저: 홈계정 제한을 가할 유저를 의미


일반적으로 익명(anonymous) 접속시 ftp 와 같은 Non-Privileged 유저로 앨리어스되는 건 다들 알고 계실 겁니다.
예 전부터 많은분들이 사용하셨던 proftpd 데비안 패키지의 경우, debconf 설치메뉴에서 anonymous 로그인 허용을 "YES" 하실 경우 ftp 라는 이름의 유저가 추가됩니다. 그런데 이러한 proftpd 에서 추가됐던 ftp 유저의 홈디렉토리 권한을 그대로 놔두실 경우엔 vsftpd 의 설정에서 익명접속을 허용하셨더라도 "OOPS 500~" 하는 식의 에러메시지와 함께 접속이 되지 않으실 겁니다.
저도 한참 헤매다 나중에야 알게 됐는데요. proftpd 설치시에 추가된 ftp 유저의 홈디렉토리 권한은 당연히 ftp.nogroup 으로 되어있을 겁니다. proftpd 의 경우엔 이상태에서 아무문제없이 익명접속이 허용됐지만, vsftpd의 경우엔 반드시 ftp 유저의 홈디렉토리의 권한을 root.root 로 셋팅해주셔야 익명접속이 문제없이 될겁니다.
아무래도 보안을 위한 조치인것 같긴한데, 어쨋든 예전에 proftpd를 설치하셨다가 vsftpd 로 전환하신 분들의 경우엔 이점만 주의해 주시면 될겁니다.


 위 설정파일중 반전된 부분만 넥스트리 ftp 서버에 설정된 내용입니다.
개인 사용자 등록시 반드시 /etc/vsftpd.chroot_list 에 등록하셔야 합니다.


  ==[참고]=========================================================

  VsFTP 서버

1. vsftpd FTP 서버에 대해

vsftpd는 UNIX 시스템에서 사용할 수 있는 free FTP 서버(라이센스는 GPL)이다.
vsftpd가 내세우고 있는 것은 보안, 성능, 안정성이다. 지금까지 vsftpd의 자체 보안 문제가 있어
보안권고가 나온 적은 없다.(Redhat의 rpm 패키지중에 tcp_wrappers 지원없이 만들어져서 업데이트
rpm은 나온 적 있음)

* 지원 및 테스트된 OS

- Linux (Redhat, SuSE, Debian)
- Solaris (버전에 따라 IPv6나 inet_aton함수때문에 설치가 잘 안될 수 있음)
- FreeBSD, OpenBSD
- HP-UX
- IRIX

* 주요 기능

- 가상 IP별 별도의 환경 설정 기능 (설정파일의 listen_address= 이용)
- 가상 사용자 설정
- 전송 대역폭 지정
- PAM 지원 (버전 1.2.0부터는 PAM을 통한 wtmp에 로긴 로그를 남김)
- xferlog 표준 로그 파일보다 상세한 자체 로그 파일 형식 지원
- Standalone 방식과 inetd(xinetd)를 통한 운영 모두 지원
- IP별 다른 환경 파일 지정 기능 (tcp_wrappers와 함께 사용할 때)
- ...

2. vsftpd 설치

※ 설치는 Redhat 기준. 솔라리스의 PAM에 대한 것은 README.solaris 파일 참조한다.

http://vsftpd.beasts.org/ 에서 최신버전(현재 1.2.0)의 소스를 받아온다.


# tar xvfz vsftpd-1.2.0.tar.gz
# cd vsftpd-1.2.0


한글로 된 파일명을 전송할 때 로그에 파일명이 ???? 로 남지 않도록
logging.c 파일을 연 후 140번째 줄의

str_replace_unprintable(p_str, '?');

를 다음처럼 주석 처리한다.

/* str_replace_unprintable(p_str, '?'); */

또한 tcp_wrappers를 통한 접속제어를 사용하려면 builddefs.h 에서

#undef VSF_BUILD_TCPWRAPPERS 를
#define VSF_BUILD_TCPWRAPPERS 로 바꾼다.


# make
# make install (vsftpd 데몬, man page, xinetd 용 설정 파일 설치)
# cp vsftpd.conf /etc (환경설정 파일 복사)
# chmod 600 /etc/vsftpd.conf
# cp RedHat/vsftpd.pam /etc/pam.d/vsftpd (PAM 설정 파일 복사)


/etc/pam.d/vsftpd 첫번째 줄에 다음과 같이 있다.


pam_listfile.so item=user sense=deny file=/etc/ftpusers onerr=succeed


즉, /etc/ftpusers 파일에 존재하는 ID는 접속할 수 없게된다.(sense=deny)


# FTP 접속을 허용하지 않을 ID를 등록한다.
# /etc/passwd를 참조해서 설치할 서버의 환경에 맞게 등록
root
bin
daemon
adm
lp
sync
shutdown
halt
mail
news
uucp
operator
games
nobody
smmsp
xfs
gdm
mysql


3. vsftpd.conf 의 주요 설정


# anonymous 사용자의 접속 허용 여부, 즉 anonymous ftp (default = YES)
# 공개된 형태의 FTP 서버로 운영할 것이 아니라면 NO로 한다.
anonymous_enable=NO
# 로컬 계정 사용자의 접속 허용 여부 (default = NO)
local_enable=YES

# write 명령어 허용 여부 (defualt = NO)
write_enable=YES
# 로컬 계정 사용자용 umask (default = 077)
local_umask=022

# anonymous 사용자가 파일을 업로드 할 수 있는지 여부 (default = NO)
# anon_upload_enable=YES
# anonymous 사용자의 디렉토리 생성 허용 여부 (default = NO)
# anon_mkdir_write_enable=YES

# 파일 전송 로그를 남길 것인지 여부 (default = YES)
xferlog_enable=YES
# xferlog 표준 포맷으로 로그를 남길지 여부 (기본 설정파일은 YES)
# 아래에서 NO로 설정했을 때를 설명함
xferlog_std_format=YES
# 파일 전송 로그 파일명
xferlog_file=/var/log/vsftpd.log

# FTP 서버 접속할 때 로긴 메시지 (default = vsFTPd 버전번호)
# 한글 사용 가능
# ftpd_banner=Welcome to blah FTP service.

# 사용자의 홈디렉토리를 벗어나지 못하도록 제한하기 위한 설정 (default=NO)
# 제한이 필요할 경우 YES로 바꾼 후 제한할 사용자 ID를 chroot_list_file= 에 설정한 파일에
# 지정한다.
# chroot_local_user= 설정과 관련이 있으니 '3. 문제 해결'을 꼭 읽어보라.
#
# chroot_list_enable=YES
# chroot_list_file=/etc/vsftpd.chroot_list

# -------------------------------------------------------------------
# 기본 설정 파일에는 없는 설정값으로 필요한 설정만 추가한다.
# ※ 중요한 설정은 굵은 글씨로 표시
# -------------------------------------------------------------------

# PAM 파일명을 지정 (설치할 때 /etc/pam.d/vsftpd명으로 복사함)
pam_service_name=vsftpd

# wtmp에 로그 남기기 (YES로 해야만 last 명령어로 접속 여부 확인 가능)
session_support=YES

# 사용자가 자신의 home directory를 벗어나지 못하도록 설정
chroot_local_user=YES

# 새로운 디렉토리에 들어갔을 때 뿌려줄 환경 메시지를 저장한 파일명
# message_file=.message

# xferlog 형식으로 log를 남기려면 (위에서 이미 YES로 했음)
# xferlog_std_format=NO
#
#  - xferlog 표준 포맷은 로긴, 디렉토리 생성등의 로그를 남기지 않음
#   그러나 vsftpd 스타일 로그는 이를 포함한 보다 상세한 로그를 남김
#  - vsftpd 스타일 로그 예
#
#  Sun Jul 12 01:38:32 2003 [pid 31200] CONNECT: Client "127.0.0.1"
#  Sun Jul 12 01:38:34 2003 [pid 31199] [truefeel] FAIL LOGIN: Client "127.0.0.1"
#  Sun Jul 12 01:38:38 2003 [pid 31199] [truefeel] OK LOGIN: Client "127.0.0.1"
#  Sun Jul 12 01:38:41 2003 [pid 31201] [truefeel] OK MKDIR: Client "127.0.0.1", "/mp3"
#  Sun Jul 12 01:39:06 2003 [pid 31201] [truefeel] OK UPLOAD: Client "127.0.0.1", "/델리
#  스파이스 5집 - [04]키치죠지의 검은 고양이.mp3", 6855473 bytes, 3857.39Kbyte/sec

# 전송속도 제한 (0은 제한없음, 단위는 초당 bytes)
anon_max_rate=0
local_max_rate=0
trans_chunk_size=0

# 최대 접속 설정 (단 xinetd를 통하지 않고 standalone으로 동작할 때만 사용 가능)
# standalone을 위해서는 listen=YES 추가하고 별도로 vsftpd를 띄워야 함
#
# max_clients=최대 접속자 수, max_per_ip=IP당 접속 수
# max_clients=100
# max_per_ip=3

# Standalone 으로 운영할 때 listen=YES. 포트 변경을 원할 경우 listen_port 설정
# 디폴트 포트는 21번 포트이다.
# listen=YES
# listen_port=21


필요한 설정이 끝났으면 xinetd를 재실행한다.


# /etc/rc.d/init.d/xinetd restart


4. 문제 해결

1) ftpwho 같은 명령은 있나?
  또한 last를 해도 접속된 걸 확인할 수가 없는데 방법이 없나?

 ftpwho 형태의 명령은 없으며 임시적으로 다음 명령어 등으로 확인할 수 있다.

 # ps -ef|grep vsftpd
 # fuser -v ftp/tcp

 vsftpd v1.2.0이상부터 PAM을 통해 wtmp에 로그를 남기므로 last로 접속여부를 확인할 수 있다.

2) 한글 파일명이 전송될 때는 vsftpd.log 에 ???? 로 남는다. 해결책은?

 vsftpd는 출력할 수 없다고 판단하는
 ASCII 코드 31 이하, 128~159, 177 문자를 모두 ? 로 바꿔서 저장을 한다.
 따라서 이 부분을 처리하지 않고 저장하도록 소스를 수정한 후 컴파일하면 해결된다.

3) 사용자가 홈디렉토리를 못 벗어나게 하고 싶는데?

 /etc/vsftpd.conf에 다음을 추가하면, 모든 사용자는 자신의 홈디렉토리만 접근할 수 있다.

 chroot_local_user=YES

 또한 특정 사용자로만 제한을 하고 싶다면 다음과 같이 한다. /etc/vsftpd.chroot_list에는 제한할
 사용자 ID를 한줄에 하나씩 나열하면 된다.

 chroot_list_enable=YES
 chroot_list_file=/etc/vsftpd.chroot_list

 주의할 것은 chroot_local_user=YES와 chroot_list_enable=YES를 함께 사용할 경우에는
 /etc/vsftpd.chroot_list에 포함된 사용자 ID만 제한없이 홈디렉토리를 벗어날 수 있다.
 즉, 반대로 작용한다.

 standalone으로 FTP서버가 동작중이면 재실행 필요. standalone에 대해서는 6)번에서.

4) root로 접속할 수는 없나?

 가능하면 root 접속은 허용하지 않기를 바란다.
 /etc/ftpusers 파일에서 root를 빼면 접속이 가능하다.

5) ID/비밀번호가 정확히 맞는데 로긴할 때 자꾸 530 Login incorrect. 라고 나온다.

 /etc/ftpusers (또는 vsftpd.ftpusers)에 등록된 사용자인지 확인한다.
 여기에 등록된 사용자는 로긴할 수 없다. 이럴 때 /var/log/messages에 다음과 같은 로그가 남는다.

 Aug 16 22:21:52 truefeel vsftpd: PAM-listfile: Refused user xxxxxxxx for service vsftpd

6) standalone으로 운영하고 싶다.
  (즉, apache나 sendmail처럼 xinetd 통하지 않고 운영을 원한다.)

 /etc/xinetd.d/vsftpd (vsftpd가 아닌 다른 파일명일 수 있음) 에서 disable = yes 로 변경하여
 xinetd로 서비스 하지 않도록 설정한다. xinetd 를 재실행하면 이제 xinetd를 통한 ftp 서비스는 종료된다.

 레드햇의 경우 /etc/rc.d/init.d/xinetd restart

 이제 vsftpd 데몬를 실행한다. (소스로 설치시 기본 경로는 /usr/local/sbin)

 # /usr/local/sbin/vsftpd &

7) 다른 포트(기본 21번)를 사용하고 싶다. (예를 들어 11121번 포트를 원할 때)

 * xinetd를 이용하는 경우

  /etc/service 에 'ftp2  11121/tcp' 한 줄을 추가한다.
  그리고 /etc/xinetd.d/vsftpd (vsftpd가 아닌 ftp와 같은 다른 파일명일 수 있음) 에서
  service ftp 를 service ftp2로 바꾸고, xinetd 를 재실행한다.

 * standalone으로 운영하는 경우

  /etc/vsftpd.conf 에서 listen_port=11121 을 추가하고 vsftpd 서버를 재실행한다.

 바뀐 포트로 운영중인지 확인은 netstat -atnp(리눅스) 또는 netstat -an(그 이외 유닉스)

8) 업로드 파일 크기를 제한하는 방법은 없나요? 이를테면 5MB이상의 파일은 업로드 못한다든지.

 현재 1.2.1버전까지 vsftpd 자체에 설정하는 방법은 없습니다.


Post by 넥스트리소프트 데꾸벅(techbug)
, |

자바스크립트의 퍼포먼스는 대부분 브라우저에 의해 결정된다.


사용자 삽입 이미지


끊임없이 회자되어 왔던 자바스크립트 퍼포먼스에 대한 이슈는 다음과 같은 중요한 키로 정리될수 있다.
  • 자바스크립트
  • 객체모델(Object Models : XMLHttpRequest, Timers, Browser, DOM and CSS)
  • Parsing
  • Rendering

흥미로운것은 브라우저안에서 퍼포먼스에 중요하게 영향을 끼치는것으로 자바스크립트를 삼았다.( by John resig) 그러나 자바스크립트는 철저하게 퍼포먼스를 극복하기위해 많이 향상되어왔으면 최근에는 DOM,CSS, 렌더링레이어에서 바틀렉(bottlenecks)이 걸린다는것이다.
여기서 흥미로운 이슈사항이 대두되는데.
  • 브라우저 밖에서의 자바스크립트 퍼포먼스는 브라우저안쪽에서의 그것보다 더 빠르다는것이다. 객체모델의 오버헤드와 객체모델과 관련된 중요한 보안체크에 대한것은 매우 다르다는것이다.
  • 적절하지 못한 자바스크립트코딩은 렌더링엔진에 퍼포먼스에 많은 영향을 끼친다.

원본 : http://ejohn.org/blog/javascript-performance-stack/


윗글에서도 보다시피 자바스크립트의 퍼포먼스는 어떤 브라우저를 선택하느냐에 따라 크게 달라질수도 있다는것이다.
이번에 버전업된 firefox3 의 퍼포먼스가 상당히 향상되었다는 오늘자 ajaxian에 포스팅글을 인용한다.

사용자 삽입 이미지


윈도우머신에서 테스트한 선스파이터 자바스크립트 벤치마크 결과에 의하면
이번 파이어폭스3의 성능은 이전버전 2.0.0.12와는 달리 크게 향상되었다는것을 느낄수 있다.  파이어폭스 Nightly(어떻게 번역해야 하는거야..매일빌드? ) 버전이 나오기전에는 오페라9.5.9807이 제일 빠른것이였는데 브라우저 시장에서 다시한번 파이어폭스의 선전이 기대된다.


  1. Firefox 3 Nightly (PGO Optimized): 7263.8ms
  2. Firefox 3 Nightly (02/25/2008 build): 8219.4ms
  3. Opera 9.5.9807 Beta: 10824.0ms
  4. Firefox 3 Beta 3: 16080.6ms
  5. Safari 3.0.4 Beta: 18012.6ms
  6. Firefox 2.0.0.12: 29376.4ms
  7. Internet Explorer 7: 72375.0ms


Post by 넥스트리소프트 데꾸벅(techbug)
, |
서버없이 ExtJS를 사용하고 싶다면 아래 파일을 다운로드 받아 HTML에 넣고 사용한다.
사내솔루션(넥스트리)개발시 서버와 상관없이 작업을 하려다 찾은소스이다.


소스를 까(?)보면 Ext.lib.Ajax 부분을 오버라이드하고 있는데 기본적으로 크로스 도메인에서는 다른 프록시를 써서 해당 우회하는 방법으로 크로스도메인을 사용한다.
그러나 ExtJS에서는 로컬을 우회 프록시로 사용하는갑다..

중간에 XhrHeader값을 보면 "X-Requested-With"를 보면 커스텀헤더를 생성해서 사용하는것을 볼수 있는데 이것은 Prototype.js나 jQuery에서도 이와 같은 방법을 사용하고 있다.

제로보드에도 이러한 스크립트가 있던데 함 뜯어봐야겠다..


[실제 PHP로 헤더값만들기]
function isAjax() {
 return isset($_SERVER['HTTP_X_REQUESTED_WITH']) &&
     $_SERVER ['HTTP_X_REQUESTED_WITH']  == 'XMLHttpRequest';
}


[사용법]
<script type="text/javascript" src="../extjs/adapter/ext/ext-base.js"></script>
<script type="text/javascript" src="../extjs/ext-all-debug.js"></script>
<script type="text/javascript" src="../extjs/adapter/ext/localXHR.js"></script>


[실제 localXHR.js 소스]

Ext.apply( Ext.lib.Ajax ,
{ forceActiveX:false,
  createXhrObject:function(transactionId)
        {
            var obj={  status:{isError:false}
                     , tId:transactionId}, http;
            try
            {
               
        if(Ext.isIE7 && !!this.forceActiveX){throw("IE7forceActiveX");}
               
        obj.conn= new XMLHttpRequest();
       
            }
            catch(e)
            {
                for (var i = 0; i < this.activeX.length; ++i) {
                    try
                    {
                        obj.conn= new ActiveXObject(this.activeX[i]);
           
                        break;
                    }
                    catch(e) {
                    }
                }
            }
            finally
            {
                obj.status.isError = typeof(obj.conn) === undefined;
            }   
            return obj;
           
        },
       
        getHttpStatus: function(reqObj){
       
            var statObj = {  status:0
                    ,statusText:''
                    ,isError:false
                    ,isLocal:false
                    ,isOK:false
                    ,error:null};
           
            try {
                if(!reqObj)throw('noobj');
                statObj.status = reqObj.status;
               
                statObj.isLocal = !reqObj.status && location.protocol == "file:" ||
                           Ext.isSafari && reqObj.status === undefined;
               
                statObj.isOK = (statObj.isLocal || (statObj.status > 199 && statObj.status < 300));
                statObj.statusText = reqObj.statusText || '';
            } catch(e){ //지원하지 않는 status 혹은 너무 빨리 호출했을 경우
              }
           
            return statObj;
       
        },
        handleTransactionResponse:function(o, callback, isAbort)
        {
   
       
        callback = callback || {};
        var responseObject=null;
       
         if(!o.status.isError){
            o.status = this.getHttpStatus(o.conn);        
            /* 필요하다면 적당한 status와 XMLDOM을 이용하여 생성하거나 향상시킨다.*/
             responseObject = this.createResponseObject(o, callback.argument);
         }
       
          if(o.status.isError){
            /* exception이 발생했을 경우 다시 체크한다.*/
           responseObject = Ext.applyIf(responseObject||{},this.createExceptionObject(o.tId, callback.argument, (isAbort ? isAbort : false)));
          
         }
       
         responseObject.options = o.options;
         responseObject.stat = o.status;
         
         if (o.status.isOK && !o.status.isError) {
            if (callback.success) {
                if (!callback.scope) {
                    callback.success(responseObject);
                }
                else {
                    callback.success.apply(callback.scope, [responseObject]);
                }
            }
          } else {

            if (callback.failure) {
                if (!callback.scope) {
                    callback.failure(responseObject);
                }
                else {
                    callback.failure.apply(callback.scope, [responseObject]);
                }
            }

         }
       
        if(o.options.async){
            this.releaseObject(o);   
            responseObject = null;
        }else{
            this.releaseObject(o);
            return responseObject;
        }
           
    },
    createResponseObject:function(o, callbackArg)
    {
        var obj = {};
        var headerObj = {},headerStr='';

        try{  //잘못된 인코딩일경우
        obj.responseText = o.conn.responseText;
        }catch(e){obj.responseText ='';}

        obj.responseXML = o.conn.responseXML;

        try{
        headerStr = o.conn.getAllResponseHeaders()||'';
        } catch(e){}

        if(o.status.isLocal){

           o.status.isOK = ((o.status.status = (!!obj.responseText.length)?200:404) == 200);

           if(o.status.isOK && (!obj.responseXML || obj.responseXML.childNodes.length == 0)){

            var xdoc=null;
            try{   //MS ActiveX가 작동하지 않을 경우
                if(typeof(DOMParser) == 'undefined'){
                    xdoc=new ActiveXObject("Microsoft.XMLDOM");
                    xdoc.async="false";
                    xdoc.loadXML(obj.responseText);

                }else{
                    try{  //Opera 9 가 xml contents 파싱에 실패할 경우
                        var domParser = new DOMParser();
                        xdoc = domParser.parseFromString(obj.responseText, 'application\/xml');
                    }catch(ex){}
                    finally{domParser = null;}

                }
            } catch(ex){
                o.status.isError = true;
                o.status.error = ex;

                }

            obj.responseXML = xdoc;
            }

            if(obj.responseXML){

            var parseBad = (obj.responseXML.parseError || 0) != 0 || obj.responseXML.childNodes.length == 0;
            if(!parseBad){
                headerStr = 'Content-Type: ' + (obj.responseXML.contentType || 'text\/xml') + '\n' + headerStr ;
                }               
            }       


        }   

       var header = headerStr.split('\n');
       for (var i = 0; i < header.length; i++) {
            var delimitPos = header[i].indexOf(':');
            if (delimitPos != -1) {
            headerObj[header[i].substring(0, delimitPos)] = header[i].substring(delimitPos + 2);
            }
        }

        obj.tId = o.tId;
        obj.status = o.status.status;
        obj.statusText = o.status.statusText;
        obj.getResponseHeader = headerObj;
        obj.getAllResponseHeaders = headerStr;
        obj.stat = o.status

        if (typeof callbackArg !== undefined) {
        obj.argument = callbackArg;
        }

        return obj;
        },
       
    request : function(method, uri, cb, data, options) {
               
                 options = Ext.apply({async:true,
               headers:false,
               userId:null,
               password:null,
               xmlData:null }, options||{});
                                       
                    var hs = options.headers;
                    if(hs){
                        for(var h in hs){
                            if(hs.hasOwnProperty(h)){
                                this.initHeader(h, hs[h], false);
                            }
                        }
                    }
                    if(options.xmlData){
                        this.initHeader('Content-Type', 'text/xml', false);
                        method = 'POST';
                        data = options.xmlData;
                    }
                               
            return this.makeRequest(method, uri, cb, data, options);
           
        },
        asyncRequest:function(method, uri, callback, postData)
        {
            var o = this.getConnectionObject();

            if (!o || o.status.isError) {
                return null;
            }
            else {
                o.options = options;
                try{
            o.conn.open(method, uri, true);
        } catch(ex){
            o.status.isError = true;
            o.status.error = ex;
            return Ext.apply(o,this.handleTransactionResponse(o, callback));
           
        }
       
       
        if (this.useDefaultXhrHeader) {
            if (!this.defaultHeaders['X-Requested-With']) {
            this.initHeader('X-Requested-With', this.defaultXhrHeader, true);
            }
        }

        if(postData && this.useDefaultHeader){
            this.initHeader('Content-Type', this.defaultPostHeader);
        }

         if (this.hasDefaultHeaders || this.hasHeaders) {
            this.setHeader(o);
        }

        this.handleReadyState(o, callback);
       
        try{ o.conn.send(postData || null);
        } catch(ex){
            o.status.isError=true;
            o.status.error = ex;
            return Ext.apply(o,this.handleTransactionResponse(o, callback));
        }
           
                   
        return o;
            }
        },
       
        makeRequest:function(method, uri, callback, postData, options)
        {
            var o = this.getConnectionObject();
                    
            if (!o || o.status.isError) {
                return null;
            }
            else {
                o.options = options;   
                try{
            o.conn.open(method, uri, options.async, options.userId, options.password);
        } catch(ex){
            o.status.isError = true;
            o.status.error = ex;
            var r=this.handleTransactionResponse(o, callback);
            return Ext.apply(o,r);
        }

        if (this.useDefaultXhrHeader) {
            if (!this.defaultHeaders['X-Requested-With']) {
            this.initHeader('X-Requested-With', this.defaultXhrHeader, true);
            }
        }

        if(postData && this.useDefaultHeader){
            this.initHeader('Content-Type', this.defaultPostHeader);
        }

         if (this.hasDefaultHeaders || this.hasHeaders) {
            this.setHeader(o);
        }

        if(o.options.async){ //blocking call때문에 Timer가 작동하지 않음
            this.handleReadyState(o, callback);
        }
       
        try{ o.conn.send(postData || null);
        } catch(ex){
            //Ext.apply(o,this.handleTransactionResponse(o, callback));
        }
               
        return options.async?o:Ext.apply(o,this.handleTransactionResponse(o, callback));
            }
   }});
   
Ext.lib.Ajax.forceActiveX = (document.location.protocol == 'file:');

Post by 넥스트리소프트 데꾸벅(techbug)
, |
한국어 로케일 설정파일을 수정할 일이 생겨 뜯어보다 보니
이번 2.0.2 버전에 추가된 부분은 빠져있는 것을 발견했다.
extjs의 locale 담당 개발자에게 메일을 보내 다음 패키징때 추가적으로 넣어달라고 부탁했는데 다음 패키징땐 소스에 데꾸벅이란 닉을 발견할수  있을까? 크크크

사용자 삽입 이미지


위와 같이 사용하려면 HTML에
    <script type="text/javascript" src="../../ext-all.js"></script>
    <script type="text/javascript" src="../../source/locale/ext-lang-ko.js" charset="utf-8"></script>
와 같이 넣으면 된다.


Post by 넥스트리소프트 데꾸벅(techbug)
, |
ExtJS에서 RESTful하게 HTTP status를 관리하게 생겼다. ㅠ.,ㅠ;
API 및 ExtJS의 코어을 뜯어본 결과 이넘들은 xhr.status >=200 && xhr.status <300 인경우만 처리하고 나머지는 모두 xhr.status 를 13030 으로 주고 있었다.

ext-base.js 에 보면 아래와 같이 처리 ㅠ.,ㅠ;

{
            if (!J) {
                this.releaseObject(I);
                return
            }
            var G,
            F;
            try {
                if (I.conn.status !== undefined && I.conn.status != 0) {
                    G = I.conn.status
                } else {
                    G = 13030
                }
            } catch(H) {
                G = 13030
            }
            if (G >= 200 && G < 300) {
                F = this.createResponseObject(I, J.argument);
                if (J.success) {
                    if (!J.scope) {
                        J.success(F)
                    } else {
                        J.success.apply(J.scope, [F])
                    }
                }
            } else {
                switch (G) {
                case 12002:
                case 12029:
                case 12030:
                case 12031:
                case 12152:
                case 13030:
                    F = this.createExceptionObject(I.tId, J.argument, (E ? E: false));
                    if (J.failure) {
                        if (!J.scope) {
                            J.failure(F)
                        } else {
                            J.failure.apply(J.scope, [F])
                        }
                    }
                    break;
                default:
                    F = this.createResponseObject(I, J.argument);
                    if (J.failure) {
                        if (!J.scope) {
                            J.failure(F)
                        } else {
                            J.failure.apply(J.scope, [F])
                        }
                    }
                }
            }
            this.releaseObject(I);
            F = null
        }


그리고 나서 모두 exception처리를 하고 있었는데

ScriptTagProxy의 경우 loadexception ( Object This, Object o, Object arg, Object e ) 에서 argument형태로 처리되고 있으며
Ext.Ajax의 경우는 requestexception : ( Connection conn, Object response, Object options ) 형태로 처리되고 있다.

기존의 예외처리를 위의 2개 이벤트를 사용해 처리해 줘야 하는데 아래와 같이 처리하면 되겠다..  ....

 Ext.Ajax.on('requestexception', function(c, r, o) {
            debugger;
            if (r.status == 402) {
              
                //alert('Your session has expired');
              
            }
            else{
                  var error = r.responseText;
                 if (!error) error = r.statusText;
                 App.aSendError.createWindow(error);
                
            }
        })


Ext.Ajax.on('beforerequest', function(conn, options) {
console.log(arguments);
} );

Ext.Ajax.on('requestcomplete', function(conn, response, options) {
console.log(arguments);
} );

Ext.Ajax.on('requestexception', function(conn, response, options) {
console.log(arguments);
} );


Ext.Ajax.request({
       url: '/techbug.json?method=saveBranch',
       success: function(response) {
               branchList_store.load();
               branchList.reconfigure(branchList_store, branchList_cm);
            Ext.MessageBox.alert('Status', 'Your changes were saved successfully.');
       },
       failure: function(response) {
               if(response.getResponseHeader.CustomHeader == "585")
                Ext.MessageBox.alert('Status', 'You do not have permission to do this.');
            else
               Ext.MessageBox.alert('Status', 'There was an unknown error saving your changes.<P>Please try again.<P>Detailed Error: ' + response.getResponseHeader.CustomHeaderMessage);
       },
       headers: {
          
       },
       params: {
           ....
       }
})


    Ext.data.HttpProxy.on("loadexception", function(options, response, e) {
        // do stuff for all load failures
    });
    Ext.data.HttpProxy.on("load", function(options, arg) {
        // do stuff for all load successes
    });


Ext.Ajax.on('requestexception', function(c, r, o) {
            debugger;
            if (r.status == 402) {
              
                //alert('Your session has expired');
              
            }
            else{
                  var error = r.responseText;
                 if (!error) error = r.statusText;
                 App.aSendError.createWindow(error);
                
            }
        })


// set up the connection to load the initial data
var loadConn = new Ext.data.Connection();
loadConn.request({method: 'POST', timeout: 120000, url: 'get_tasks_for_job.cfm' , params: { client_code: localClient, job: localJob, employee: localEmployee } });
// handle the response
loadConn.on('requestcomplete', function(sender, param) {
    try
    {
        var response = Ext.util.JSON.decode(param.responseText);
    } catch (e) {
        alert('There was a problem loading the tasks for this job.');
        return;
    }
    if (response.success == 'Y') {
        // the init function will run loadData() as needed
        localTaskData = response.data;
        Ext.taskEditApp.main.init();
    } else {
        alert('There was a problem loading the tasks for this job.');
    }
}, { scope: this });
loadConn.on('requestexception', function(conn, response, options) {
    alert('failed!!!');
    for (property in response) {
        alert(property);
        alert(response[property]);
    }       
}, { scope: this }); 

ds.load({params:{start:0, limit:pageCount},
    callback:function(record, options, success){
        if(!success){
            alert('error occure.');
            Ext.get('grid_id').unmask();
        }
    }
});


참고URL :
Post by 넥스트리소프트 데꾸벅(techbug)
, |
이전블로그(http://blog.naver.com/techbug)에 포스팅했던 글을 백업받아 옵니다.
--------[이후]-----------------------


GWT Ext 2.0 이 릴리즈됐다.
2007년 ajax framework and libraries에서 prototype.js, jQuery다음 3위를 차지하더니만 선전하고 있는 extjs 아자...
맞바람을 탄다는 기분은 이런 것이라... 데꾸벅 뽯팅!

관련사이트 :
http://ajaxian.com/archives/gwt-ext-20-released
http://gwt-ext.com/
http://gwt-ext.googlecode.com/files/gwtext-2.0.1.zip

데모 : http://gwt-ext.com/demo/


사용자 삽입 이미지

Post by 넥스트리소프트 데꾸벅(techbug)
, |
ExtJS 관련 IDE를 정리하다. 관련URL : http://ajaxian.com/archives/ext-js-ide-support-roundup
ExtJS 2.0 API탑재 Aptana plug-in download : http://orsox.mocis.at/download.php?view.1

사용자 삽입 이미지


There’s been a lot of talk lately about the different IDEs and the support they offer for the various JavaScript libraries. Ext’s uber-coder, Jack Slocum, has put up a blog entry explaining which IDEs support the Ext JS framework:

The Ext 2.0 API is very extensive and remembering all of the functions, properties or configs available is virtually impossible. The API documentation is very thorough, but it would be nice if IDEs would provide code assist options in JavaScript as they do in other languages such as Java and C#. Luckily, there are some IDEs and plugins available that do just that — and also have direct support for Ext 2.0.

Included in the mix are:

This great news and it shows that IDE vendors are taking JavaScript frameworks seriously. Anything that makes development easier is definitely welcome.


Post by 넥스트리소프트 데꾸벅(techbug)
, |