블로그 이미지

카테고리

데꾸벅 (194)
Publisher (39)
Scripter (97)
Programmer (1)
Designer (30)
Integrator (18)
Pattern Searcher (4)
News (2)
강좌 및 번역 (3)

최근에 올라온 글

최근에 달린 댓글


Ajax 사이트를 개발하다보면 브라우저 버전에 따른 별도의 작업을 해줘야 하는 경우가 발생한다.
실제 현재 투입되어 개발중인 사이트의 경우에도 IE6,IE7에 최적화되게 개발하기로 했지만 실제로 테스트해본결과 Opera9, FF2~3, IE7, IE8Beta 버전에서 더 잘 돌아갔다..
문제는 IE6인데 IE6에서도 Windows 2000 SP1~3, Windows XP SP1,SP2에서는 무리없이 잘 작동되던 스크립트인데 유독 Windows XP SP3 버전의 IE6에서만 오작동하는 경우가 발생했다.
IE6 버전 (WindowsXP SP3)
6.0.2900.5512 xpsp.080413-2111
Mozilla/4.0 (compatible; MSIE 6.0; Windows NT 5.1; SV1; .NET CLR 1.1.4322; .NET CLR 2.0.50727)


이놈 하나 때문에 패키징을 다시 해야 되는 경우가 발생되었고 모든 작업을 브라우저버젼별로 분리하여 작업하기란 워낙 까다로운게 아닐수 없다.
그냥 사용자의 브라우저를 IE7로 업그레이드를 시킬수만 있다면 좋을텐데 라는 생각을 많이 하곤 한다.

그러다 찾아 본 사이트가 이곳 푸쉬업(Push up:Pushing up the web) 이다.
자바스크립트와 CSS로 업데이트 날짜가 지난 사용자의 브라우저를 업데이트하라는 경고메세지를 보낼수 있다.


현재지원되는 브라우저 버전
  • Internet Explorer 7+
  • Firefox 2+
  • Safari 3+
  • Opera 9.25+
사용자 삽입 이미지


설치방법은 간단하다
아래 파일을 다운로드 받은후 원하는 페이지소스에다 아래와 같이 입력하면 된다.
(July 27 2008)


<link rel='stylesheet' type='text/css' href='css/pushup.css' />
<script type='text/javascript' src='js/pushup.js'></script>


Post by 넥스트리소프트 데꾸벅(techbug)
, |

웹표준코딩에 익숙한 사용자라면 csszengarden 사이트를 잘 알것이다.
csszengarden 사이트를 보면 동일한 마크업(HTML)에 CSS만으로 페이지 자체가 완전히 틀린 분위기를 연출하게 만들며 환상적인 폰트사용을 볼수 있다.

@font-face에 대해서 말해보려 한다.
아래 이미지는 강의자료로 사용했던 내용이다.
사용자 삽입 이미지

웹폰트 제공사이트 : http://www.fontembedding.com/fonts-and-the-law/

오늘 Ajaxian에 올라온 포스트중에 재미있는 글이 있어 링크를 따라 가다 보니 다음과 같은 글이 있어 포스팅해 본다.
원문 : http://www.alistapart.com/articles/cssatten


웹폰트 사용할시
@font-face { font-family: "Kimberley"; src: url(http://www.princexml.com/fonts/larabie/ » kimberle.ttf) format("truetype"); }
h1 { font-family: "Kimberley", sans-serif }

@font-face와 같이 길게 쓰지 않고 간략한 표현
@import url(http://www.princexml.com/fonts/ » larabie/index.css) all;
h1 { font-family: Goodfish, serif }

W3에서 권장하는 방법
h1 { font-family: "Trebuchet MS", sans-serif; letter-spacing: 0.1em; }
@media all and (web-fonts: "truetype") {
   h1 { font-family: "Primer Apples", sans-serif; letter-spacing: 0.2em; }
}

사용자 삽입 이미지

Screenshot of web page using real TrueType fonts. PDF (via Prince). HTML (via your browser).


사용자 삽입 이미지

Screenshot of web page using real TrueType fonts. PDF (via Prince). HTML (via your browser).


사용자 삽입 이미지

Screenshot of web page using real TrueType fonts. PDF (via Prince). HTML (via your browser).


사용자 삽입 이미지

Screenshot of web page using real TrueType fonts. PDF (via Prince). HTML (via your browser).


사용자 삽입 이미지

Screenshot of web page using real TrueType fonts. PDF (via Prince). HTML (via your browser).


사용자 삽입 이미지

Screenshot of web page using real TrueType fonts. PDF (via Prince). HTML (via your browser).

사용자 삽입 이미지

Screenshot of web page using real TrueType fonts. PDF (via Prince). HTML (via your browser).


데꾸벅폰트 다운로드


HTML5에서 Canvas 관련 요약정리 CheatSheet


Post by 넥스트리소프트 데꾸벅(techbug)
, |

XPATH 가이드

Publisher/XML/XHTML / 2008. 4. 15. 12:48


Xpath는 XML DOM문서의 내용을 조회하는데 있어서 일관적이고 빠른 방법을 제공한다. 하지만, 사용하는 방법에 따라 성능상의 차이가 나타날 수 있다. 이 글은 JavaScript에서 Xpath를 활용하는데 있어 방법에 따른 성능의 차이를 보이고, 보다 효과적으로 XML DOM 문서 다루는 방법을 설명한다.


Xpath사용시 흔한 잘못

Xpath는 XML DOM(Document Object Model) 문서에서 특정 조건을 만족하는 노드를 찾는 표준적인 방법을 제공한다. 보통 하나의 노드를 찾고, 다시 부모를 찾거나 혹은 얻어진 값으로 다시 다른 Xpath 쿼리를 작성하는 경우가 많다. selectSingleNode() 혹은 selectNodes()등을 자주 호출하여 성능이 저하되고, 작성된 코드도 길어진다. Xpath의 조건을 잘 이용하면, 여러 번에 나누어 조회하지 않고 한번에 원하는 노드를 찾을 수 있는 경우가 많다.

<?xml version="1.0" encoding="euc-kr"?>

<Message xmlns:xsi="http://www.w3.org/2001/XMLSchema-instance">

  <Header/>

  <Body Desc="고객조회">

    <LastName></LastName>

    <FirstName>철수</FirstName>

    <SSN>701202-1111111</SSN>

    <Rgn>02</Rgn>

    <Age/>

    <JobCode/>

    <Sex/>

    <CrdtRate Code="C10">

      <Lov Code="C40" Desc="프리미엄"/>

      <Lov Code="C30" Desc="최우수"/>

      <Lov Code="C20" Desc="우수고객"/>

      <Lov Code="C10" Desc="단골고객"/>

    </CrdtRate>

    <Child SSN="001202-2024433"/>

    <Family>

      <LastName></LastName>

      <FirstName>영희</FirstName>

      <SSN>701202-2111111</SSN>

      <Sex>2</Sex>

      <RelCode>03</RelCode>

    </Family>

    <Family>

      <LastName></LastName>

      <FirstName>란아</FirstName>

      <SSN>001202-1111111</SSN>

      <Sex>1</Sex>

      <RelCode>04</RelCode>

    </Family>

  </Body>

</Message>

[예제 XML. sample_message.xml]

위의 XML 문서는 예제를 위한 테스트 문서 이다. 조회의 조건과 결과로 얻고 싶은 노드를 잘 구분하는 것이 좋다. 다음 세 개의 Xpath 문장은 비슷하지만, 리턴 하는 노드가 다르다.

/Message/Body/Family/SSN[.="001202-2024433"] // SSN 노드를 리턴 
/Message/Body/Family[SSN="001202-2024433"]   // Family 노드를 리턴 
/Message/Body[Family/SSN="001202-2024433"]   // Body 노드를 리턴

XML 문서가 가진 노드의 특정한 값을 찾고, 그 값으로 다른 노드를 검색하고자 하는 경우가 있다. 예를 들어, 위 XML 문서에서 /Message/Body/Child 의 SSN(주민번호)가 Family/SSN 값과 같은 Family 노드를 찾고자 한다면, 다음과 같이 쿼리를 작성할 수 있다.

/Message/Body/Family[SSN=string(/Message/Body/Child/@SSN)]

이와 같이 쿼리를 잘 작성하면 두 번 이상 조회를 한번에 하도록 할 수 있다. 다음 예는 의도적으로 selectNodes()를 사용하여 두개의 노드를 한번에 얻도록 쿼리를 작성한 것이다. /Message/Body/Child 노드의 SSN(주민번호)값과 같은 SSN 속성을 가지는 Family노드를 찾아 LastName과 FirstName 노드의 text를 얻는 코드이다. (xpath_01.htm 참조)

var xpath = '/Message/Body/Family[SSN
=string(/Message/Body/Child/@SSN)]/LastName
| /Message/Body/Family[SSN=string(/Message/Body/Child/@SSN)]
/FirstName';
var nodes = xmldoc.selectNodes(xpath); 
var name = nodes[0].text + nodes[1].text; 
alert(name);

Xpath 성능향상

Xpath 역시 쿼리조건을 기술하는 방법과 사용하는 방법에 따라 많은 성능의 차이를 보인다. 가장 좋은 방법은 쿼리 회수 자체를 줄이는 것이며, 두번째는 쿼리의 대상이 되는 범위를 줄이는 것이다. 다양한 비교를 통해 성능 향상을 위한 구체적인 방법을 살펴보자. 이 글에서 사용한 예제 XML은 아래의 [sample_message.xml]이다.

<?xml version="1.0" encoding="euc-kr"?>

<!-- sample xml -->

<message xmlns:xsi="http://www.w3.org/2001/XMLSchema-instance">

 <header svr-time="20050505101023" ch="EnRich001" trans="E833CDF563EAC3" cli-time="20050101175941">

   <svc name="CustInfo" mtd="getEmno_1" resid="getEmno_1"/>

   <scr comp-id="Btn02" no="0321"/>

   <cli ip="10.15.56.56" mac="00-90-96-75-C4-79"/>

   <user name="홍길동" id="plusjune"/>

   <res err-code="000">정상</res>

   <curr-odr>1</curr-odr>

   <debug log-level="1" test="true"/>

   <sso-token>Vy3zFySSOx2DTESTzTyGIDx2D1zCy1120</sso-token>

 </header>

 <sub-header>

   <auth>0</auth>

   <emp-no>17874</emp-no>

   <name>김유신</name>

   <br-cd>868</br-cd>

   <br-name>고객사업부</br-name>

   <level>4</level>

   <pos-cd>314</pos-cd>

   <pos-name>과장</pos-name>

<!--중략 -->

   <cif>123456789</cif>

   <SSN/>

 </sub-header>

 <body>

   <result-set resid="cust_Info_select_detail_info">

     <res resid="cust_workcarrer" code="0" msg="">

       <rec rownum="1">

         <col name="emno" type="char">9102321</col>

         <col name="gaze_stymd" type="date"/>

         <col name="gaze_edymd" type="date"/>

         <col name="position" type="number"/>

         <col name="branch_1" type="char"/>

       </rec>

     </res>

     <res resid="cust_license" code="0" msg="">

       <rec rownum="1">

         <col name="emno" type="char">9102321</col>

         <col name="qual_nm" type="char"/>

         <col name="gain_ymd" type="date"/>

         <col name="iss_plac" type="char"/>

       </rec>

     </res>

     <res resid="cust_traning" code="0" msg="">

       <rec rownum="1">

         <col name="emno" type="char">9102321</col>

         <col name="trn_nm" type="char"/>

         <col name="mng_plac" type="char"/>

         <col name="stday" type="date"/>

         <col name="enday" type="date"/>

       </rec>

<!--중략 -->

     </res>

   </result-set>

   <result-set resid="product_info">

     <cust id="cust_selfvaluation1" code="0" msg="">

       <opt key="emno" type="char">9102321</opt>

       <opt key="yy" type="char">2005</opt>

       <opt key="hfy_clcd" type="char">1</opt>

       <opt key="branch_2" type="char"/>

       <opt key="apr_grp_nm" type="char"/>

       <opt key="rank" type="number"/>

     </cust>

<!--중략 -->

   </result-set>

 </body>

</message>


시간 측정을 위해 LapTime.js 클래스(첨부파일 참조)를 사용하였다.

성능향상 – ‘//’를 쓰지 말 것

‘//’로 시작하는 쿼리는 XML DOM전체를 full-scan하기 때문에 좋지 않은 성능을 보여준다. [sample01.js]의 예제는 ‘//’를 쓴 경우와 절대 경로를 쓴 경우를 비교하고 있다. [sample01.js]의 코드에서 각각의 함수는 다음과 같은 내용을 가지고 있다.

    1. f1() – ‘//’로 시작하는 쿼리를 사용하였다.
    2. f2() – 먼저 부모노드를 찾고 그 다음 하위노드를 찾아 비교하였다.
    3. f3() – 절대 경로를 사용하였다.

[sample01.js]

function f1()
{
  return xmldoc.selectSingleNode("//rec[@rownum='2']/col[@name='emno']").text;
}

function f2()
{
  var node = xmldoc.selectSingleNode("//rec[@rownum='2']");
  return node.selectSingleNode("col[@name='emno']").text;
}

function f3()
{
  var base_path = "/message/body/result-set/res";
  return xmldoc.selectSingleNode(base_path + "/rec[@rownum='2']/col[@name='emno']").text;
}


f1은 두 개의 조건을 한번에 사용하였고, f2()는 한 개의 조건에 해당하는 노드를 찾은뒤 다시 하위 노드에서 두번째 조건을 사용하였다. f3()는 절대경로를 사용하였다. [그림1]은 f1()~ f3()함수를 각각 10,000씩 수행하는데 걸린 수행 시간을 보여주고 있다.

사용자 삽입 이미지


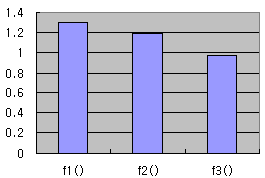
[그림1 – sample01.js 결과]

결과적으로 ‘//’로 시작하는 쿼리보다 절대 경로를 사용한 쿼리가 빠르다는 것을 알 수 있다. 이 차이는 XML DOM 문서가 크면 클수록 차이가 크게 생긴다.

성능향상 - 쿼리대상의 범위를 줄일 것

절대 경로를 사용하더라도 사용하는 횟수가 많으면 좋지 않은 성능을 가져올 수 있다. 매번 절대경로를 사용하는 것보다, 조회할 하위 노드 부분이 정해지면 상위 노드를 한번 찾아놓고, 하위 노드를 찾는 방식이 빠르다. 또한 특정 범위의 상위 노드를 처음 참조할 때 한번 찾아놓고, 다음 부터는 찾아놓은 노드를 활용하는 것도 성능 향상을 위해 좋은 방법이 될 수 있다.


[sample02.js]

function header1()
{
  var result_text = '';
 
  result_text += "name=" + xmldoc.selectSingleNode("/message/header/svc/@name").nodeValue + ",";
  result_text += "mtd=" + xmldoc.selectSingleNode("/message/header/svc/@mtd").nodeValue + ",";
  result_text += "resid=" + xmldoc.selectSingleNode("/message/header/svc/@resid").nodeValue + ",";

  return result_text;
}

function header2()
{
  var result_text = '';
  var attrs = xmldoc.selectSingleNode("/message/header/svc").attributes;
  result_text += "name=" + attrs.getNamedItem("name").nodeValue + ",";
  result_text += "mtd=" + attrs.getNamedItem("mtd").nodeValue + ",";
  result_text += "resid=" + attrs.getNamedItem("resid").nodeValue + ",";

  return result_text;
}

function header3()
{
  var result_text = '';
  if(header3.attrs == undefined)
    header3.attrs = xmldoc.selectSingleNode("/message/header/svc").attributes;
 
  result_text += "name=" + header3.attrs.getNamedItem("name").nodeValue + ",";
  result_text += "mtd=" + header3.attrs.getNamedItem("mtd").nodeValue + ",";
  result_text += "resid=" + header3.attrs.getNamedItem("resid").nodeValue + ",";

  return result_text;
}


[sample02.js]는 header1()과 header2(),header3() 함수로 구성되어 있다. header1()은 매번 절대 경로를 사용하여 속성값을 얻오는 것을 보여주고 있고, header2()함수는 부모 노드를 찾은 뒤 노드의 함수들을 이용하여 하위 노드(혹은 속성)값을 가져오는 방법을 보여준다.

header3()은 조금 더 진보한 방법을 사용하고 있다. 처음에 속성 노드를 찾아 놓고 JavaScript에 멤버를 추가하여 유지하도록 하는 방식(header3.attrs는 Java 혹은 C#의 static 멤버와 같다. 이와 관련하여 Object Oriented JavaScript (2)를 참조하라)을 사용하고 있다. 반복하여 호출하는 경우 즉, XML노드를 반복하여 참조하는 경우에 매우 유리하다. header1()과 header2(),header3() 함수의 수행속도를 비교한 결과는 아래 [그림2]와 같다.

사용자 삽입 이미지


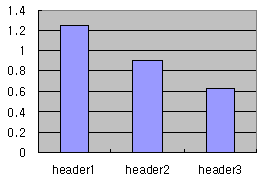
[그림2 – sample01.js 결과]

성능향상 – 객체지향 JavaScript와 BOM 활용

JavaScript의 객체지향을 잘 이용하여 BOM(Business Object Model)을 생성하고 활용하면, 속도의 개선 뿐만 아니라 어플리케이션의 구성을 유지보수하기 좋은 형태로 구성할 수 있다. 앞서 이야기한 것과 같이 Xpath를 이용하여 XML DOM을 매번 조회하지 않고, 초기에 한번만 조회하도록 하였다. header1()과 header2()는 그러한 차이를 보여준다.

 
function header1(){
 this.getResultText = function _getResultText(){
  var result_text = '';
  var node = xmldoc.selectSingleNode("message/header/svc");
  result_text += "name=" + node.attributes.getNamedItem("name").nodeValue + ",";
  result_text += "mtd=" + node.attributes.getNamedItem("mtd").nodeValue + ",";
  result_text += "resid=" + node.attributes.getNamedItem("resid").nodeValue + ",";
 
  return result_text;
 }
}
function header2(){
 var result_text;
 this.update = function _update(){
  var node = xmldoc.selectSingleNode("message/header/svc");
  result_text += "name=" + node.attributes.getNamedItem("name").nodeValue + ",";
  result_text += "mtd=" + node.attributes.getNamedItem("mtd").nodeValue + ",";
  result_text += "resid=" + node.attributes.getNamedItem("resid").nodeValue + ",";
 }
 this.getResultText = function _getResultText(){
  if(result_text == undefined)
    this.update();
  return result_text;
 }
}


[sample03.js]

header2()는 두개의 멤버함수를 가지고 있다. getResultText()는 결과 값을 DOM으로부터 가져와 result_text에 기록하는 역할을 수행한다. 즉, DOM에 대한 Xpath 쿼리를 수행한다. 아래의 코드는 결과가 정의되어 있지 않을 때(undefined) Xpath 쿼리를 수행하도록 하고 있다.

if(result_text == undefined) this.update();

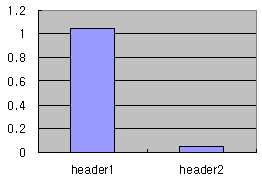
update() 멤버함수는 필요에 따라 호출될 수 있다. (예를 들어 XML DOM을 새로 읽었거나 변경된 경우). 이런 구성을 잘 활용하면, 속도의 증진 뿐만 아니라 복잡한 XML DOM과 템소를 Wrapping 하여 유지보수하기 좋고 이해하기 좋은 구성을 가지도록 코드를 작성할 수 있다. [그림3]은 반복하여 수행한 결과를 보여준다. (header2의 경우 Xpath 쿼리를 1회만 수행하므로, 반복적으로 Xpath 쿼리를 수행하는 header1에 비해 비교가 되지 않을 정도로 빠르다)

사용자 삽입 이미지


결론

Xpath 쿼리를 잘 작성하면, 여러 번에 나누어 쿼리하지 않아도 되므로 코드를 간결하게 유지할 수 있을 뿐만 아니라, 잦은 쿼리의 부하도 줄일 수 있다. XML DOM을 효과적으로 다루는 첫번째 방법은 쿼리회수 자체를 줄이는 것이고, 두번째는 검색 대상 범위를 줄이는 것이다. DOM 전체를 크게 몇 개의 논리적인 단위로 나누고, 각각의 상위 노드에 대한 참조를 가지고, 그 참조에 대해 Xpath 쿼리를 하는 것도 하나의 방법이다. 또한, BOM을 잘 구성하여 Xpath와 관련된 operation을 wrapping 함으로써, 속도의 개선뿐만 아니라 유지보수하기 좋도록 어플리케이션을 구성할 수 있다.


'Publisher > XML/XHTML' 카테고리의 다른 글

XML 메소드와 속성 및 특성  (0) 2008.04.15
Post by 넥스트리소프트 데꾸벅(techbug)
, |

CSS 2.0 표준 Reference!

CSS 2.0 Reference

Values 읽는 법 : 기울임체(이텔릭) 적용된 값들은 속성 값을 총칭하는 이름으로서 실제의 값 또는 수치로 변환하여 적용하여야 한다. (예:color→#CCCCCC, length→5px)

Background

Property Description Values NN IE W3C
background A shorthand property for setting all background properties in one declaration background-color
background-image
background-repeat
background-attachment
background-position
6.0 4.0 CSS1
background-attachment Sets whether a background image is fixed or scrolls with the rest of the page scroll
fixed
6.0 4.0 CSS1
background-color Sets the background color of an element color-rgb
color-hex
color-name
transparent
4.0 4.0 CSS1
background-image Sets an image as the background url
none
4.0 4.0 CSS1
background-position Sets the starting position of a background image top left
top center
top right
center left
center center
center right
bottom left
bottom center
bottom right
x-% y-%
x-pos y-pos
6.0 4.0 CSS1
background-repeat Sets if/how a background image will be repeated repeat
repeat-x
repeat-y
no-repeat
4.0 4.0 CSS1

Border

Property Description Values NN IE W3C
border A shorthand property for setting all of the properties for the four borders in one declaration border-width
border-style
border-color
4.0 4.0 CSS1
border-bottom A shorthand property for setting all of the properties for the bottom border in one declaration border-bottom-width
border-style
border-color
6.0 4.0 CSS1
border-bottom-color Sets the color of the bottom border border-color 6.0 4.0 CSS2
border-bottom-style Sets the style of the bottom border border-style 6.0 4.0 CSS2
border-bottom-width Sets the width of the bottom border thin
medium
thick
length
4.0 4.0 CSS1
border-color Sets the color of the four borders, can have from one to four colors color 6.0 4.0 CSS1
border-left A shorthand property for setting all of the properties for the left border in one declaration border-left-width
border-style
border-color
6.0 4.0 CSS1
border-left-color Sets the color of the left border border-color 6.0 4.0 CSS2
border-left-style Sets the style of the left border border-style 6.0 4.0 CSS2
border-left-width Sets the width of the left border thin
medium
thick
length
4.0 4.0 CSS1
border-right A shorthand property for setting all of the properties for the right border in one declaration border-right-width
border-style
border-color
6.0 4.0 CSS1
border-right-color Sets the color of the right border border-color 6.0 4.0 CSS2
border-right-style Sets the style of the right border border-style 6.0 4.0 CSS2
border-right-width Sets the width of the right border thin
medium
thick
length
4.0 4.0 CSS1
border-style Sets the style of the four borders, can have from one to four styles none
hidden
dotted
dashed
solid
double
groove
ridge
inset
outset
6.0 4.0 CSS1
border-top A shorthand property for setting all of the properties for the top border in one declaration border-top-width
border-style
border-color
6.0 4.0 CSS1
border-top-color Sets the color of the top border border-color 6.0 4.0 CSS2
border-top-style Sets the style of the top border border-style 6.0 4.0 CSS2
border-top-width Sets the width of the top border thin
medium
thick
length
4.0 4.0 CSS1
border-width A shorthand property for setting the width of the four borders in one declaration, can have from one to four values thin
medium
thick
length
4.0 4.0 CSS1

Classification

Property Description Values NN IE W3C
clear Sets the sides of an element where other floating elements are not allowed left
right
both
none
4.0 4.0 CSS1
cursor Specifies the type of cursor to be displayed url
auto
crosshair
default
pointer
move
e-resize
ne-resize
nw-resize
n-resize
se-resize
sw-resize
s-resize
w-resize
text
wait
help
6.0 4.0 CSS2
display Sets how/if an element is displayed none
inline
block
list-item
run-in
compact
marker
table
inline-table
table-row-group
table-header-group
table-footer-group
table-row
table-column-group
table-column
table-cell
table-caption
4.0 4.0 CSS1
float Sets where an image or a text will appear in another element left
right
none
4.0 4.0 CSS1
position Places an element in a static, relative, absolute or fixed position static
relative
absolute
fixed
4.0 4.0 CSS2
visibility Sets if an element should be visible or invisible visible
hidden
collapse
6.0 4.0 CSS2

Dimension

Property Description Values NN IE W3C
height Sets the height of an element auto
length
%
6.0 4.0 CSS1
line-height Sets the distance between lines normal
number
length
%
4.0 4.0 CSS1
max-height Sets the maximum height of an element none
length
%
6.0   CSS2
max-width Sets the maximum width of an element none
length
%
6.0   CSS2
min-height Sets the minimum height of an element length
%
6.0   CSS2
min-width Sets the minimum width of an element length
%
6.0   CSS2
width Sets the width of an element auto
%
length
4.0 4.0 CSS1

Font

Property Description Values NN IE W3C
font
A shorthand property for setting all of the properties for a font in one declaration font-style
font-variant
font-weight
font-size/line-height
font-family
caption
icon
menu
message-box
small-caption
status-bar
4.0 4.0 CSS1
font-family
A prioritized list of font family names and/or generic family names for an element family-name
generic-family
4.0 3.0 CSS1
font-size
Sets the size of a font xx-small
x-small
small
medium
large
x-large
xx-large
smaller
larger
length
%
4.0 3.0 CSS1
font-size-adjust Specifies an aspect value for an element that will preserve the x-height of the first-choice font none
number
    CSS2
font-stretch Condenses or expands the current font-family normal
wider
narrower
ultra-condensed
extra-condensed
condensed
semi-condensed
semi-expanded
expanded
extra-expanded
ultra-expanded
    CSS2
font-style
Sets the style of the font normal
italic
oblique
4.0 4.0 CSS1
font-variant
Displays text in a small-caps font or a normal font normal
small-caps
6.0 4.0 CSS1
font-weight
Sets the weight of a font normal
bold
bolder
lighter
100
200
300
400
500
600
700
800
900
4.0 4.0 CSS1

Generated Content

Property Description Values NN IE W3C
content Generates content in a document. Used with the :before and :after pseudo-elements string
url
counter(name)
counter(name, list-style-type)
counters(name, string)
counters(name, string, list-style-type)
attr(X)
open-quote
close-quote
no-open-quote
no-close-quote
6.0   CSS2
counter-increment Sets how much the counter increments on each occurrence of a selector none
identifier number
    CSS2
counter-reset Sets the value the counter is set to on each occurrence of a selector none
identifier number
    CSS2
quotes Sets the type of quotation marks none
string string
6.0   CSS2

List and Marker

Property Description Values NN IE W3C
list-style A shorthand property for setting all of the properties for a list in one declaration list-style-type
list-style-position
list-style-image
6.0 4.0 CSS1
list-style-image Sets an image as the list-item marker none
url
6.0 4.0 CSS1
list-style-position Sets where the list-item marker is placed in the list inside
outside
6.0 4.0 CSS1
list-style-type Sets the type of the list-item marker none
disc
circle
square
decimal
decimal-leading-zero
lower-roman
upper-roman
lower-alpha
upper-alpha
lower-greek
lower-latin
upper-latin
hebrew
armenian
georgian
cjk-ideographic
hiragana
katakana
hiragana-iroha
katakana-iroha
4.0 4.0 CSS1
marker-offset   auto
length
7.0   CSS2

Margin

Property Description Values NN IE W3C
margin A shorthand property for setting the margin properties in one declaration margin-top
margin-right
margin-bottom
margin-left
4.0 4.0 CSS1

margin-bottom
Sets the bottom margin of an element auto
length
%
4.0 4.0 CSS1

margin-left
Sets the left margin of an element auto
length
%
4.0 3.0 CSS1

margin-right
Sets the right margin of an element auto
length
%
4.0 3.0 CSS1
margin-top Sets the top margin of an element auto
length
%
4.0 3.0 CSS1

Outlines

Property Description Values NN IE W3C
outline A shorthand property for setting all the outline properties in one declaration outline-color
outline-style
outline-width
    CSS2
outline-color Sets the color of the outline around an element color
invert
    CSS2
outline-style Sets the style of the outline around an element none
dotted
dashed
solid
double
groove
ridge
inset
outset
    CSS2
outline-width Sets the width of the outline around an element thin
medium
thick
length
    CSS2

Padding

Property Description Values NN IE W3C
padding A shorthand property for setting all of the padding properties in one declaration padding-top
padding-right
padding-bottom
padding-left
4.0 4.0 CSS1

padding-bottom
Sets the bottom padding of an element length
%
4.0 4.0 CSS1

padding-left
Sets the left padding of an element length
%
4.0 4.0 CSS1

padding-right
Sets the right padding of an element length
%
4.0 4.0 CSS1
padding-top Sets the top padding of an element length
%
4.0 4.0 CSS1

Positioning

Property Description Values NN IE W3C
bottom Sets how far the bottom edge of an element is above/below the bottom edge of the parent element auto
%
length
6.0 5.0 CSS2
clip Sets the shape of an element. The element is clipped into this shape, and displayed shape
auto
6.0 4.0 CSS2
left Sets how far the left edge of an element is to the right/left of the left edge of the parent element auto
%
length
4.0 4.0 CSS2
overflow
Sets what happens if the content of an element overflow its area visible
hidden
scroll
auto
6.0 4.0 CSS2
right Sets how far the right edge of an element is to the left/right of the right edge of the parent element auto
%
length
6.0 5.5 CSS2
top Sets how far the top edge of an element is above/below the top edge of the parent element auto
%
length
4.0 4.0 CSS2
vertical-align Sets the vertical alignment of an element baseline
sub
super
top
text-top
middle
bottom
text-bottom
length
%
4.0 4.0 CSS1
z-index Sets the stack order of an element auto
number
6.0 4.0 CSS2

Table

Property Description Values NN IE W3C
border-collapse Sets the border model of a table collapse
separate
7.0 5.5 CSS2
border-spacing Sets the distance between the borders of adjacent cells (only for the "separated borders" model) length length 6.0   CSS2
caption-side Sets the position of the caption according to the table top
bottom
left
right
6.0   CSS2
empty-cells Sets whether cells with no visible content should have borders or not (only for the "separated borders" model) show
hide
6.0   CSS2
table-layout Sets the algorithm used to lay out the table auto
fixed
6.0 5.5 CSS2

Text

Property Description Possible Values NN IE W3C
color Sets the color of a text color 4.0 3.0 CSS1
direction Sets the text direction ltr
rtl
    CSS2
letter-spacing Increase or decrease the space between characters normal
length
6.0 4.0 CSS1
text-align Aligns the text in an element left
right
center
justify
4.0 4.0 CSS1
text-decoration Adds decoration to text none
underline
overline
line-through
blink
4.0 4.0 CSS1
text-indent Indents the first line of text in an element length
%
4.0 4.0 CSS1
text-shadow   none
color
length
     
text-transform Controls the letters in an element none
capitalize
uppercase
lowercase
4.0 4.0 CSS1
unicode-bidi   normal
embed
bidi-override
  5.0 CSS2
white-space Sets how white space inside an element is handled normal
pre
nowrap
4.0 5.5 CSS1
word-spacing Increase or decrease the space between words normal
length
6.0 6.0 CSS1

Post by 넥스트리소프트 데꾸벅(techbug)
, |
하두 잘 까먹어서 꼬불쳐 두었던 글인데 네이버블로그에 있던글을 다시 포스팅한다


XML 생성

XML.appendChild() 메소드
지정된 객체의 자식 목록 끝에 노드 추가
XML.createElement() 메소드
새로운 XML 요소 생성
XML.createTextNode() 메소드
새로운 XML 텍스트 노드 생성
예)myXML = new XML();
node = myXML.createElement("주소록");
name = myXML.createElement("이름");
ntext = myXML.createTextNode("누군가");
name.appendChild(ntext);
node.appendChild(name);
tel = myXML.createElement("전화번호");
ttext = myXML.createTextNode("000-000-0000");
tel.appendChild(ttext);
node.appendChild(tel);
myXML.appendChild(node);
trace(myXML);

※ 결과:<주소록><이름>누군가<전화번호>000-000-0000

XML 복제

XML.cloneNode(true or false) 메소드
지정된 노드를 복제하고 선택 및 반복적으로 모든 자식 복제
true면 자식의 노드까지 복사되고 false면 노드만 복사
예) myXML = new XML();
node = myXML.createElement("주소록");
name = myXML.createElement("이름");
text = myXML.createTextNode("누군가");
name.appendChild(text);
node.appendChild(name);
myXML.appendChild(node);
trace(myXML);
copyXMLt = myXML.cloneNode(true);
copyXMLf = name.cloneNode(false);
trace(copyXMLt);
trace(copyXMLf);

※ 결과:<주소록><이름>누군가
<주소록><이름>누군가
<이름 />

XML 특정 노드의 존재 유뮤 확인

XML.hasChildNodes() 메소드
지정된 노드에 자식 노드 유무에 따라 True 및 False 반환
예) myXML = new XML();
node = myXML.createElement("주소록");
name = myXML.createElement("이름");
text = myXML.createTextNode("누군가");
name.appendChild(text);
node.appendChild(name);
myXML.appendChild(node);
trace(myXML);
if(myXML.hasChildNodes) {
trace("자식노드가 존재합니다");
} else {
trace("자식노드가 존재하지 않습니다");
}

※ 결과:<주소록><이름>누군가
자식노드가 존재합니다

XML 문서 해석

XML.parseXML(source) 메소드
XML 문서를 지정된 XML 객체 트리로 파싱
※ source는 문자열이며 source안에는 Spacebar, Tab, Enter가 들어가면 안된다.
예) myXML = new XML();
source = "<주소록><이름>누군가"
myXML.parseXML(source);
trace(myXML);

※ 결과:<주소록><이름>누군가

외부 XML문서 불러오기

XML.load("URL") 메소드()
URL의 XML 문서 로드 후 XML 계층 구조로 변환
XML.onLoad 이벤트 핸들러
load 및 sendAndLoad에 대한 지정된 함수(콜백 함수) 호출
예1)function loadEnd(){
trace(this);
}
myXML = new XML();
myXML.onLoad = loadEnd;
myXML.load("주소록.xml");

예2)myXML = new XML();
myXML.onLoad = function loadEnd() {
trace(this);
}
myXML.load("주소록.xml");


 XML 문서의 특정 노드 접근

XML.firstChild 속성
지정된 노드의 목록에서 첫번째 자식 노드 참조(읽기)
XML.lastChild 속성
지정된 노드의 목록에서 마지막 자식 노드 참조(읽기)
XML.nextSibling 속성
부모 노드의 자식 목록에서 다음 형제 노드 참조(읽기)
XML.previousSibling 속성
부모 노드의 자식 목록에서 이전 형제 노드 참조(읽기)
XML.parentNode 속성
지정된 노드의 부모 노드 참조(읽기)

XML.nodeName 속성
XML객체의 노드 이름을 가져오거나 반환(읽기/쓰기)
XML.nodeValue 속성
XML 객체의 노드 값(Value) 반환(읽기/쓰기)

XML.nodeType 속성
노드 값을 가져오거나 반환. 형태가 '노드'면 1, '텍스트'면 3 반환(읽기/쓰기)

XML 문서 속성 사용

XML.attributes 컬렉션
지정된 노드의 모든 속성을 포함하는 관련 배열 반환(읽기/쓰기)
예)myXML = new XML();
source = "<주소록 이름= '누군가' 전화번호='어딘가'>";
myXML.parseXML(source);

myXML.firstChild.attributes.이름 //참조
myXML.firstChild.attributes.전화번호="054-000-0000" //수정

XML.getBytesLoaded() 메소드
지정된 XML 문서용으로 로드된 바이트 수 반환

XML.getBytesTotal() 메소드
XML 문서의 크기를 바이트 수로 반환

XML.insertBefore() 메소드
지정된 노드의 자식 목록에서 기존 노드 앞에 노드 삽입

XML.removeNode() 메소드
지정된 노드를 부모에서 제거

XML.send() 메소드
지정된 XML 객체를 URL로 전송

XML.sendAndLoad() 메소드
지정된 XML 객체를 URL로 보내고
서버 응답을 다른 XML객체에 로드

XML.toString() 메소드
지정된 로드와 자식을 XML 텍스트로 변환
XML.contentType 속성
서버에 전송된 Mime 유형 표현(읽기/쓰기)

XML.docTypeDecl 속성
XML 문서의 Doctype 선언에 대한 정보 설정 및 반환(읽기/쓰기)

XML.ignoreWhite 속성
true로 설정되면
공백만 포함한 텍스트 노드는 파싱 과정에서 삭제(읽기/쓰기)

XML.loaded 속성
지정된 XML 객체가 로드되었는지 확인(읽기)

XML.status 속성
XML 문서 파싱 작업의 성공 또는 실패를 나타내는 숫자 상태 코드 반환(읽기)

XML.xmlDecl 속성
XML 문서의 문서 선언에 대한 정보 설정 및 반환(읽기/쓰기)
XML.childNodes 컬렉션
지정된 노드의 자식 노드를 배열 형식으로 참조 가능하게 만들어 줌(읽기)

XML.onData 이벤트 핸들러
서버에서 XML 텍스트를 완전히 로드한 경우 또는 다운로드할 때 오류가 발생한 경우 호출되는 콜백 함수

'Publisher > XML/XHTML' 카테고리의 다른 글

XPATH 가이드  (0) 2008.04.15
Post by 넥스트리소프트 데꾸벅(techbug)
, |
XHTML 1.0 에서 쿽스모드가 아닌 일반 Strict나 trasitional 모드에서 Height 100%를 CSS만으로 구현하기가 상당히 까다롭다.
그래서 구글신에게 물어봤다.

아는 분들은 알겠지만... 아래 방법들을 사용하면 되나 #body영역에 iframe이 들어간다면 iframe의 높이가 100%일때 처리되지 않는 단점이 있다.

[sample1]


<!DOCTYPE html PUBLIC "-//W3C//DTD XHTML 1.0 Strict//EN"
"http://www.w3.org/TR/xhtml1/DTD/xhtml1-strict.dtd">
<html xmlns="http://www.w3.org/1999/xhtml">
<head>
<meta http-equiv="Content-Type" content="text/html; charset=utf-8" />
<title>Untitled Document</title>
<style type="text/css">
html,
body {
    height: 100%;
    margin: 0;
    padding: 0;
}
#head {
    height: 100px;
    background: #ddd;
    position: relative;
    z-index: 1;
}
#body {
    min-height: 100%;
    margin: -100px 0 -50px;
}
* html #body {
    height: 100%;
}
#content-area {
    padding: 100px 0 50px;
}
#foot {
    height: 50px;
    background: #ddd;
}
</style>
</head>

<body>
<div id="head">
    요건 100px 높이 헤드
</div>
<div id="body">
    <div id="content-area">
        <p>컨텐츠 영역 1</p>
        <p>컨텐츠 영역 2</p>
        <p>컨텐츠 영역 3</p>
        <p>(계속 추가해서 테스트 가능)</p>
    </div>
</div>
<div id="foot">
    요건 50px 높이 풋
</div>
</body>
</html>


[sample2]
<!DOCTYPE html PUBLIC "-//W3C//DTD XHTML 1.0 Transitional//EN" "http://www.w3.org/TR/xhtml1/DTD/xhtml1-transitional.dtd">
<html xmlns="http://www.w3.org/1999/xhtml" xml:lang="ko">
<head>
<meta http-equiv="Content-Type" content="text/html; charset=utf-8" />
<title>CSS Layout - 100% height</title>
<style type="text/css">
html,body {
    margin:0;
    padding:0;
    height:100%; /* needed for container min-height */
    background:gray;
    font-family:arial,sans-serif;
    font-size:small;
    color:#666;
}

div#container {
    position:relative; /* needed for footer positioning*/
    margin:0 auto; /* center, not in IE5 */
    width:100%;
    background:#f0f0f0;
    height:auto !important; /* real browsers */
    height:100%; /* IE6: treaded as min-height*/
    min-height:100%; /* real browsers */
}

div#header {
    padding:1em;
    background:#ddd url("../csslayout.gif") 98% 10px no-repeat;
    border-bottom:6px double gray;

div#content {
    padding:1em 1em 5em; /* bottom padding for footer */
}

div#footer {
    position:absolute;
    width:100%;
    bottom:0; /* stick to bottom */
    background:#ddd;
    border-top:6px double gray;
    height:50px;
}
</style>
</head>
<body>
    <div id="container">
        <div id="header">
            헤더
        </div>

        <div id="content">
            컨텐츠
        </div>

        <div id="footer">
            푸터
        </div>
    </div>
</body>
</html>


[sample3]

  1. html,
  2. body {
  3. margin:0;
  4. padding:0;
  5. height:100%; /* 100 % height */
  6. }
  7. html>body #wrap {height:100%;} /* 100 % height */
  8. #header {
  9. width:100%;
  10. height:5em;
  11. }
  12. html>body #header {
  13. position:fixed;
  14. z-index:10; /* Prevent certain problems with form controls */
  15. }
  16. html>body #content-wrap {height:100%;} /* 100 % height */
  17. html>body #content {padding:6em 1em;} /* 6em = height of #header and #footer + 1em, 1em = give the content some breathing space */
  18. #footer {
  19. width:100%;
  20. height:5em;
  21. }
  22. html>body #footer {
  23. position:fixed;
  24. bottom:0;
  25. z-index:10; /* Prevent certain problems with form controls */
  26. }

[sample4]


  1. html,
  2. body {
  3. margin:0;
  4. padding:0;
  5. height:100%; /* 100 % height */
  6. }
  7. html>body #wrap {height:100%;} /* 100 % height */
  8. #wrap {
  9. width:40em;
  10. margin:0 auto;
  11. }
  12. #header {
  13. width:40em;
  14. height:5em;
  15. }
  16. html>body #header {
  17. position:fixed;
  18. z-index:10; /* Prevent certain problems with form controls */
  19. }
  20. html>body #content-wrap {height:100%;} /* 100 % height */
  21. html>body #content {padding:6em 1em;} /* 6em = height of #header and #footer + 1em, 1em = give the content some breathing space */
  22. #footer {
  23. width:40em;
  24. height:5em;
  25. }
  26. html>body #footer {
  27. position:fixed;
  28. bottom:0;
  29. z-index:10; /* Prevent certain problems with form controls */
  30. }


Post by 넥스트리소프트 데꾸벅(techbug)
, |
제목은 그럴듯 하지만 CSS의 hover속성을 이용한 mouseover, click 이벤트에 따른 이미지로드이다.

원본출처 : http://www.sitepen.com/blog/2008/03/28/svg-css-animations-fisheye-fun/
데모 : http://sitepen.com/labs/code/cssDock/

.dock img {
   width:50px;
   padding:10px;
   float:left;
   position:relative;
   display:block;
   -webkit-transition:width 0.5s ease-out, top 0.2s ease-out;
}
 
.dock img:hover {
   width:100px;
}
 
.dock img:active {
   top:-40px;
}
 
.dock img:hover + img {
   width:70px;
}
 

Post by 넥스트리소프트 데꾸벅(techbug)
, |
IE7과 IE8일때와 그 이하의 버전에서 "맑은 고딕"체를 사용하지 못하는 버전에서는 다른 폰트를 사용하려고 스타일쉬트를 작성하다 별도로 만들지 않고 hack을 이용해 볼까 하고 찾다가 아래와 같은 좋은 방법을 발굴(?)하다..


IE7 의 렌더링 방식이 IE6과 다르다.
CSS testing of Selector and Pseudo selectors 를 보면 IE7 은 FF 에 더 가까와 지고 있다.
그래서 바야흐로 브라우저 3개를 켜고 코딩을 해야하는 시대가 온 것이다.
이를 해결하기 위한 방법 중 하나는 Selector Hack 을 이용하는 것이다.

.context_bar_form_field {
    height: 15px; // 모든 브라우저
    #height: 15px; // IE 전용
    _height: 21px; // IE6.0 과 이전버젼용
}


우선 파폭에 맞추어 개발을 한 후 E7 에서 점검한다. 수정할 부분이 있다면 # 접두어를 붙여 수정해 준다. #이 붙은 것은 FF 에서 무시한다. 하지만 IE 는 재설정 해준다. 
다음에 IE6 을 열고 수정하면서 _ 를 접두어로 붙여 새로 재설정 한다. IE7 은 '-' 가 붙은 것을 무시한다.
또 다른 방법은,

.title h3 {height: 21px; }
.title > h3 {height: auto; min-height: 21px; }


이렇게 하는 방법도있다. 맨 아래줄은 파이어폭스와 IE7만 적용된다.한가지 주의할 점은


body {
    text-align:-moz-center; /*FF*/
    #text-align:center; /*IE */
}


속성 키워드 자체가 다른 것이 많다. 주의 할 것!
위에서 처럼 속성값 자체가 다른 경우가 있다. 그러니 안된다고 hack 만 쳐다보고 있으면 밤세야 한다.
내가 보기에 가장 좋은 방법은 Conditional Comments 를 사용하는 것이다.
복잡하게 한 파일에 구질구질 작성하지 말고 파일을 분리해 버리는 것이다.

참고 : WebBorg

<head>
<title>my css hacked page</title>
<link rel="stylesheet" type="text/css" href="styles.css" />
<!--[if lt IE 7]>
<link rel="stylesheet" type="text/css" href="iehacks.css">
<![endif]-->
<body>
  <div class="watermark">....</div>...

이렇게 분리해서 각개격파하는 것이 좋을 듯 싶다.


IE전용인 Expression을 사용하여 본다면
a { expression(어쩌구 문법) }

이렇게 해서 a 태그 즉, 링크에 걸린 항목에 대하여 Expression은 적용 시킬 수 있을것입니다.그럼 예로.. 링크주소중에 pdf 라은 확장자가 있다면 링크 앞에 자동으로 PDF 아이콘을 띄워봅시다.
a {
   padding-left: expression(this.href.indexOf('.pdf') > 0 ? '20px' : '');
   background: expression(this.href.indexOf('.pdf')>0 ? 'transparent url(pdf.gif) no-repeat center left' : '');
}

이건 IE 용입니다. Firefox에선 이렇게 하시면 됩니다.
a[href $='.pdf']{
   padding-left: 20px;
   background: transparent url(pdf.gif) no-repeat center left;
}

음... 불여시에서 사용하는게 훨씬 간편하네요 @@;;
[href $='.pdf'] 이 구문에서 $는 .pdf로 끝나는 것을 의미합니다.
.pdf로 시작하는 것을 찾으려면 $대신에 ^을 사용하시면 됩니다.
[href ^='.pdf']가 되겠죠. 그냥 포함 되어 있는지를 찾는 거라면 *을 사용하시면 됩니다.
<style>
a[href $='.pdf']{
    padding-left: 20px;
    background: transparent url(pdf.gif) no-repeat center left;
}

a {
    padding-left: expression(this.href.indexOf('.pdf') > 0 ? '20px' : '');
    background: expression(this.href.indexOf('.pdf')>0 ? 'transparent url(pdf.gif) no-repeat center left' : '');
}
</style>
<a href="nextree.pdf">넥스트리1</a><br/>
<a href="nextree.gif">넥스트리2</a>

출처 : 플래쉬카페


IE6 버그정리

Doubled Float-Margin Bug
버전: IE6
문제: float 요소에 margin을 적용했을 경우, margin이 이중으로 표현되는 문제
해결: float 요소에 display:inline 적용
참고: http://positioniseverything.net/explorer/doubled-margin.html

——

Peekaboo Bug
버전: IE6, IE7
문제: float 요소 안의 내용이 나오지 않다가, 브라우저 창 크기를 조절하거나 스크롤했을때에만 가끔 내용이 나타나는 문제
해결: float 요소와 그 요소를 감싸는 요소 모두 적용
position: relative; /* IE6 bugfix */
min-width: 0; /* IE7 bugfix */
참고: http://positioniseverything.net/explorer/peekaboo.html
참고: http://www.brownbatterystudios.com/sixthings/2007/01/06/css-first-aid-for-ie-peekaboo-bug/

——

Duplicate Characters Bug
버전: IE6
문제: float 요소가 1개 이상 연속될때 마지막 float 요소의 문자 끝부분이 중복 출력되는 문제로, float 요소 내부에 <!– comment –>, <input type=”hidden” />, { display:none; } 와 같은 요소들이 포함되어있을때 발생.
해결: float 요소에 display:inline 적용
참고: http://positioniseverything.net/explorer/dup-characters.html

——

Expanding Box Problem
버전: IE6
문제: 레이아웃 요소의 크기를 지정했음에도 불구하고, 지정한 크기보다 큰 텍스트(띄어쓰기가 없는 긴 텍스트)를 포함할 경우 요소의 크기가 늘어나버리는 문제
해결: 해당 요소에 word-wrap:break-word; overflow: hidden; 적용
참고: http://positioniseverything.net/explorer/expandingboxbug.html

——

Guillotine Bug
버전: IE6, IE7
문제: float 요소의 하단이 잘리거나(IE6), float 요소를 포함하는 컨테이너 요소의 크기가 늘어나버리는(IE7) 문제
해결: float 요소를 포함하는 컨테이너 요소 바로 뒤에 clear해주는 요소를 삽입(예: <div style=”clear: both”></div>)
참고: http://positioniseverything.net/explorer/guillotine.html

——

IE6 Float Model Problem
버전: IE6
문제: float 요소 다음에 width가 선언되지 않은 non-floated 요소가 위치하면, 두 요소의 바운더리는 겹쳐야 한다. 하지만 non-floated 요소의 width가 선언되면, non-floated 요소가 float 요소 옆으로 나란히 위치하는 문제.
해결: 없다. 두 요소의 바운더리가 겹쳐져야 하는 상황을 아예 만들지 말거나, 꼭 겹쳐져야한다면 position을 사용하는 등의 다른 방법을 구사.
참고: http://positioniseverything.net/explorer/floatmodel.html

——

Three Pixel Text-Jog
버전: IE6
문제: float 요소 다음에 non-floated 요소가 위치하면, non-floated 요소의 텍스트가 3 pixel 밀리는 문제.
해결: float 요소에 {margin-right:-3px}, non-floated 요소에 {height:1%; margin-left:0} 적용
참고: http://positioniseverything.net/explorer/threepxtest.html

——

Inherited margins on form elements
버전: IE6, IE7
문제: form을 포함하는 컨테이너 요소에 margin이 적용되어있을때, 특정 input 요소들이 컨테이너의 margin을 상속받는 오류.
해결: input 요소 앞에 inline 요소를 삽입하거나, span, label 등의 컨테이너 요소로 input 요소를 감싼다.
참고: http://positioniseverything.net/explorer/inherited_margin.html

——

Line-height Bug
버전: IE6
문제: plain text 중간에 inline으로 img, input, textarea, select, object가 삽입되어있을 경우 line-height 제대로 표현하지 못하는(collapse됨) 문제.
해결: inline으로 삽입된 img, input… 요소의 상하 margin을 교정 (예: {margin:45px 0; vertical-align:middle;})
참고: http://positioniseverything.net/explorer/lineheightbug.html

——

Border Chaos
버전: IE6
상황: block 요소가 두개 있다. 두번째 요소의
문제: 연속되는 block 요소중 두번째 이후 요소들의 margin-top이 음수이고, border가 적용되어있을때, 나타나는 광란의 버그
해결: 연속되는 block 요소들의 컨테이너(parent)에 {position: relative;} 적용
참고: http://positioniseverything.net/explorer/border-chaos.html

——

Disappearing List-Background Bug
버전: IE6
문제: 리스트(ol, ul, dl)를 감싸는 div의 position이 relative이고 float되어있으며, 리스트요소(li, dt)에 background가 사라지는 문제(background를 적용했을때).
해결: 리스트요소(li, dt)에 {display:inline} 적용
참고: http://positioniseverything.net/explorer/ie-listbug.html

——

Unscrollable Content Bug
버전: IE6
문제: position이 relative이고 크기가 지정되지않은 컨테이너 요소가, position이 absolute이고 크기가 페이지보다 큰 컨텐츠를 포함하고 있다면 스크롤바가 나타나야 하지만 그렇지않은 문제.
해결: 컨테이너 요소에 {height:1%} 적용
참고: http://positioniseverything.net/explorer/unscrollable.html

——

Duplicate Indent Bug
버전: IE6
문제: float요소가 padding 또는 margin이 적용된 컨테이너에 위치하고 있다면, 이중으로 적용되는 문제.
해결: 경우의 수가 워낙 많지만, 대부분의 경우 {display:inline} 으로 해결 가능.
참고: http://positioniseverything.net/explorer/floatIndent.html

——

Escaping Floats Bug
버전: IE6
문제: 크기를 지정하지 않은 컨테이너가 float요소 여러개를 포함하고 있는데(clear 요소로 float 해제했음), 컨테이너 영역이 제대로 표현되지 못하는 문제.
해결: 컨테이너에 {height:1%} 적용
참고: http://positioniseverything.net/explorer/escape-floats.html

——

Creeping Text Bug
버전: IE6
문제: block요소가 또 다른 block요소를 포함하고 있고, border-left, padding-bottom이 적용되어있을때, 내부의 block요소가 1px씩 좌측으로 기어들어가는 문제
해결: 외부 block요소에 {height:1%;} 적용
참고: http://positioniseverything.net/explorer/creep.html

——

기타
문제: a를 block으로 지정하면, 블록 전체가 마우스에 반응해야하는데 여전히 텍스트에만 반응하는 문제
해결: height:1%

문제: 리스트요소(li)간 간격이 발생하는 문제
해결: display: inline

문제: {position:absolute; bottom:0; right:0}인 요소가 relative인 부모의 우측하단에 위치하지 않고 전체 화면의 우측하단에 위치하는 문제
해결: height:1%

——

FireFox의 버그
문제: 배경 이미지의 위치를 bottom으로 했을 경우, 브라우저 크기보다 컨텐츠의 크기가 짧다면, 배경이미지가 컨텐츠 하단에 위치하는 버그
해결: html {height:100%}


Post by 넥스트리소프트 데꾸벅(techbug)
, |
empty-cells:show 가 IE7 에서 먹지 않는 문제로 많이 고민하다.

<!--[if lte IE 7]>
<script type="text/javascript">
window.onload = function() {
      tds = document.all.tags("td");
      for (x = 0; x < tds.length; x++) {
         if (tds[x].innerHTML == '') tds[x].innerHTML = "&nbsp;";
      }
}
</script>
<![endif]-->
Post by 넥스트리소프트 데꾸벅(techbug)
, |