Mouse wheel programming in JavaScript
http://adomas.org/javascript-mouse-wheel/
Mouse wheel programming in JavaScript
Quick links: source · test page · long test page (with scrollbars) · compatibility
Though many people still find this page useful, there have been some changes in the browsers since last update of this page, and I generally consider some information here to be outdated. However, I suggest using MooTools or other general Javascript frameworks that provide portable and maintainable basis for writing Javascript code.
Web applications are becoming more and more like “normal” desktop applications. Of course, they are more and more functional, but smooth user interface acts the primary role. So we have drag and drop, autocompletition, and much more. Many of those nice features got possible only with help of AJAX.
This page, however, is not about AJAX (or any other buzzword). It is about rather simple user input method -- mouse wheel. I believe it would now be difficult to find a mouse without wheel. Vast majority of users are used to the wheel as a control for scrolling in lists, zooming etc. Rather few web applications, however, make smart use of mouse wheel. This page is to provide you with general information about handling mouse wheel-generated events in JavaScript programming language.
Annotated code
Below is annotated javascript code, which should explain the magic behind mouse wheel generated events. There is also plain version for copy and paste.
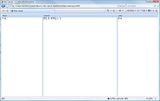
/** This is high-level function.
* It must react to delta being more/less than zero.
*/
function handle(delta) {
if (delta < 0)
…;
else
…;
}
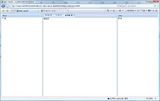
/** Event handler for mouse wheel event.
*/
function wheel(event){
var delta = 0;
if (!event) /* For IE. */
event = window.event;
if (event.wheelDelta) { /* IE/Opera. */
delta = event.wheelDelta/120;
/** In Opera 9, delta differs in sign as compared to IE.
*/
if (window.opera)
delta = -delta;
} else if (event.detail) { /** Mozilla case. */
/** In Mozilla, sign of delta is different than in IE.
* Also, delta is multiple of 3.
*/
delta = -event.detail/3;
}
/** If delta is nonzero, handle it.
* Basically, delta is now positive if wheel was scrolled up,
* and negative, if wheel was scrolled down.
*/
if (delta)
handle(delta);
/** Prevent default actions caused by mouse wheel.
* That might be ugly, but we handle scrolls somehow
* anyway, so don't bother here..
*/
if (event.preventDefault)
event.preventDefault();
event.returnValue = false;
}
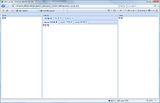
/** Initialization code.
* If you use your own event management code, change it as required.
*/
if (window.addEventListener)
/** DOMMouseScroll is for mozilla. */
window.addEventListener('DOMMouseScroll', wheel, false);
/** IE/Opera. */
window.onmousewheel = document.onmousewheel = wheel;
Handler function

In the code above, there is “handle” function
which is, of course, meant to be written by you. As you have noticed,
it takes on parameter, delta. It is called so, because
mouse wheel has no absolute system, and we only capture scrolling
deltas, that is wheel angle changes.
Practically, you only have to watch for positive and negative values of delta. These cases are pictured on the left.
If delta is positive, wheel was scrolled up. Otherwise, it was scrolled down.
Note that in applications, scrolling up usually means page is scrolled down etc.
You might wonder, what will the actual values of delta be.
In fact, the code above is adjusted in such a way that you should
get -1 or +1 in 99% of all cases.
Though, for instance, I have seen ±3 in Firefox if you scroll
very fast. Someone
in Digg reported delta of 14, and Geoffrey Kruse
was able to get 76 on his Powerbook trackpad. :-) Of course,
that depends on sensivity that you've set for your mouse. There is
also subtlety in Firefox (at least): if you start scrolling the wheel
fast and then push the right mouse button for the menu, large value
of delta is reported, e.g. 30.
Robert Gerlach writes about his experience on Safari, MacOS X: “For a single turn its +-0.1, if you roll it faster, the values become bigger. This is because of Mac OS' mouse/wheel-acceleration. You move/turn it one time, it moves/scrolls 1 pixel. Then you move/turn it three times fast and it moves/turns 30 pixel” He also writes about Camino, which is based on Gecko, the same engine that Firefox uses: “much like Safari (+- 0.3 to +-Infinity), which astonishes me, since it is based on the same engine as Firefox, which only shows +-2.666666 despite the speed.”
You are also welcome to see test page and also long test page, i.e. with scrollbars – that shows how preventing default behaviour works.
Compatability
I have written first version of this code in January 2006. Back then, Firefox and Internet Explorer 6 were only supported browsers. Older Internet Explorer version do not work. Thanks to Kane Barton for reporting that this works since Firefox 1.0.7 (so possibly since 1.0).
I would like to thank Jean-Luc Milot for contributing notes on how to make the code work properly in Opera 9. That version of Opera is relatively new (as of July 2006); previous versions of Opera do not support mouse wheel. I am also grateful to Юрій Чайковський (Yurij Chaikovsky) for pointing out that in newer versions of Opera (at least from 9.20 and up) you no longer have to invert the sign of delta. So the behaviour is the same as in Internet Explorer. I am a bit worried about compatability with older versions of Opera (though Opera forcibly recommends its users to update once new version is out) but after some time passes I will remove the conditional code that was written specifically for Opera.
Also thanks to Andrew Shearer, Dorian and Geoffrey Kruse for pointing out that the code works in Safari. Andrew mentions version 2.0.4, but I am not sure about earlier versions. Markus Rothenbacher wrote me telling that Konqueror (at least till version 3.5.4) does not have support for mouse wheel.
Preventing default behaviour code comes from phpspot.org and Johan Sundström. You can see how their code works in long test page (i.e. with scrollbars). Still, it works in IE/Firefox. It should also work in Opera since version 9.02. (Thanks to Jarkko Rantavuori for pointing this out.)
It is useful to note, however, that Opera, Safari and Firefox include automated upgrade systems that prompt users to upgrade to newer versions of the browser once it gets released, so you can be prepared to the fact that more and more internet users will have browsers for which this mouse wheel code works.
Mouse wheel currently works on: (with earliest version known to work)
- Internet Explorer 6
- Firefox 1.0
- Opera 9.
- Safari.
Unsupported browsers: (no existing version supports mouse wheel)
- Konqueror
- OmniWeb
- iCab
Usability
(Few “don't”s.)
- Don't make wheel act unexpectedly. Users know that wheel scrolls the list of files. If there is list of files in your web application, use it. Some map programs use wheel for zooming (and so does Google Maps). So use it.
- Don't force users to depend on having wheel working. Just as it is bad practice to rely on JavaScript.
- Try to get rid of global scrollbars, because mixing them with this code might cause frustration to the users.
Real world examples
If you know more practical and interesting examples, please mail me a link.
- Google Maps uses mouse wheel for zooming in and out.
- ACME Mapper combines more data sources than original Google Maps.
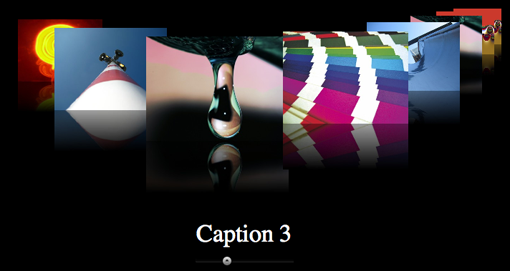
- ImageFlow by Finn Rudolph
Related stuff
- Italian translation with live demonstration, by Francesco Napoletano.
- Digg
- Simple Mouse Wheel support for GWT
Hope this was useful to you. You may drop me a note if it was.
'Scripter > JAVASCRIPT' 카테고리의 다른 글
| FF3에서의 window.showModalDialog (0) | 2008.06.24 |
|---|---|
| IE6에서 CSS로 fixed로 했을경우 고정되지 안는 문제 (2) | 2008.05.12 |
| IE7에서 파일업로드 미리보기 기능 (0) | 2008.04.22 |
| IE에서 Javascript 로컬 실행(ActiveX 창뜰때) (8) | 2008.04.17 |
| JSON에 대한 작은 단상 : JSON Diet (1) | 2008.04.16 |
 invalid-file


 invalid-file