블로그 이미지

카테고리

데꾸벅 (194)
Publisher (39)
Scripter (97)
Programmer (1)
Designer (30)
Integrator (18)
Pattern Searcher (4)
News (2)
강좌 및 번역 (3)

최근에 올라온 글

최근에 달린 댓글


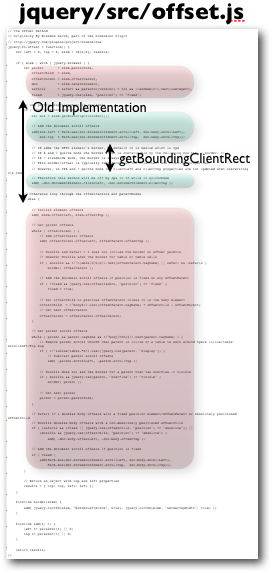
IE5에서 첫선을 보인 객체.getBoundingClientRect는 객체의 offset의 top, left,width,height를 반환하는 멋진놈이다.
일반적으로 gecko 엔진을 사용하는 FF2에서는 getBoxObjectFor(객체)를 사용했으나
FF3에서는  getBoundingClientRect도 지원한다.

FF3가 출시되자 마자 기존 스크립트들을 많이 바꾸고 있는데 이중에 getBoundingClientRect가 포함되었다.
드디어 FF도 IE의 손을 들어준것인가? IE8에서는 얼마만큼 오픈소스진영의 손을 들어줄것인지 귀추가 주목된다.

Mozilla사이트의 getBoundingClientRect에 관련된 Reference 참조

사용자 삽입 이미지
John Resig의 getBoundingClientRect is Awesome 포스트 참조

데꾸벅이 사용하는 객체의 offset left,top,width, height반환하는 함수
/**
 * tag 객체의 위치값 및 너비/높이값을 반환한다.
 * @param {objId} DOM객체 : document.getElementById()
 * @return {ret} left,top,width,height 를 반환한다.
 * @author 데꾸벅
 */
function getBoundsObject(objId){
    var techbug = new Object();
    var tag = document.getElementById(objId);

    if(tag !=null && tag != undefined ){
        if(tag.getBoundingClientRect){ //IE, FF3
            var rect = tag.getBoundingClientRect();
            techbug.left = rect.left + (document.documentElement.scrollLeft || document.body.scrollLeft);
            techbug.top = rect.top + (document.documentElement.scrollTop || document.body.scrollTop);
            techbug.width = rect.right - rect.left;
            techbug.height = rect.bottom - rect.top +1; // +1 = Moz와 맞춤
        } else  if (document.getBoxObjectFor) { // gecko 엔진 기반 FF3제외
            var box = document.getBoxObjectFor(tag);
            techbug.left = box.x;
            techbug.top = box.y;
            techbug.width = box.width;
            techbug.height = box.height;
        }else {
            techbug.left = tag.offsetLeft;
            techbug.top = tag.offsetTop;
            techbug.width = tag.offsetWidth;
            techbug.height = tag.offsetHeight  + 3;  // +1 = Moz와 맞춤
            var parent = tag.offsetParent;
            if (parent != tag) {
                while (parent) {
                    techbug.left += parent.offsetLeft;
                    techbug.top += parent.offsetTop;
                    parent = parent.offsetParent;
                }
            }
            // 오페라와 사파리의 'absolute' postion의 경우 body의 offsetTop을 잘못 계산 보정
            var ua = navigator.userAgent.toLowerCase();
            if (ua.indexOf('opera') != -1 || ( ua.indexOf('safari') != -1 && getStyle(tag, 'position') == 'absolute' )) {
                techbug.top -= document.body.offsetTop;
            }

        }
        return techbug;
    }
}

Post by 넥스트리소프트 데꾸벅(techbug)
, |

엊그제 Firefox 3.0 정식버전이 출시되자 마자 설치를 했다.
조금더 빨라진거, UI가 조금더 고급(?)스러워진것, 주소표시줄에 사용자접근성을 고려해서 나오는 아이콘들... 뭐 여튼 이건 설치해 보면 자연스레 알게 될것이고..
알려진 버그로는 URL에 한글이 들어가면 깨진다는거... 기본셋팅이 UTF-8이 아니라서 그런거라 about:config에서 변경해주면 그만이겠고....
여튼 다 좋은데.......

IE전용인줄 알았던 window.showModalDialog 로 먹는것이 아닌가? 
항상 스크립트에서..

if(window.showModalDialog) {
  //IE전용
}else {
   //그외 브라우저
}


일케 작업했었는데 하나를 더 주가해 주게 생겼다.

if(window.showModalDialog && document.all) {
  //IE전용
}else {
  //그외 브라우저
}


참고 사이트 : http://developer.mozilla.org/en/docs/DOM:window.showModalDialog

흠.. Mozilla 사이트에서 MSDN 사이트를 참조하란다...  ㅡ.,ㅡ;


그외의 window객체에 새로추가된것들이 많은데..  여기(모질라개발자사이트) 에서 확인하기 바란다.

뭐 간단히 정리하면 ...
window.applicationCache
window.fullScreen
window.returnValue
window.postMessage <-- 이녀석 드디어 추가됐다..


IE6, IE7에서 지원하던 스크립트도 FF3에서 지원을 하기 시작한 메쏘드나 프로퍼티가 있는데 아래 사이트를 참조하면 도움이 될듯하다.
DOM Client Object Cross-Reference:document


사용자 삽입 이미지


Post by 넥스트리소프트 데꾸벅(techbug)
, |

IE7 나온지가 얼마나 됐다고 IE8 사용성 테스트를 해야 한다니..복장이 터질지경이다.

현재 프로젝트에서 사용자중 가장많이 차지하는 부분이 IE6인데..기본 개발 브라우저는
IE6,IE8,IE9, FF2,FF3, Opera9에서 까지 잘 보여야 한다니.....

일전에 포스팅한 IE8출시에 따른 호환성테스트 글에서 언급했지만
IE8에서 IE7과 같이 쓰려면 다음과 같은 Meta태그를 넣어주면된다.

<meta http-equiv="X-UA-Compatible" content="IE=EmulateIE7" />

출처 : MS IE Compatibility Site


아래 내용은 MS의 고객지원센터에서 발췌한 글이다.

'Designer > UX' 카테고리의 다른 글

UX 디자인 기획은 원맨쇼가 아니다  (6) 2009.03.04
2009년 유행할 웹디자인 트렌드  (14) 2009.01.19
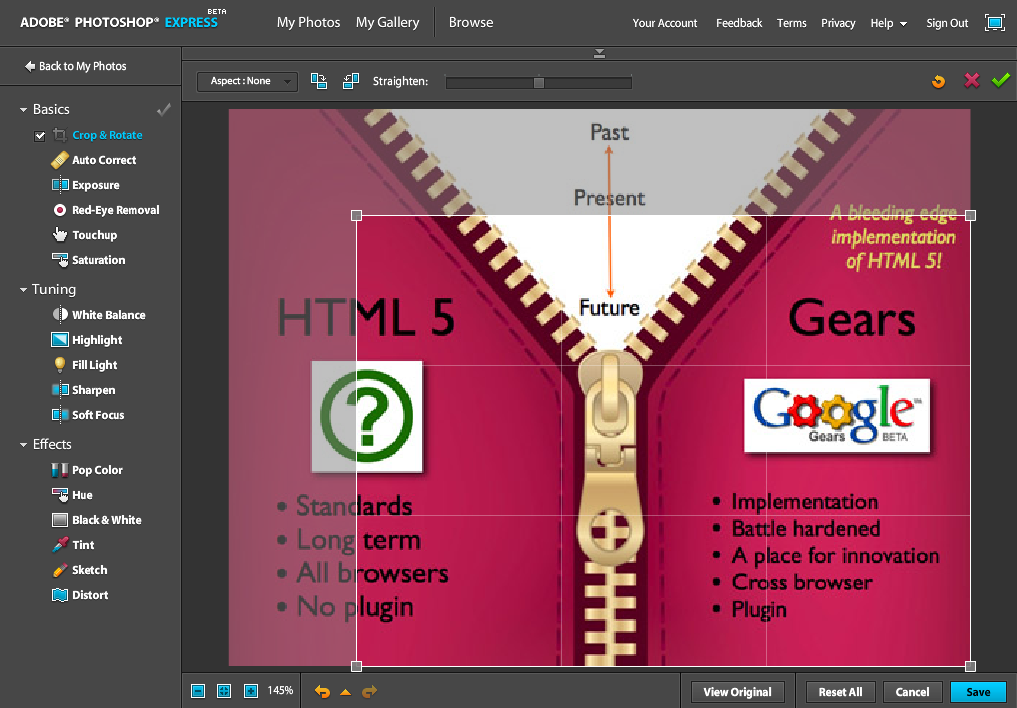
PhotoshopExpress : 포토샵이 웹으로?  (2) 2008.03.28
칼라에 대한 고찰  (0) 2008.02.21
IE6 PNG background없애기  (0) 2008.02.21
Post by 넥스트리소프트 데꾸벅(techbug)
, |

[출처 : PHPSchool]

쩝..IE7에서 보안이 강화되면서 미리보기 기능이 구현안돼서 헤매고 당기다 아지트에서 발견하다...

소스 :


<html>
<head>
<meta http-equiv="content-type" content="text/html; charset=euc-kr">
<style type="text/css">
#previewPhoto {
 width:100%;
 height:100%;
 position:absolute;
 z-index:1;
 filter:progid:DXImageTransform.Microsoft.AlphaImageLoader(sizingMethod=scale);
}
#previewPhotoGara {
 width:115px;
 height:150px;
 filter:progid:DXImageTransform.Microsoft.AlphaImageLoader(sizingMethod=scale);
}
</style>
<script type="text/JavaScript">
<!--
function showPhoto(src) {
 if(src.match(/\.(gif|jpg|jpeg|png)$/i)) {
 // 복사용 개체에 그림 삽입하고 실제 크기 구하기
  var obj = document.getElementById("previewPhotoGara");
  obj.style.filter = "progid:DXImageTransform.Microsoft.AlphaImageLoader(src='" + src + "',sizingMethod=image)";
  var w = obj.offsetWidth;
  var h = obj.offsetHeight;
  /*if(w > 115) { // 가로 길이가 115 이상일 경우만 축소하기
   var x_axis = w / 115; // X축의 축소 비율 구하기
   var y_axis = parseInt(h / x_axis); // X축이 들어든 만큼 Y축의 크기를 축소한다.
  } else {
   var y_axis = h;
  }
  // 썸네일 컨테이너의 크기 조정
  document.getElementById("previewPhotoBox").style.width = '115px';
  document.getElementById("previewPhotoBox").style.height = y_axis + 'px';
  */

  // 썸네일에 그림 삽입하고 이상유무 첵~
  document.getElementById("previewPhoto").style.filter = "progid:DXImageTransform.Microsoft.AlphaImageLoader(src='" + src + "',sizingMethod=scale)";
 } else {
  alert("이미지 파일만 올려주세요");

 }
}
function killPhoto() {
 if(!confirm("사진을 취소하시겠습니까?")) return;
 document.getElementById("filePhoto").outerHTML = document.getElementById("filePhoto").outerHTML;
 document.getElementById("previewPhoto").style.filter = "progid:DXImageTransform.Microsoft.AlphaImageLoader(src='noPhoto.gif',sizingMethod=scale)";
}
//-->
</script>
</head>
<body>


<DIV style="overflow:hidden; width:115px; height:150px"><!-- 썸네일 크롭핑 -->
<DIV id=previewPhotoBox style="width:115px; height:150px"><!-- 썸네일 컨테이너 -->
<DIV id=previewPhoto><!-- 썸네일 -->
</DIV>
</DIV>
</DIV>

<DIV style="overflow:hidden; width:1px; height:1px">
<DIV id=previewPhotoGara></DIV>
</DIV>

<input type=hidden id=verifyPhoto value=""><!-- 업로드 파일이 이미지 파일(jpg,gif)인지 최종판단 -->

<input type=file name=filePhoto id=filePhoto onchange="showPhoto(this.value)">
<input type=button value="사진취소" onclick="killPhoto()">

</body>
</html>

Post by 넥스트리소프트 데꾸벅(techbug)
, |

ExtJS 2.1 릴리즈

Scripter/EXTJS / 2008. 4. 22. 09:55

프로젝트가 바빠서 한동안 들리지 않았더니만...
extjs 2.1 이 릴리즈됐다.

많은 변화가 있었는데 가장 큰 변화라면 라이센스정책이 기존의 LPGL에서 3가지로 구분되어 나뉘어졌다. YUI에서 출발한 extjs는 아닐거라고 생각했는데 유료로 전환해 버렸네~
우선 가장 이번 2.1버전에서 달라진 점(Release Note)을 찾아본다면 아래와 같다.

  1. 라이센스 정책 변화
  2. Full REST 지원
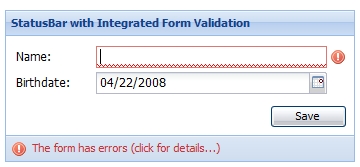
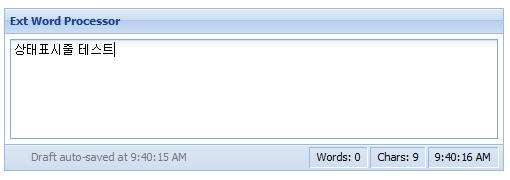
  3. Ext.StatusBar 컴포넌트 추가 (IE7,FF에서 보안정책때문에 애먹어서 구현하고 있었는데.. ㅠ.,ㅠ)
  4. 컴포넌트 Config옵션 Remote Loading지원
  5. Grid 필터링 추가
  6. Layout Browser Sample 추가
  7. Spotlight 기능추가
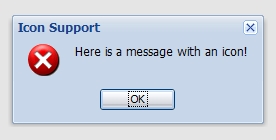
  8. 아이콘 팝업 추가
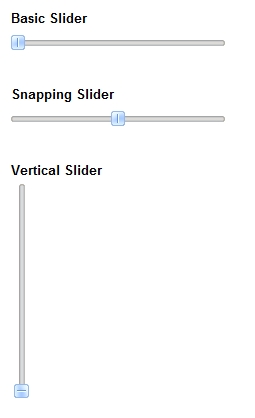
  9. 슬라이드기능 추가
  10. validation기능 추가(향상이라고 해야 하나?)
  11. Card Panel Layout추가 (Wizard기능)
  12. Markup re-Rendering기능 향상

라이센스정책
많은 개발자들의 활발한 활동과 커뮤니티의 활성화로 Ext가 안정화 되면서 Ext개발자와 공헌자들이 계속 개발을 할수 있게 하기위해 라이센스 정책을 변경함 ( 뭐~ 다들 일케 말하더라~ )  여기서 말하는 듀얼 라이센스 정책이라는것은 개발된 애플리케이션의 소스를 공개하지 않는다면 commercial License이고 공개한다면 Open Source가 된다는 거다.. ㅡ.,ㅡ;
둘다 Open Source이긴 하지만.. 돈있으면 소스공개하지 말고 commercial로 쓰고 돈없으면 소스 공개해서 OpenSource로 까발리라는 얘기다~~

1. Commercial License :
 Quid Pro Quo 원칙에 근거하여 배포할 목적으로 애플리케이션을 개발한다면 적정한 수 만큼의 라이센스를 구입해야 함. (듀얼 라이센스정책)
 - 구매한 소스에 대해서는 상업용으로 전환 가능.
  - GPL에 의해 소스를 수정할수 있음.
2. Open Source
 기존의 LGPL에서 GPL에 따른 라이센스 정책
3. OEM / Reseller License


샘플보기 : http://www.extjs.com/deploy/dev/examples/samples.html


헉... Firebug를 켠 상태로 들어갔더니만 이런 메세제가 ㅡ.,ㅡ; firebug detecting기능을..

사용자 삽입 이미지


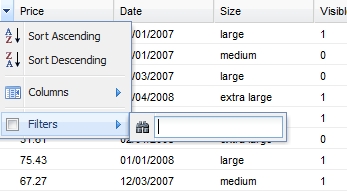
그리드 필터링 기능 : 언제가 사용자중에 이 기능을 extesion으로 올렸던것이 추가되었다.

사용자 삽입 이미지


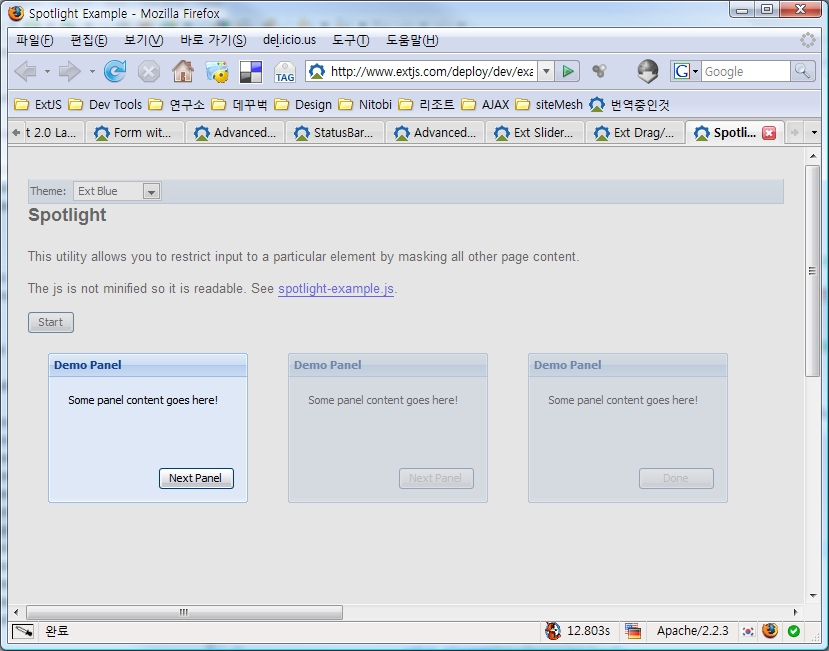
Sportlight기능 : 설치하기나 step으로 나눈것 설명할때 편하겠군효~~
사용자 삽입 이미지


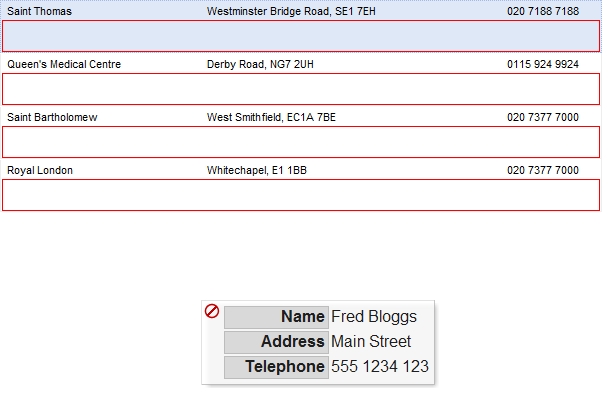
Drag & Drop 기능향상

사용자 삽입 이미지


슬라이드 기능 (기존 scriptaculous사이트에서 보던 예제를 extjs로... ㅡ.,ㅡ;)


사용자 삽입 이미지


StatusBar 기능
사용자 삽입 이미지


흠.. StatusBar기능 괜찮네~ 이것도 사용자 extension이였던 기능이였는데..
사용자 삽입 이미지


개발시 가장 까다로웠던 validation check기능이 많이 추가되었다.
사용자 삽입 이미지


CardLayout을 이용한 Wizard기능 추가
사용자 삽입 이미지


흠... 이건.. 추가라고 할것도 없이 사용자 편의성을 위해 아이콘추가 ㅡ.,ㅡ;
사용자 삽입 이미지


'Scripter > EXTJS' 카테고리의 다른 글

Extjs 3.0 Roadmap  (10) 2008.11.12
Ext2.2 Release  (11) 2008.08.07
RESTFul 한 ExtJS  (0) 2008.04.16
Extjs Qtips 사용하기  (2) 2008.04.16
Extjs 기본레이아웃에 각종 패널붙이기  (12) 2008.04.16
Post by 넥스트리소프트 데꾸벅(techbug)
, |

100라인 Ajax Wrapper

Scripter/AJAX / 2008. 4. 19. 15:13


다른 분들은 어떨지 모르나 UI 개발자인 데꾸벅의 경우는 프로젝트를 할때 마다 느끼는 거지만 어떤 Ajax framework를 쓸지 고민을 많이 하는 편이다.
그냥 규모가 좀 되는곳이라면 jQuery나 prototype을.. 그리고 내부 애플리케이션이라면 extjs를... 혹은 작더라도 struts2를 쓸때는 dojo를...
근데 문제가 되는것은 아주 작은 소규모 프로젝트의 경우는 이러한 ajax framework나 libraries를 사용하기가 좀 그래서 단순 XHR Wrapper를 만들어 사용한다


[데꾸벅이 사용하는 Ajax Wrapper 01]

function createHttp() {
 try {
  return new XMLHttpRequest();
 }
 catch (e) {
  var objectNames = ["MSXML2.XMLHTTP.5.0",
"MSXML2.XMLHTTP.4.0", "MSXML2.XMLHTTP.3.0",
"MSXML2.XMLHTTP", "Microsoft.XMLHTTP"];
  for (var i = 0; i < objectNames.length; i ++) {
   try {
    return new ActiveXObject(objectNames[i]);
    break;
   }
   catch (e) {
   }
  }
  return null;
 }
}


var loading = false;
function getResponse(uri,content) {
 try {
  loading = true
  var body = document.body;
  var oHttp = createHttp();
  if(uri.indexOf('?') ==-1) aux = '?';
  else aux = '&';
  oHttp.open("POST", uri + aux+"time=" + (new Date()).getTime(), false);
  if(content == undefined) {
   content = '';
  } else {
   oHttp.setRequestHeader("Content-Type", "application/x-www-form-urlencoded");
  }
  oHttp.send(content);
  result = new Array();
  if(isSafari || isOpera) {
    resultNodes = oHttp.responseXML.firstChild.childNodes;
    for(var i=0; i';

  return false;
 }
}

function requestHttp(uri) {
 try{
  var oHttp = createHttp();
  oHttp.open("GET", uri + "&time=" + (new Date()).getTime(), false);
  oHttp.send("");
  if(isSafari || isOpera) {
   var returnValue = oHttp.responseXML.firstChild.firstChild.nextSibling.firstChild.nodeValue;
   delete oHttp;
   return returnValue;
  } else {
   var returnValue = oHttp.responseXML.selectSingleNode("/response/error").text;
   delete oHttp;
   return returnValue;
  }
 } catch (e) {
  window.status = e.messge;
 }
}

function requestHttpText(uri) {
 var oHttp = createHttp();
 oHttp.open("POST", uri + "&time=" + (new Date()).getTime(), false);
 oHttp.send("");
 var returnValue = oHttp.responseText;
 delete oHttp;
 return returnValue;
}

function requestHttpXml(uri) {
 var oHttp = createHttp();
 oHttp.open("GET", uri + "&time=" + (new Date()).getTime(), false);
 oHttp.send("");
 var returnValue = oHttp.responseXML;
 delete oHttp;
 return returnValue;
}

function requestPost(uri, content) {
 var oHttp = createHttp();
 oHttp.open("POST", uri + "&time=" + (new Date()).getTime(), false);
 oHttp.setRequestHeader("Content-Type", "application/x-www-form-urlencoded");
 oHttp.send(content+ "&time=" + (new Date()).getTime());
 var returnValue = oHttp.responseXML.selectSingleNode("/response/error").text;
 delete oHttp;
 return returnValue;
}

function requestPostText(uri, content) {
 var oHttp = createHttp();
 oHttp.open("POST", uri + "&time=" + (new Date()).getTime(), false);
 oHttp.setRequestHeader("Content-Type", "application/x-www-form-urlencoded");
 oHttp.send(content);
 var returnValue = oHttp.responseText;
 delete oHttp;
 return returnValue;
}


function setRequestBody(elementName, elementValue, boundary){
 var body = "";
 body += "--" + boundary + "\r\n";
 body += "Content-Disposition: form-data; name=\"" + elementName + "\"" + "\r\n\r\n";
 body += elementValue + "\r\n";
 return body;
}


[모 프로젝트에서 사용했던 예~ ]

/**
 * HTTP 혹은 HTTPS 방식의 통신을 제공하는 클래스객체를 생성합니다.
 * @class EnHttp
 *
 */
function EnHttp(){

 this.dialBack ="";    //컴포넌트와 컨테이너 인증에 사용합니다.
 this.extraInfo ="";    //Url의 추가 정보를 지정합니다.
 this.host = "127.0.0.1";  //호스트 이름을 지정합니다.
 this.method = "POST";   //메쏘드(HTTP의 Verb)를 지정합니다.
 this.optionalHeaders = "";  //HTTP요청의 추가 헤더를 지정합니다.
 this.password = "";    //패스워드를 지정합니다.
 this.port = "80";    //포트를 지정합니다.
 this.postData ="";    //POST, PUT 요청에 사용되는 데이터를 지정합니다.
 this.protocol ="HTTP";   //프로토콜을 지정합니다.
 this.proxy ="";     //프록시가 설정된 환경인 경우, 프록시설정 정보를 지정합니다.
 this.referer = "";    //HTTP요청의 Referer를 지정합니다.
 this.responseContents="";  //응답 내용 문자열을 전달합니다.
 this.responseHeaders ="";  //응답헤더 문자열을 전달합니다.
 this.responseStatusCode =""; //응답상태코드를 문자열로 전달합니다 (예: "404")
 this.responseStatusText =""; //응답상태를 문자열로 전달합니다.(예: "Not Found")
 this.ssl = false;    //SSL 사용여부를 지정합니다.
 this.timeout = 0;    //HTTP요청의 timeout을 지정합니다.
 this.urlPath="";    //경로를 지정합니다.
 this.user ="";     //사용자 이름을 지정합니다.
 this.version ="";    //HTTP버전 문자열을 지정합니다.
 this.url = "";     //전체 URL을 지정 합니다.


 /**
  * 실제 HTTP요청을 서버에 전송합니다.
  * @return true/false
  */
 this.SendRequest = function(){
  this.url = this.protocol + "://"+ this.host + ":" + this.port + this.urlPath;

  var xmlhttp = createHttp();
  xmlhttp.open(this.method, this.url,false);

  var headers = this.optionalHeaders.split("\r\n");
  for(var i=0; i < headers.length; i++){
   var oneHeaders = headers[i].split(":");
   xmlhttp.setRequestHeader(oneHeaders[0],oneHeaders[1]);
  }


  var varResponseStatusCode = "";
  var varResponseHeaders = "";
  var varResponseContents = "";

     //도착하는 이벤트 핸들러 걸어주고
     xmlhttp.onreadystatechange = function() {
         if (xmlhttp.readyState==4) {
    varResponseStatusCode = xmlhttp.status;
    varResponseHeaders = xmlhttp.getAllResponseHeaders();
             if (xmlhttp.status==200) {
     varResponseContents = xmlhttp.responseText;
    }
         }
     }
     xmlhttp.send(this.postData);
  this.responseStatusCode = varResponseStatusCode;
  this.responseHeaders = varResponseHeaders;
  this.responseContents = varResponseContents;
 }


 /**
  * 쿠키를 읽어옵니다.
  * @param {Object} url - 쿠키를 읽어올 Url주소
  * @return Cookie
  */
 this.getCookie = function(url){

 }

 /**
  * 쿠키를 설정합니다.
  * @param {Object} url- 쿠키를 설정할 Url주소.
  * @param {Object} cookie- 설정할 쿠키.
  * @return ture@false
  */
 this.setCookie = function(url,cookie){

 }


 /**
  * 파일을 form 형태로 업로드합니다.
  * @param {Object} file- 업로드할 파일명(경로).
  * @param {Object} url- 업로드할 경로.
  */
 this.upload = function(file,url){

}
}


Kris Zyp's 블로그에 Future Ajax Wrapper라는 포스트에서 cross-browser와 cross-domain을 지원하는 100라인 짜리 ajax wrapper 소스를 선보였다.

W3C에서 제안한 cross-site acess 를 사용하는 대신에 IE8의 XDR(XDomainRequest)와 새로운 cross-site request를 추가하였다고 한다. 이번에 출시된 IE8은 표준을 모두 따른다고 하더니만....   또다시 IE8용으로 분기를 해줘야 한다.. ㅡ.,ㅡ;


function doRequest(method,url,async,onLoad,onProgress) {
    var xhr;
    if ((onProgress || isXDomainUrl(url)) && window.XDomainRequest) {
         if (url.match(/^https:/) && !onProgress) {
            loadUsingScriptTag(url); 

            return;
	}
        xhr = new XDomainRequest;
	if (!url.match(/^http:/)) {
            url = absoluteUrl(location.href,url);

          }
	if (!(method == “GET” || method == “POST”)) {
	    url += “&method=” + method;
	    method = “POST”;
	}
	function xdrLoad() {
	   if (xhr.contentType.match(/\/xml/)){
		var dom = new ActiveXObject(”Microsoft.XMLDOM”);
		dom.async = false;
		dom.loadXML(xhr.responseText,200);
		onLoad(dom);
	   }
	   else {
	   	onLoad(xhr.responseText,200);
	   }
	}
	if (async === false) {
	    var loaded;
	    xhr.onload = function() {
		loaded = true;
		xdrLoad();
	    }
            xhr.open(method,url);
	    xhr.send(null);
	    while(!loaded) {
		alert(”결과를 기다리는 중입니다.”);
	    }
 	    return;
	}
	else {	// do an asynchronous request with XDomainRequest
            xhr.onload = xdrLoad;
            xhr.open(method,url);
            xhr.onprogress = onProgress;
	}
    }

    else {
        xhr = new XMLHttpRequest; 
        xhr.open(method,url,async);
        xhr.onreadystatechange = function() {
            if (xhr.readyState == 3) 
                onProgress(xhr.responseText);
            if (xhr.readyState == 4) // finished
                onLoad(xhr.responseText,xhr.status);
        }
    }
    xhr.send(null); 


	function absoluteUrl : function(baseUrl, relativeUrl) {
		if (relativeUrl.match(/\w+:\/\//))
			return relativeUrl;
		if (relativeUrl.charAt(0)==’/') {
			baseUrl = baseUrl.match(/.*\/\/[^\/]+/)
			return (baseUrl ? baseUrl[0] : ”) + relativeUrl;
		}
		baseUrl = baseUrl.substring(0,baseUrl.length - baseUrl.match(/[^\/]*$/)[0].length);
		if (relativeUrl == ‘.’)
			return baseUrl;
		while (relativeUrl.substring(0,3) == ‘../’) {
			baseUrl = baseUrl.substring(0,baseUrl.length - baseUrl.match(/[^\/]*\/$/)[0].length);
			relativeUrl = relativeUrl.substring(3);
		}
		return baseUrl + relativeUrl;
	}
	function loadUsingScriptTag(url) {
		… do JSONP here if we want
	}
}

'Scripter > AJAX' 카테고리의 다른 글

Ajax Framework 분석  (0) 2009.05.04
CSSHttpRequest  (0) 2008.11.12
HTTP Header에 대하여  (0) 2008.11.08
AJAX에서 즐겨찾기와 뒤로가기를 다루는 방법  (0) 2008.09.24
어떤 AJAX Framework를 선택할 것인가.  (0) 2008.03.14
Post by 넥스트리소프트 데꾸벅(techbug)
, |
소위 Mark of the Web이라고 불리우는 ActiveX 보안창을 끄기 위해서 매일 도구>옵션에서 체크를 해줬는데 근본적인 문제 해결은 아닌것 같다.

실제로 모 프로젝트에서 X-internet솔루션중에 해당 HTML소스를 사용자 로컬에 내려받아서 HTML을 내려받는 서버부하를 줄였던 기억이 난다.

그럴경우 대부분 로컬에서 스크립트를 실행하게 되는데 실제 프로젝트에서는 ActiveX를 설치해서 작업하였다. 빈대잡으려다 초가삼간 태운다고 아래코드 한줄이면 해결할수 있었는데...
Windows XP SP2에서
<!-- saved from url=(0013)about:internet -->


위 코드를 실제 javascript가 포함된 HTML안에 넣어주면 로컬영역이 아니라 인터넷 영역으로 설정되어 보안설정이 해제된다. HTML뿐만 아니라 flash에서도 적용된다.


[본문인용:http://www.adobe.com/kr/support/flash/ts/documents/xpsp2.htm]


Microsoft에서 제시한 해결 방법은 .html 파일에 해결 코드 한 줄을 삽입하는 것입니다. 이 코드를 삽입하면 파일이 로컬 컴퓨터 영역 대신 인터넷 영역으로 설정되어 로컬 컴퓨터 차단이 해제됩니다. Microsoft에서 Mark of the Web이라고 하는 이 코드는 다음과 같습니다.

<!-- saved from url=(0013)about:internet -->

JavaScript 또는 Flash 내용이 포함된 파일을 로컬에서 미리 볼 때의 보안 메시지

액티브 콘텐트(예: JavaScript 또는 Flash)가 포함된 파일을 하드 드라이브에서 로컬로 미리 볼 경우 Internet Explorer의 노란색 정보 표시줄에서 다음과 같은 보안 메시지가 나타납니다.

보안을 위해 Internet Explorer가 이 파일에서 사용자의 컴퓨터를 액세스할 수 있는 액티브 컨텐트를 표시하는 것을 차단했습니다. 옵션을 보려면 여기를 클릭하십시오...

참고: 이 보안 메시지는 하드 드라이브의 파일(예: C:\myFiles\myFile.htm)을 직접 볼 경우에만 나타납니다. http:// 프로토콜을 사용하여 로컬 웹 서버(http://localhost/myFile.htm)나 원격 웹 서버(http://www.macromedia.com/myFile.htm)에서 페이지를 볼 경우에는 이 메시지가 나타나지 않습니다.

이 보안 메시지가 나타나지 않도록 하는 방법에는 두 가지가 있습니다.

  • 웹 페이지를 만드는 Flash 개발자가 SWF 파일을 로컬에서 재생할 때 메시지가 표시됩니다.(TechNote 19480)의 설명대로 Mark of the Web 코드를 파일에 추가하여 이 경고 메시지가 나타나지 않도록 할 수 있습니다.
  • 로컬에서 파일을 테스트하는 Flash 개발자의 경우 페이지에 Mark of the Web 코드를 추가하는 대신 다음 단계에 따라 로컬에서 액티브 콘텐트를 허용할 수 있습니다. 웹 사이트 방문자는 http:// 프로토콜을 통해 웹 페이지를 보게 되므로 Internet Explorer에서 이 변경 작업을 수행할 필요가 없습니다.
    1. 로컬 워크스테이션의 Internet Explorer에서 "도구" > "인터넷 옵션"을 선택합니다.
    2. "고급" 탭을 선택한 다음 "보안" 섹션으로 스크롤합니다.
    3. "[내 컴퓨터]에 있는 파일에서 액티브 콘텐트가 실행되는 것을 허용"을 선택합니다.
    4. "확인"을 선택합니다.


Post by 넥스트리소프트 데꾸벅(techbug)
, |

RESTFul 한 ExtJS

Scripter/EXTJS / 2008. 4. 16. 19:49


오늘따라 많이 포스팅한다는 느낌이... ( 데꾸벅 무리하다... ㅡ.,ㅡ; )
사실 뒤에 앉아 있는 울 겸댕이 윤부장의 친구분이 이 블로그를 보고 계신다기에 팁으로 올려본다.

RESTFul 한 Web application을 개발하기 위하여 부단히 노력하고 계신분들을 위한 포스트~
크헬헬~


먼저 이곳을 먼저 보세요.. : RESTful Web Services (번역중~ 크헬헬)


이제껏 RESFul하다고 하면서 개발할때 사실 2.0이전 버전에서는 모든 데이타를 parameter값들에 의해서 일일이 encodeURIComponent까지 친절히 적어주면서 작업을 하였으나 2.0 버전부터는 REST를 Full 지원하게 되면서 상당히 작업하기가 편해진것은 사실이다.

Request를 보낼때 다음과 같이 보내면 된다.....

    Ext.Ajax.request({
        url: 'process.json',
        method:'delete',
        jsonData: {foo:'bar'},   //보낼 json타입을 파라미터 값이아니라 json객체로 ..
        headers: {
            'Content-Type': 'application/json-rpc' // application/json이 아님에 주의
        }
    });


단, 아직은 완전한 REST 같지 않아서 다음과 같이 오버라이드해야 한다.


Ext.override(Ext.form.Action.Submit, {
    run : function(){
        var o = this.options;
        var method = this.getMethod();
        var isGet = method == 'GET';
        if(o.clientValidation === false || this.form.isValid()){
            Ext.Ajax.request(Ext.apply(this.createCallback(o), {
                form:this.form.el.dom,
                url:this.getUrl(isGet),
                method: method,
                params:!isGet ? this.getParams() : null,
                isUpload: this.form.fileUpload
            }));
        }else if (o.clientValidation !== false){ // client validation failed
            this.failureType = Ext.form.Action.CLIENT_INVALID;
            this.form.afterAction(this, false);
        }
    }
});

Ext.lib.Ajax.request = function(method, uri, cb, data, options) {
    if(options){
        var hs = options.headers;
        if(hs){
            for(var h in hs){
                if(hs.hasOwnProperty(h)){
                    this.initHeader(h, hs[h], false);
                }
            }
        }
        if(options.xmlData){
            if (!hs || !hs['Content-Type']){
                this.initHeader('Content-Type', 'text/xml', false);
            }
            method = (method ? method : (options.method ? options.method : 'POST'));
            data = options.xmlData;
        }else if(options.jsonData){
            if (!hs || !hs['Content-Type']){
                this.initHeader('Content-Type', 'application/json', false);
            }
            method = (method ? method : (options.method ? options.method : 'POST'));
            data = typeof options.jsonData == 'object' ? Ext.encode(options.jsonData) : options.jsonData;
        }
    }
   
    return this.asyncRequest(method, uri, cb, data);
};

Ext.lib.Ajax.asyncRequest = function(method, uri, callback, postData) {
    var o = this.getConnectionObject();
    if (!o) {
        return null;
    }
    else {
        o.conn.open(method, uri, true);
       
        if (this.useDefaultXhrHeader) {
            if (!this.defaultHeaders['X-Requested-With']) {
                this.initHeader('X-Requested-With', this.defaultXhrHeader, true);
            }
        }
       
        if(postData && this.useDefaultHeader && !this.headers['Content-Type']){
            this.initHeader('Content-Type', this.defaultPostHeader);
        }
       
        if (this.hasDefaultHeaders || this.hasHeaders) {
            this.setHeader(o);
        }
       
        this.handleReadyState(o, callback);
        o.conn.send(postData || null);
       
        return o;
    }
};

참고 : extjs.com 포럼글 중에서


'Scripter > EXTJS' 카테고리의 다른 글

Ext2.2 Release  (11) 2008.08.07
ExtJS 2.1 릴리즈  (4) 2008.04.22
Extjs Qtips 사용하기  (2) 2008.04.16
Extjs 기본레이아웃에 각종 패널붙이기  (12) 2008.04.16
ExtJS를 이용한 EditorGrid 붙이기  (2) 2008.04.07
Post by 넥스트리소프트 데꾸벅(techbug)
, |

HTML작업을 하다 보면 Tooltip을 사용할 일이 많아진다.
예를 들어

<img src="이미지 주소" alt="이미지설명"  title="이미지설명" />

<a href="" title="링크설명">

<table summary="테이블에 대한 간략한 소개">

 와 같이 사용하는데 사용자 마음대로 원하는 형태로 나오기가 어렵다는 단점이 있다. 또한 일정시간이 지나면 자동으로 없어지므로 사용하기가 까다롭다.

단 이미지가 없을 경우 엑박(엑스박스)을 없애기 이미지에 대한 내용이 들어가게 해주는 기능이 있으나 이럴경우 ExtJS를 사용하여 다음과 같이 작성해 줄수 있다.

 MARKUP

<div id="아이디" ext:qtitle="툴팀 타이틀" ext:qtip="데꾸벅<br />머리아포">

 JAVAScript (ExtJS)

Ext.QuickTips.init();
Ext.QuickTips.getQuickTip();

 과 같이 적어주면 자동으로 Ext.Tooltip() 과 같은 효과를 볼수 있다.


'Scripter > EXTJS' 카테고리의 다른 글

ExtJS 2.1 릴리즈  (4) 2008.04.22
RESTFul 한 ExtJS  (0) 2008.04.16
Extjs 기본레이아웃에 각종 패널붙이기  (12) 2008.04.16
ExtJS를 이용한 EditorGrid 붙이기  (2) 2008.04.07
ExtJS 로드맵  (0) 2008.04.01
Post by 넥스트리소프트 데꾸벅(techbug)
, |

JSON은 XML보다 더 심플하게 작성하는 방법에 대한 아이디어가 화장실에서 문득.. ㅡ.,ㅡ;
XML보다 좀더 구조화되고 심플하게 작성!!

개념은 일반적으로 Data를 구조화하기 위해 필요한 태그나 엘리먼트들을 줄이면 상당히 적은양의 데이타로 빠르게 통신할수 있을텐데라는 생각에서 출발한다.
Http통신이 원래는 RESTFul한 사상에서 출발해서 지금은 대부분 잘못쓰고 있는것처럼, JS(simple)ON 철학이 이런것에서 출발한것인데 잘못 쓰고 있다는 생각이... 아주 문득 들었다.

기존 JSON :

{
    "users": [
        {"first": "Homer",
         "last": "Simpson"},
        {"first": "Hank",
         "last": "Hill"},
        {"first": "Peter",
         "last": "Griffin"}
    ],
    "books": [
        {"title":"JavaScript",
         "author": "Flanagan",
         "year": 2006},
        {"title": "Cascading Style Sheets",
         "author": "Meyer",
         "year": 2004},
        {"title": "The C Programming Lanaguage",
         "author": "Kernighan",
         "year": 1988},
        {"title": "The Scheme Programming Language",
         "author": "Dybvig",
         "year": 2003},
        {"title": "Design Patterns",
         "author": "The Gang of Four",
         "year": 1995}

    ]

}

위와 같이 first,last 라는 attribute값들이 들어가는데 이것만 별도로 처리하여 배열식으로 처리한다면...

다이어트된 JSON :

{
    "users": {
        "cols": ["first", "last"],
        "rows": [["Homer", "Simpson"],
                 ["Hank", "Hill"],
                 ["Peter", "Griffin"]]
    },
    "books": {
        "cols": ["title", "author", "year"],
        "rows": [["JavaScript", "Flanagan", 2006],
                 ["Cascading Style Sheets", "Meyer", 2004],
                 ["The C Programming Language", "Kernighan", 1988],
                 ["The Scheme Programming Language", "Dybvig", 2003],
                 ["Design Patterns", "Gang of Four", 1995]]
    }
}


반복되는 키들을 줄임으로써 리소스를 상당량 줄일수 있겠다.문제는 서버상에서 JSON 생성할때랑 프리젠테이션 레이어에서 처리해줄때 약간 신경을 더 써야 한다는거...

흠.. Extjs에서는 어케 하지? ㅡ.,ㅡ;

Post by 넥스트리소프트 데꾸벅(techbug)
, |
사내 위키에 올렸던 글을 다시 정리하여 포스팅하다!
기본 레이아웃 viewport에 각 Region마다 서로다른 패널(panel)을 붙여봅니다.

Basic Concept

각 각의 패널(Panel)에 대하여 알아본다. 기본적인 레이아웃은 이미 앞장에서 설명했던 소스를 이용하여 각각의 Region에 서로 다른 Panel을 붙여본다. 서로다른 패널들이 레이아웃에서 어떻게 붙고(append)되고 자동으로 생성되며(Create) 삭제(remove and destroy)되는지에 대해서 알아본다. 최종적으로 재사용할 컴포넌트모듈을 작성하여 적용하는 방법(Step4)을 소개한다.
각 패널들에 대한 상세한 옵션에 대해서는 장차 설명하기로 하고 여기에서는 기본적인 레이아웃에 패널을 넣는 방식에 대해서 알아본다.

최종소스 :


Step 1.  Basic Layout and BoxComponent

우선 이전에 포스팅했던 기본레이아웃 그리기를 준비한다.

[basicLayout.html]

<html>
<head>
<title>Basic Layout</title>
<link rel="stylesheet" type="text/css" href="../../../resources/css/ext-all.css" />
<script type="text/javascript" src="../../../adapter/ext/ext-base.js"></script>
<script type="text/javascript" src="../../../ext-all.js"></script>
<script type="text/javascript" src="basicLayout.js"></script>
</head>
<body id="basicLayoutBody"></body>
</html>


 [basicLayout.js]

// 좌측 패널 (region : west ) 클래스
WestArea
= function() {
 WestArea.superclass.constructor.call(this, {
  region : 'west',
  title : 'WEST',
  collapsible : true,
  collapsed : false,
  width : 300,
  minSize : 100,
  split : true,
  layout : 'fit',
  margins : '5 0 5 5',
  cmargins : '5 5 5 5',
  html : '좌측'
 })
};
Ext.extend(WestArea, Ext.Panel, {});

// 우측 패널 (region: east) 클래스
EastArea
= function() {
 EastArea.superclass.constructor.call(this, {
  region : 'east',
  title : 'EAST',
  collapsible : true,
  collapsed : false,
  width : 300,
  minSize : 100,
  split : true,
  layout : 'fit',
  margins : '5 5 5 0',
  cmargins : '5 5 5 5',
  html : '우측'
 })
};
Ext.extend(EastArea, Ext.Panel, {});

// 중앙 컨텐츠 패널 (region : center) 클래스
CenterArea
= function() {
 CenterArea.superclass.constructor.call(this, {
  region : 'center',
  title : 'CENTER',
  layout : 'fit',
  margins : '5 0 5 0',
  html : '<div id="_CONTENTS_AREA_">컨텐츠 영역입니다.</div>'
 })
};
Ext.extend(CenterArea, Ext.Panel, {});

// 메인 클래스
BasicLayoutClass = function() {
 return {
  init : function() {
   Ext.QuickTips.init();
   this.viewport = new Ext.Viewport( {
    layout : 'border',
    items : [this.WestPanel = new WestArea(),
      this.EastPanel = new EastArea(),
      this.CenterPanel = new CenterArea()]
   });

   this.viewport.doLayout();
   this.viewport.syncSize();
  }
 }
}();
Ext.EventManager.onDocumentReady(BasicLayoutClass.init, BasicLayoutClass, true);


 위와 같이 각각의 region마다 별도의 파일로 클래스를 관리한다.

  • WestArea.js
  • EastArea.js
  • CenterArea.js
  • basicLayout.js

사용자 삽입 이미지


Step 2.  Tab Panel - center regionEdit section

중앙컨텐츠 패널(center region : CenterArea.js )에 여러개의 TabPanel을 넣어보자

CenterArea = function(viewport) {
 this.viewport = viewport;
 CenterArea.superclass.constructor.call(this, {
  region : 'center',
  title : false,
  // TabPanel일 경우 Nested된 Panel의 타이틀이 영역을 차지하므로 title은 항상 false가 되어야함.
  margins : '5 0 5 0',
  deferredRender : false, // CotainerLayout이 로드될때 defer없이 렌더링한다.
  tabPosition : 'top', // Tab이 패널의 위쪽에 위치하게 한다. ( 'top'/'bottom'
  // 두가지를 지원하며 scrolling TabPanel은 'top'만
  // 지원한다.)
  activeTab : 0, // 처음 로드(렌더링)될때 첫번째(tab index : 0 ) 탭이 activate되게 한다.
  // 기본 Panel을 사용하거나 다른Panel이 Nested 될수 있다.
  items : [this.FirstPanel = new Ext.Panel( {
   id : 'CENTER_TAB_01',
   title : '첫번째 탭',
   autoScroll : true,
   html : "첫번째"
  }), this.SecondPanel = new Ext.Panel( {
   id : 'CENTER_TAB_02',
   title : '두번째 탭',
   autoScroll : true,
   html : "두번째"

  }), this.ThirdPanel = new Ext.Panel( {
   id : 'CENTER_TAB_03',
   title : '세번째 탭',
   autoScroll : true,
   closable : true,
   html : "세번째"
  })]
 })
  // activate - 탭이 활성화 될때 일어나는(fire)되는 이벤트
 this.SecondPanel.on('activate', function(panel) {
  alert(panel.title + '이 활성화 되었습니다.' + panel.getId());
 }, this);

 // deactivate - 탭이 비활성화될때 일어나는 이벤트
 this.SecondPanel.on('deactivate', function(panel) {
  alert(panel.title + '이 비활성화 되었습니다.' + panel.getId());
 }, this);

 // beforedestory - 탭이 닫히기전에 일어나는 이벤트
 this.ThirdPanel.on('beforedestroy', function(panel) {
  alert(panel.title + '이 닫혔습니다.');
 }, this);
};
Ext.extend(CenterArea, Ext.TabPanel, {});

탭패널의 경우 한 화면에 여러개의 패널(Panel)이 필요할 경우 유용하며 연관된 다를 데이타를 사용할때 상당히 유용하다. 기본적인 event는 위에서는 3가지만 열거했지만 위 3가지 만으로도 충분히 다양한 효과를 낼수 있을 것이다. 또한 각 탭 마다 다양한 패널을 추가할수 있으며 기본 ContainerLayout도 추가할수 있으므로 여러가지형태의 레이아웃을 잡을때 상당히 유용하다.
예를 들어 이전장에서 기본레이아웃에 그리드를 추가하는 방법을 배웠는데 첫번째 탭패널에 그리드 레이아웃을 넣어 해당 레이아웃을 테스트 해보기 바란다. 또한 각 탭이 activate될때 그리드의 데이타스토어를 다시 로드할수 있도록 이벤트를 걸어주거나 다른 액션을 취할수 있다.

참고: Ext.TabPanel은 Ext.layout.CardLayout을 사용하므로 deferredRender의 경우 Ext.layout.CardLayout의 deferredRender를 참조한다.

사용자 삽입 이미지


위의 소스중 탭패널이 바로 borderLayout에 속한(region:center)일 경우에는 title 이 나타나지 않는데 기본 Layout에 Nested된 TabPanel일 경우는 기본 Layout의 region에 title을 넣으면 된다. 실제로 작업을 하다보면 위의 방법보다 아래방법을 많이 사용하게 된다. 탭패널안의 탭패널이 들어갈 경우도 발생할수 있으므로 Nested된 패널로 기본 cotainerLayout을 잡은후 넣는 방법이 좋다.

CenterArea = function(viewport) {
 this.viewport = viewport;
 CenterArea.superclass.constructor.call(this, {
  region : 'center',
  title : 'CENTER',
  layout : 'fit',
  margins : '5 0 5 0',
  items : [ // Nested된 TabPanel
   new Ext.TabPanel( {
    deferredRender : false,
    tabPosition : 'bottom',
    activeTab : 0,
    border : false,
    enableTabScroll : true,
    items : [this.FirstPanel = new Ext.Panel( {
     id : 'CENTER_TAB_01',
     title : '첫번째 탭',
     autoScroll : true,
     html : "첫번째"
    }), this.SecondPanel = new Ext.Panel( {
     id : 'CENTER_TAB_02',
     title : '두번째 탭',
     autoScroll : true,
     html : "두번째"

    }), this.ThirdPanel = new Ext.Panel( {
     id : 'CENTER_TAB_03',
     title : '세번째 탭',
     autoScroll : true,
     closable : true,
     html : "세번째"
    })]
   })]
  })
};
Ext.extend(CenterArea, Ext.Panel, {}); //기본 ContainerLayout

  위 소스를 응용하면 탭안의 탭패널, 그안의 탭패널을 넣는 방식으로 계단식 탭패널이 가능하다.

사용자 삽입 이미지


Step 3. Accordian Panel and Tree Panel - west regionEdit section

좌측패널(WestArea.js, west region)에 Accordian Panel을 붙여본다. 각각의 패널에는 tree Panel 및 여러 Panel이 올수 있다.

WestArea = function(viewport){
 this.viewport = viewport;
 WestArea.superclass.constructor.call(this,{
  region : 'west',
  title : 'WEST',
  collapsible : true,
  collapsed:false,
  width : 300,
  minSize:100,
  split : true,
  margins:'5 0 5 5',
  cmargins : '5 5 5 5',
  // Accordion Layout을 사용
  layout:'accordion',
  // Accordion Layout의 config option
  layoutConfig:{
   // 각각의 패널 처음 로드시 collapse먼저 하겠는지 확인
   collapseFirst:false,    
   // 패널 로드시 animated되게 할것인지
   animate:true,      
   // 타이틀을 눌렀을때 collapse할것인지
   titleCollapse: true,    
   // 각각의 패널중 activate될때 맨 처음으로 오게 할것인지
   activeOnTop: false,    
   // 패널의 내용에 상관없이 패널의 높이를 owerContainer의 높이와 맞출것인지 처리
   fill:true      
  },
  items: [
   this.FirstPanel = new Ext.Panel({
    title:'첫번째',
    border:false,
    html:'<p>트리가 들어갈 곳입니다.</p>'
   }),
   this.SecondPanel = new Ext.Panel({
    title:'두번째',
    border:false,
    html:'<p>두번째 패널의 내용이 들어갑니다.</p>'
   })
  ]
 })
};
Ext.extend(WestArea, Ext.Panel,{ });

accordion Layout으로 바꿨으니 이제 각각의 패널에 알맞은(?) 패널들을 넣어보자. 우선 첫번째 패널에 TreePanel을 넣어보자

WestArea = function(viewport) {
 this.viewport = viewport;
 WestArea.superclass.constructor.call(this, {
  region : 'west',
  title : 'WEST',
  collapsible : true,
  collapsed : false,
  width : 300,
  minSize : 100,
  split : true,
  margins : '5 0 5 5',
  cmargins : '5 5 5 5',
  layout : 'accordion',
  layoutConfig : {
   collapseFirst : false,
   animate : true,
   titleCollapse : true,
   activeOnTop : false,
   fill : true
  },
  items : [this.FirstPanel = new Ext.tree.TreePanel( {
   title : '첫번째',
   border : false,
   layout : 'fit',
   loader : new Ext.tree.TreeLoader( {
    dataUrl : 'menu.js',
    baseParams : {}
   }),
   rootVisible : true,
   lines : true,
   autoScroll : true,
   root : new Ext.tree.AsyncTreeNode( {
    id : '_MENU_PANEL_',
    text : '트리메뉴의 Root',
    draggable : false,
    expanded : true
   })
  }), this.SecondPanel = new Ext.Panel( {
   title : '두번째',
   border : false,
   html : '<p>두번째 패널의 내용이 들어갑니다.</p>'
  })]
 })
};
Ext.extend(WestArea, Ext.Panel, {});
사용자 삽입 이미지


Step 4. Common Modules

이미 Step1,2,3 에서 접해봐서 알겠지만 각각의 패널에는 기본 ContainerLayout만 있으면 어떤 패널이던지 가져다 붙일수 있다는것을 알았을 것이다.
그럼 각각의 공통적으로 사용되는 패널의 경우 공통모듈화 하여 사용자가 정의한 모듈로써 사용하게 된다면 어느 패널에서든지 마음대로 붙였다 떼었다 할수 있을 것이다.


[basicLayout.html]

<html>
<head>
<title>Basic Layout</title>
<link rel="stylesheet" type="text/css" href="../../../resources/css/ext-all.css" />
<script type="text/javascript" src="../../../adapter/ext/ext-base.js"></script>
<script type="text/javascript" src="../../../adapter/ext/localXHR.js"></script>
<script type="text/javascript" src="../../../ext-all.js"></script>
<script type="text/javascript" src="Modules.js"></script>
<script type="text/javascript" src="WestArea.js"></script>
<script type="text/javascript" src="EaseArea.js"></script>
<script type="text/javascript" src="CenterArea.js"></script>
<script type="text/javascript" src="basicLayout.js"></script>
</head>
<body id="basicLayoutBody"></body>
</html>

[Modules.js]

Ext.namespace("Ext.techbug");

// 공통으로 사용되는 트리메뉴
Ext.techbug.TreeMenu = function(config) {
 Ext.apply(this, config);
 Ext.techbug.TreeMenu.superclass.constructor.call(this, {
  loader : new Ext.tree.TreeLoader( {
   dataUrl : 'menu.js',
   baseParams : {}
  }),
  rootVisible : true,
  lines : true,
  autoScroll : true,
  root : new Ext.tree.AsyncTreeNode( {
   id : '_MENU_PANEL_',
   text : '트리메뉴의 Root',
   draggable : false,
   expanded : true
  })
 })
};
Ext.extend(Ext.techbug.TreeMenu, Ext.tree.TreePanel, {});

[WestArea.js]

WestArea = function(viewport) {
 this.viewport = viewport;
 WestArea.superclass.constructor.call(this, {
  region : 'west',
  title : 'WEST',
  collapsible : true,
  collapsed : false,
  width : 300,
  minSize : 100,
  split : true,
  margins : '5 0 5 5',
  cmargins : '5 5 5 5',
  layout : 'accordion',
  layoutConfig : {
   collapseFirst : false,
   animate : true,
   titleCollapse : true,
   activeOnTop : false,
   fill : true
  },
  items : [
  // 공통모듈로 사용하는 트리메뉴로 변경
    this.FirstPanel = new Ext.techbug.TreeMenu( {
     title : '첫번째',
     border : false,
     layout : 'fit'
    }),
this.SecondPanel = new Ext.Panel( {
     title : '두번째',
     border : false,
     html : '<p>두번째 패널의 내용이 들어갑니다.</p>'
    })]
 })
};
Ext.extend(WestArea, Ext.Panel, {});


'Scripter > EXTJS' 카테고리의 다른 글

RESTFul 한 ExtJS  (0) 2008.04.16
Extjs Qtips 사용하기  (2) 2008.04.16
ExtJS를 이용한 EditorGrid 붙이기  (2) 2008.04.07
ExtJS 로드맵  (0) 2008.04.01
ExtJS를 이용한 Password Meter  (0) 2008.04.01
Post by 넥스트리소프트 데꾸벅(techbug)
, |

IE전용으로 프로젝트를 진행하다 보니 Jscript를 사용할 일이 생겼다.
Ajax를 이용하지 않고 Jscript만 사용한다면 아래 방법도 괜찮을것 같다.

<html xmlns:ie>
<head>
<meta http-equiv="content-type" content="text/html; charset=EUC-KR">
<style type="text/css">
<!--
BODY { font-size:12px; }
-->
</style>

<script language="javascript">
<!--
var loaded, content, processlist;
var urls1 = "a.html";
var urls2 = new Array("b.html", "c.html", "d.html");

function onDownloadDone(html){
 content += html;
 if (++loaded < processlist.length) CONTENT.startDownload(processlist[loaded], onDownloadDone);
 else CONTENT.innerHTML = content;
}

function loadHTML(toSource){
 loaded = 0;
 content = "";
 
 processlist = new Array();
 for (var i=0; i<arguments.length; i++) {
  processlist = processlist.concat(arguments[i]);
 }
 
 CONTENT.startDownload(processlist[0], onDownloadDone);
}
-->
</script>
</head>

<body>

사용법 예제 :
<button onclick="loadHTML(urls1);"> 1</button>
<button onclick="loadHTML(urls2);">2</button>
<button onclick="loadHTML(urls1, urls2);">3</button>
<button onclick="loadHTML('c.html');">4</button>
<button onclick="loadHTML('c.html', 'd.html');">5</button>
<button onclick="loadHTML('c.html', urls1, 'd.html', urls2, urls2, urls1);">6</button>

<hr />
<!-- 불러온 코드가 삽입될 곳 -->
<ie:download id="CONTENT" style="behavior:url(#default#download);" />
</body>
</html>


Post by 넥스트리소프트 데꾸벅(techbug)
, |

XPATH 가이드

Publisher/XML/XHTML / 2008. 4. 15. 12:48


Xpath는 XML DOM문서의 내용을 조회하는데 있어서 일관적이고 빠른 방법을 제공한다. 하지만, 사용하는 방법에 따라 성능상의 차이가 나타날 수 있다. 이 글은 JavaScript에서 Xpath를 활용하는데 있어 방법에 따른 성능의 차이를 보이고, 보다 효과적으로 XML DOM 문서 다루는 방법을 설명한다.


Xpath사용시 흔한 잘못

Xpath는 XML DOM(Document Object Model) 문서에서 특정 조건을 만족하는 노드를 찾는 표준적인 방법을 제공한다. 보통 하나의 노드를 찾고, 다시 부모를 찾거나 혹은 얻어진 값으로 다시 다른 Xpath 쿼리를 작성하는 경우가 많다. selectSingleNode() 혹은 selectNodes()등을 자주 호출하여 성능이 저하되고, 작성된 코드도 길어진다. Xpath의 조건을 잘 이용하면, 여러 번에 나누어 조회하지 않고 한번에 원하는 노드를 찾을 수 있는 경우가 많다.

<?xml version="1.0" encoding="euc-kr"?>

<Message xmlns:xsi="http://www.w3.org/2001/XMLSchema-instance">

  <Header/>

  <Body Desc="고객조회">

    <LastName></LastName>

    <FirstName>철수</FirstName>

    <SSN>701202-1111111</SSN>

    <Rgn>02</Rgn>

    <Age/>

    <JobCode/>

    <Sex/>

    <CrdtRate Code="C10">

      <Lov Code="C40" Desc="프리미엄"/>

      <Lov Code="C30" Desc="최우수"/>

      <Lov Code="C20" Desc="우수고객"/>

      <Lov Code="C10" Desc="단골고객"/>

    </CrdtRate>

    <Child SSN="001202-2024433"/>

    <Family>

      <LastName></LastName>

      <FirstName>영희</FirstName>

      <SSN>701202-2111111</SSN>

      <Sex>2</Sex>

      <RelCode>03</RelCode>

    </Family>

    <Family>

      <LastName></LastName>

      <FirstName>란아</FirstName>

      <SSN>001202-1111111</SSN>

      <Sex>1</Sex>

      <RelCode>04</RelCode>

    </Family>

  </Body>

</Message>

[예제 XML. sample_message.xml]

위의 XML 문서는 예제를 위한 테스트 문서 이다. 조회의 조건과 결과로 얻고 싶은 노드를 잘 구분하는 것이 좋다. 다음 세 개의 Xpath 문장은 비슷하지만, 리턴 하는 노드가 다르다.

/Message/Body/Family/SSN[.="001202-2024433"] // SSN 노드를 리턴 
/Message/Body/Family[SSN="001202-2024433"]   // Family 노드를 리턴 
/Message/Body[Family/SSN="001202-2024433"]   // Body 노드를 리턴

XML 문서가 가진 노드의 특정한 값을 찾고, 그 값으로 다른 노드를 검색하고자 하는 경우가 있다. 예를 들어, 위 XML 문서에서 /Message/Body/Child 의 SSN(주민번호)가 Family/SSN 값과 같은 Family 노드를 찾고자 한다면, 다음과 같이 쿼리를 작성할 수 있다.

/Message/Body/Family[SSN=string(/Message/Body/Child/@SSN)]

이와 같이 쿼리를 잘 작성하면 두 번 이상 조회를 한번에 하도록 할 수 있다. 다음 예는 의도적으로 selectNodes()를 사용하여 두개의 노드를 한번에 얻도록 쿼리를 작성한 것이다. /Message/Body/Child 노드의 SSN(주민번호)값과 같은 SSN 속성을 가지는 Family노드를 찾아 LastName과 FirstName 노드의 text를 얻는 코드이다. (xpath_01.htm 참조)

var xpath = '/Message/Body/Family[SSN
=string(/Message/Body/Child/@SSN)]/LastName
| /Message/Body/Family[SSN=string(/Message/Body/Child/@SSN)]
/FirstName';
var nodes = xmldoc.selectNodes(xpath); 
var name = nodes[0].text + nodes[1].text; 
alert(name);

Xpath 성능향상

Xpath 역시 쿼리조건을 기술하는 방법과 사용하는 방법에 따라 많은 성능의 차이를 보인다. 가장 좋은 방법은 쿼리 회수 자체를 줄이는 것이며, 두번째는 쿼리의 대상이 되는 범위를 줄이는 것이다. 다양한 비교를 통해 성능 향상을 위한 구체적인 방법을 살펴보자. 이 글에서 사용한 예제 XML은 아래의 [sample_message.xml]이다.

<?xml version="1.0" encoding="euc-kr"?>

<!-- sample xml -->

<message xmlns:xsi="http://www.w3.org/2001/XMLSchema-instance">

 <header svr-time="20050505101023" ch="EnRich001" trans="E833CDF563EAC3" cli-time="20050101175941">

   <svc name="CustInfo" mtd="getEmno_1" resid="getEmno_1"/>

   <scr comp-id="Btn02" no="0321"/>

   <cli ip="10.15.56.56" mac="00-90-96-75-C4-79"/>

   <user name="홍길동" id="plusjune"/>

   <res err-code="000">정상</res>

   <curr-odr>1</curr-odr>

   <debug log-level="1" test="true"/>

   <sso-token>Vy3zFySSOx2DTESTzTyGIDx2D1zCy1120</sso-token>

 </header>

 <sub-header>

   <auth>0</auth>

   <emp-no>17874</emp-no>

   <name>김유신</name>

   <br-cd>868</br-cd>

   <br-name>고객사업부</br-name>

   <level>4</level>

   <pos-cd>314</pos-cd>

   <pos-name>과장</pos-name>

<!--중략 -->

   <cif>123456789</cif>

   <SSN/>

 </sub-header>

 <body>

   <result-set resid="cust_Info_select_detail_info">

     <res resid="cust_workcarrer" code="0" msg="">

       <rec rownum="1">

         <col name="emno" type="char">9102321</col>

         <col name="gaze_stymd" type="date"/>

         <col name="gaze_edymd" type="date"/>

         <col name="position" type="number"/>

         <col name="branch_1" type="char"/>

       </rec>

     </res>

     <res resid="cust_license" code="0" msg="">

       <rec rownum="1">

         <col name="emno" type="char">9102321</col>

         <col name="qual_nm" type="char"/>

         <col name="gain_ymd" type="date"/>

         <col name="iss_plac" type="char"/>

       </rec>

     </res>

     <res resid="cust_traning" code="0" msg="">

       <rec rownum="1">

         <col name="emno" type="char">9102321</col>

         <col name="trn_nm" type="char"/>

         <col name="mng_plac" type="char"/>

         <col name="stday" type="date"/>

         <col name="enday" type="date"/>

       </rec>

<!--중략 -->

     </res>

   </result-set>

   <result-set resid="product_info">

     <cust id="cust_selfvaluation1" code="0" msg="">

       <opt key="emno" type="char">9102321</opt>

       <opt key="yy" type="char">2005</opt>

       <opt key="hfy_clcd" type="char">1</opt>

       <opt key="branch_2" type="char"/>

       <opt key="apr_grp_nm" type="char"/>

       <opt key="rank" type="number"/>

     </cust>

<!--중략 -->

   </result-set>

 </body>

</message>


시간 측정을 위해 LapTime.js 클래스(첨부파일 참조)를 사용하였다.

성능향상 – ‘//’를 쓰지 말 것

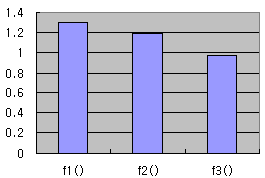
‘//’로 시작하는 쿼리는 XML DOM전체를 full-scan하기 때문에 좋지 않은 성능을 보여준다. [sample01.js]의 예제는 ‘//’를 쓴 경우와 절대 경로를 쓴 경우를 비교하고 있다. [sample01.js]의 코드에서 각각의 함수는 다음과 같은 내용을 가지고 있다.

    1. f1() – ‘//’로 시작하는 쿼리를 사용하였다.
    2. f2() – 먼저 부모노드를 찾고 그 다음 하위노드를 찾아 비교하였다.
    3. f3() – 절대 경로를 사용하였다.

[sample01.js]

function f1()
{
  return xmldoc.selectSingleNode("//rec[@rownum='2']/col[@name='emno']").text;
}

function f2()
{
  var node = xmldoc.selectSingleNode("//rec[@rownum='2']");
  return node.selectSingleNode("col[@name='emno']").text;
}

function f3()
{
  var base_path = "/message/body/result-set/res";
  return xmldoc.selectSingleNode(base_path + "/rec[@rownum='2']/col[@name='emno']").text;
}


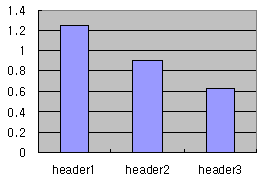
f1은 두 개의 조건을 한번에 사용하였고, f2()는 한 개의 조건에 해당하는 노드를 찾은뒤 다시 하위 노드에서 두번째 조건을 사용하였다. f3()는 절대경로를 사용하였다. [그림1]은 f1()~ f3()함수를 각각 10,000씩 수행하는데 걸린 수행 시간을 보여주고 있다.

사용자 삽입 이미지


[그림1 – sample01.js 결과]

결과적으로 ‘//’로 시작하는 쿼리보다 절대 경로를 사용한 쿼리가 빠르다는 것을 알 수 있다. 이 차이는 XML DOM 문서가 크면 클수록 차이가 크게 생긴다.

성능향상 - 쿼리대상의 범위를 줄일 것

절대 경로를 사용하더라도 사용하는 횟수가 많으면 좋지 않은 성능을 가져올 수 있다. 매번 절대경로를 사용하는 것보다, 조회할 하위 노드 부분이 정해지면 상위 노드를 한번 찾아놓고, 하위 노드를 찾는 방식이 빠르다. 또한 특정 범위의 상위 노드를 처음 참조할 때 한번 찾아놓고, 다음 부터는 찾아놓은 노드를 활용하는 것도 성능 향상을 위해 좋은 방법이 될 수 있다.


[sample02.js]

function header1()
{
  var result_text = '';
 
  result_text += "name=" + xmldoc.selectSingleNode("/message/header/svc/@name").nodeValue + ",";
  result_text += "mtd=" + xmldoc.selectSingleNode("/message/header/svc/@mtd").nodeValue + ",";
  result_text += "resid=" + xmldoc.selectSingleNode("/message/header/svc/@resid").nodeValue + ",";

  return result_text;
}

function header2()
{
  var result_text = '';
  var attrs = xmldoc.selectSingleNode("/message/header/svc").attributes;
  result_text += "name=" + attrs.getNamedItem("name").nodeValue + ",";
  result_text += "mtd=" + attrs.getNamedItem("mtd").nodeValue + ",";
  result_text += "resid=" + attrs.getNamedItem("resid").nodeValue + ",";

  return result_text;
}

function header3()
{
  var result_text = '';
  if(header3.attrs == undefined)
    header3.attrs = xmldoc.selectSingleNode("/message/header/svc").attributes;
 
  result_text += "name=" + header3.attrs.getNamedItem("name").nodeValue + ",";
  result_text += "mtd=" + header3.attrs.getNamedItem("mtd").nodeValue + ",";
  result_text += "resid=" + header3.attrs.getNamedItem("resid").nodeValue + ",";

  return result_text;
}


[sample02.js]는 header1()과 header2(),header3() 함수로 구성되어 있다. header1()은 매번 절대 경로를 사용하여 속성값을 얻오는 것을 보여주고 있고, header2()함수는 부모 노드를 찾은 뒤 노드의 함수들을 이용하여 하위 노드(혹은 속성)값을 가져오는 방법을 보여준다.

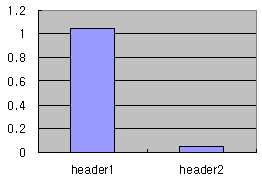
header3()은 조금 더 진보한 방법을 사용하고 있다. 처음에 속성 노드를 찾아 놓고 JavaScript에 멤버를 추가하여 유지하도록 하는 방식(header3.attrs는 Java 혹은 C#의 static 멤버와 같다. 이와 관련하여 Object Oriented JavaScript (2)를 참조하라)을 사용하고 있다. 반복하여 호출하는 경우 즉, XML노드를 반복하여 참조하는 경우에 매우 유리하다. header1()과 header2(),header3() 함수의 수행속도를 비교한 결과는 아래 [그림2]와 같다.

사용자 삽입 이미지


[그림2 – sample01.js 결과]

성능향상 – 객체지향 JavaScript와 BOM 활용

JavaScript의 객체지향을 잘 이용하여 BOM(Business Object Model)을 생성하고 활용하면, 속도의 개선 뿐만 아니라 어플리케이션의 구성을 유지보수하기 좋은 형태로 구성할 수 있다. 앞서 이야기한 것과 같이 Xpath를 이용하여 XML DOM을 매번 조회하지 않고, 초기에 한번만 조회하도록 하였다. header1()과 header2()는 그러한 차이를 보여준다.

 
function header1(){
 this.getResultText = function _getResultText(){
  var result_text = '';
  var node = xmldoc.selectSingleNode("message/header/svc");
  result_text += "name=" + node.attributes.getNamedItem("name").nodeValue + ",";
  result_text += "mtd=" + node.attributes.getNamedItem("mtd").nodeValue + ",";
  result_text += "resid=" + node.attributes.getNamedItem("resid").nodeValue + ",";
 
  return result_text;
 }
}
function header2(){
 var result_text;
 this.update = function _update(){
  var node = xmldoc.selectSingleNode("message/header/svc");
  result_text += "name=" + node.attributes.getNamedItem("name").nodeValue + ",";
  result_text += "mtd=" + node.attributes.getNamedItem("mtd").nodeValue + ",";
  result_text += "resid=" + node.attributes.getNamedItem("resid").nodeValue + ",";
 }
 this.getResultText = function _getResultText(){
  if(result_text == undefined)
    this.update();
  return result_text;
 }
}


[sample03.js]

header2()는 두개의 멤버함수를 가지고 있다. getResultText()는 결과 값을 DOM으로부터 가져와 result_text에 기록하는 역할을 수행한다. 즉, DOM에 대한 Xpath 쿼리를 수행한다. 아래의 코드는 결과가 정의되어 있지 않을 때(undefined) Xpath 쿼리를 수행하도록 하고 있다.

if(result_text == undefined) this.update();

update() 멤버함수는 필요에 따라 호출될 수 있다. (예를 들어 XML DOM을 새로 읽었거나 변경된 경우). 이런 구성을 잘 활용하면, 속도의 증진 뿐만 아니라 복잡한 XML DOM과 템소를 Wrapping 하여 유지보수하기 좋고 이해하기 좋은 구성을 가지도록 코드를 작성할 수 있다. [그림3]은 반복하여 수행한 결과를 보여준다. (header2의 경우 Xpath 쿼리를 1회만 수행하므로, 반복적으로 Xpath 쿼리를 수행하는 header1에 비해 비교가 되지 않을 정도로 빠르다)

사용자 삽입 이미지


결론

Xpath 쿼리를 잘 작성하면, 여러 번에 나누어 쿼리하지 않아도 되므로 코드를 간결하게 유지할 수 있을 뿐만 아니라, 잦은 쿼리의 부하도 줄일 수 있다. XML DOM을 효과적으로 다루는 첫번째 방법은 쿼리회수 자체를 줄이는 것이고, 두번째는 검색 대상 범위를 줄이는 것이다. DOM 전체를 크게 몇 개의 논리적인 단위로 나누고, 각각의 상위 노드에 대한 참조를 가지고, 그 참조에 대해 Xpath 쿼리를 하는 것도 하나의 방법이다. 또한, BOM을 잘 구성하여 Xpath와 관련된 operation을 wrapping 함으로써, 속도의 개선뿐만 아니라 유지보수하기 좋도록 어플리케이션을 구성할 수 있다.


'Publisher > XML/XHTML' 카테고리의 다른 글

XML 메소드와 속성 및 특성  (0) 2008.04.15
Post by 넥스트리소프트 데꾸벅(techbug)
, |

CSS 2.0 표준 Reference!

CSS 2.0 Reference

Values 읽는 법 : 기울임체(이텔릭) 적용된 값들은 속성 값을 총칭하는 이름으로서 실제의 값 또는 수치로 변환하여 적용하여야 한다. (예:color→#CCCCCC, length→5px)

Background

Property Description Values NN IE W3C
background A shorthand property for setting all background properties in one declaration background-color
background-image
background-repeat
background-attachment
background-position
6.0 4.0 CSS1
background-attachment Sets whether a background image is fixed or scrolls with the rest of the page scroll
fixed
6.0 4.0 CSS1
background-color Sets the background color of an element color-rgb
color-hex
color-name
transparent
4.0 4.0 CSS1
background-image Sets an image as the background url
none
4.0 4.0 CSS1
background-position Sets the starting position of a background image top left
top center
top right
center left
center center
center right
bottom left
bottom center
bottom right
x-% y-%
x-pos y-pos
6.0 4.0 CSS1
background-repeat Sets if/how a background image will be repeated repeat
repeat-x
repeat-y
no-repeat
4.0 4.0 CSS1

Border

Property Description Values NN IE W3C
border A shorthand property for setting all of the properties for the four borders in one declaration border-width
border-style
border-color
4.0 4.0 CSS1
border-bottom A shorthand property for setting all of the properties for the bottom border in one declaration border-bottom-width
border-style
border-color
6.0 4.0 CSS1
border-bottom-color Sets the color of the bottom border border-color 6.0 4.0 CSS2
border-bottom-style Sets the style of the bottom border border-style 6.0 4.0 CSS2
border-bottom-width Sets the width of the bottom border thin
medium
thick
length
4.0 4.0 CSS1
border-color Sets the color of the four borders, can have from one to four colors color 6.0 4.0 CSS1
border-left A shorthand property for setting all of the properties for the left border in one declaration border-left-width
border-style
border-color
6.0 4.0 CSS1
border-left-color Sets the color of the left border border-color 6.0 4.0 CSS2
border-left-style Sets the style of the left border border-style 6.0 4.0 CSS2
border-left-width Sets the width of the left border thin
medium
thick
length
4.0 4.0 CSS1
border-right A shorthand property for setting all of the properties for the right border in one declaration border-right-width
border-style
border-color
6.0 4.0 CSS1
border-right-color Sets the color of the right border border-color 6.0 4.0 CSS2
border-right-style Sets the style of the right border border-style 6.0 4.0 CSS2
border-right-width Sets the width of the right border thin
medium
thick
length
4.0 4.0 CSS1
border-style Sets the style of the four borders, can have from one to four styles none
hidden
dotted
dashed
solid
double
groove
ridge
inset
outset
6.0 4.0 CSS1
border-top A shorthand property for setting all of the properties for the top border in one declaration border-top-width
border-style
border-color
6.0 4.0 CSS1
border-top-color Sets the color of the top border border-color 6.0 4.0 CSS2
border-top-style Sets the style of the top border border-style 6.0 4.0 CSS2
border-top-width Sets the width of the top border thin
medium
thick
length
4.0 4.0 CSS1
border-width A shorthand property for setting the width of the four borders in one declaration, can have from one to four values thin
medium
thick
length
4.0 4.0 CSS1

Classification

Property Description Values NN IE W3C
clear Sets the sides of an element where other floating elements are not allowed left
right
both
none
4.0 4.0 CSS1
cursor Specifies the type of cursor to be displayed url
auto
crosshair
default
pointer
move
e-resize
ne-resize
nw-resize
n-resize
se-resize
sw-resize
s-resize
w-resize
text
wait
help
6.0 4.0 CSS2
display Sets how/if an element is displayed none
inline
block
list-item
run-in
compact
marker
table
inline-table
table-row-group
table-header-group
table-footer-group
table-row
table-column-group
table-column
table-cell
table-caption
4.0 4.0 CSS1
float Sets where an image or a text will appear in another element left
right
none
4.0 4.0 CSS1
position Places an element in a static, relative, absolute or fixed position static
relative
absolute
fixed
4.0 4.0 CSS2
visibility Sets if an element should be visible or invisible visible
hidden
collapse
6.0 4.0 CSS2

Dimension

Property Description Values NN IE W3C
height Sets the height of an element auto
length
%
6.0 4.0 CSS1
line-height Sets the distance between lines normal
number
length
%
4.0 4.0 CSS1
max-height Sets the maximum height of an element none
length
%
6.0   CSS2
max-width Sets the maximum width of an element none
length
%
6.0   CSS2
min-height Sets the minimum height of an element length
%
6.0   CSS2
min-width Sets the minimum width of an element length
%
6.0   CSS2
width Sets the width of an element auto
%
length
4.0 4.0 CSS1

Font

Property Description Values NN IE W3C
font
A shorthand property for setting all of the properties for a font in one declaration font-style
font-variant
font-weight
font-size/line-height
font-family
caption
icon
menu
message-box
small-caption
status-bar
4.0 4.0 CSS1
font-family
A prioritized list of font family names and/or generic family names for an element family-name
generic-family
4.0 3.0 CSS1
font-size
Sets the size of a font xx-small
x-small
small
medium
large
x-large
xx-large
smaller
larger
length
%
4.0 3.0 CSS1
font-size-adjust Specifies an aspect value for an element that will preserve the x-height of the first-choice font none
number
    CSS2
font-stretch Condenses or expands the current font-family normal
wider
narrower
ultra-condensed
extra-condensed
condensed
semi-condensed
semi-expanded
expanded
extra-expanded
ultra-expanded
    CSS2
font-style
Sets the style of the font normal
italic
oblique
4.0 4.0 CSS1
font-variant
Displays text in a small-caps font or a normal font normal
small-caps
6.0 4.0 CSS1
font-weight
Sets the weight of a font normal
bold
bolder
lighter
100
200
300
400
500
600
700
800
900
4.0 4.0 CSS1

Generated Content

Property Description Values NN IE W3C
content Generates content in a document. Used with the :before and :after pseudo-elements string
url
counter(name)
counter(name, list-style-type)
counters(name, string)
counters(name, string, list-style-type)
attr(X)
open-quote
close-quote
no-open-quote
no-close-quote
6.0   CSS2
counter-increment Sets how much the counter increments on each occurrence of a selector none
identifier number
    CSS2
counter-reset Sets the value the counter is set to on each occurrence of a selector none
identifier number
    CSS2
quotes Sets the type of quotation marks none
string string
6.0   CSS2

List and Marker

Property Description Values NN IE W3C
list-style A shorthand property for setting all of the properties for a list in one declaration list-style-type
list-style-position
list-style-image
6.0 4.0 CSS1
list-style-image Sets an image as the list-item marker none
url
6.0 4.0 CSS1
list-style-position Sets where the list-item marker is placed in the list inside
outside
6.0 4.0 CSS1
list-style-type Sets the type of the list-item marker none
disc
circle
square
decimal
decimal-leading-zero
lower-roman
upper-roman
lower-alpha
upper-alpha
lower-greek
lower-latin
upper-latin
hebrew
armenian
georgian
cjk-ideographic
hiragana
katakana
hiragana-iroha
katakana-iroha
4.0 4.0 CSS1
marker-offset   auto
length
7.0   CSS2

Margin

Property Description Values NN IE W3C
margin A shorthand property for setting the margin properties in one declaration margin-top
margin-right
margin-bottom
margin-left
4.0 4.0 CSS1

margin-bottom
Sets the bottom margin of an element auto
length
%
4.0 4.0 CSS1

margin-left
Sets the left margin of an element auto
length
%
4.0 3.0 CSS1

margin-right
Sets the right margin of an element auto
length
%
4.0 3.0 CSS1
margin-top Sets the top margin of an element auto
length
%
4.0 3.0 CSS1

Outlines

Property Description Values NN IE W3C
outline A shorthand property for setting all the outline properties in one declaration outline-color
outline-style
outline-width
    CSS2
outline-color Sets the color of the outline around an element color
invert
    CSS2
outline-style Sets the style of the outline around an element none
dotted
dashed
solid
double
groove
ridge
inset
outset
    CSS2
outline-width Sets the width of the outline around an element thin
medium
thick
length
    CSS2

Padding

Property Description Values NN IE W3C
padding A shorthand property for setting all of the padding properties in one declaration padding-top
padding-right
padding-bottom
padding-left
4.0 4.0 CSS1

padding-bottom
Sets the bottom padding of an element length
%
4.0 4.0 CSS1

padding-left
Sets the left padding of an element length
%
4.0 4.0 CSS1

padding-right
Sets the right padding of an element length
%
4.0 4.0 CSS1
padding-top Sets the top padding of an element length
%
4.0 4.0 CSS1

Positioning

Property Description Values NN IE W3C
bottom Sets how far the bottom edge of an element is above/below the bottom edge of the parent element auto
%
length
6.0 5.0 CSS2
clip Sets the shape of an element. The element is clipped into this shape, and displayed shape
auto
6.0 4.0 CSS2
left Sets how far the left edge of an element is to the right/left of the left edge of the parent element auto
%
length
4.0 4.0 CSS2
overflow
Sets what happens if the content of an element overflow its area visible
hidden
scroll
auto
6.0 4.0 CSS2
right Sets how far the right edge of an element is to the left/right of the right edge of the parent element auto
%
length
6.0 5.5 CSS2
top Sets how far the top edge of an element is above/below the top edge of the parent element auto
%
length
4.0 4.0 CSS2
vertical-align Sets the vertical alignment of an element baseline
sub
super
top
text-top
middle
bottom
text-bottom
length
%
4.0 4.0 CSS1
z-index Sets the stack order of an element auto
number
6.0 4.0 CSS2

Table

Property Description Values NN IE W3C
border-collapse Sets the border model of a table collapse
separate
7.0 5.5 CSS2
border-spacing Sets the distance between the borders of adjacent cells (only for the "separated borders" model) length length 6.0   CSS2
caption-side Sets the position of the caption according to the table top
bottom
left
right
6.0   CSS2
empty-cells Sets whether cells with no visible content should have borders or not (only for the "separated borders" model) show
hide
6.0   CSS2
table-layout Sets the algorithm used to lay out the table auto
fixed
6.0 5.5 CSS2

Text

Property Description Possible Values NN IE W3C
color Sets the color of a text color 4.0 3.0 CSS1
direction Sets the text direction ltr
rtl
    CSS2
letter-spacing Increase or decrease the space between characters normal
length
6.0 4.0 CSS1
text-align Aligns the text in an element left
right
center
justify
4.0 4.0 CSS1
text-decoration Adds decoration to text none
underline
overline
line-through
blink
4.0 4.0 CSS1
text-indent Indents the first line of text in an element length
%
4.0 4.0 CSS1
text-shadow   none
color
length
     
text-transform Controls the letters in an element none
capitalize
uppercase
lowercase
4.0 4.0 CSS1
unicode-bidi   normal
embed
bidi-override
  5.0 CSS2
white-space Sets how white space inside an element is handled normal
pre
nowrap
4.0 5.5 CSS1
word-spacing Increase or decrease the space between words normal
length
6.0 6.0 CSS1

Post by 넥스트리소프트 데꾸벅(techbug)
, |
하두 잘 까먹어서 꼬불쳐 두었던 글인데 네이버블로그에 있던글을 다시 포스팅한다


XML 생성

XML.appendChild() 메소드
지정된 객체의 자식 목록 끝에 노드 추가
XML.createElement() 메소드
새로운 XML 요소 생성
XML.createTextNode() 메소드
새로운 XML 텍스트 노드 생성
예)myXML = new XML();
node = myXML.createElement("주소록");
name = myXML.createElement("이름");
ntext = myXML.createTextNode("누군가");
name.appendChild(ntext);
node.appendChild(name);
tel = myXML.createElement("전화번호");
ttext = myXML.createTextNode("000-000-0000");
tel.appendChild(ttext);
node.appendChild(tel);
myXML.appendChild(node);
trace(myXML);

※ 결과:<주소록><이름>누군가<전화번호>000-000-0000

XML 복제

XML.cloneNode(true or false) 메소드
지정된 노드를 복제하고 선택 및 반복적으로 모든 자식 복제
true면 자식의 노드까지 복사되고 false면 노드만 복사
예) myXML = new XML();
node = myXML.createElement("주소록");
name = myXML.createElement("이름");
text = myXML.createTextNode("누군가");
name.appendChild(text);
node.appendChild(name);
myXML.appendChild(node);
trace(myXML);
copyXMLt = myXML.cloneNode(true);
copyXMLf = name.cloneNode(false);
trace(copyXMLt);
trace(copyXMLf);

※ 결과:<주소록><이름>누군가
<주소록><이름>누군가
<이름 />

XML 특정 노드의 존재 유뮤 확인

XML.hasChildNodes() 메소드
지정된 노드에 자식 노드 유무에 따라 True 및 False 반환
예) myXML = new XML();
node = myXML.createElement("주소록");
name = myXML.createElement("이름");
text = myXML.createTextNode("누군가");
name.appendChild(text);
node.appendChild(name);
myXML.appendChild(node);
trace(myXML);
if(myXML.hasChildNodes) {
trace("자식노드가 존재합니다");
} else {
trace("자식노드가 존재하지 않습니다");
}

※ 결과:<주소록><이름>누군가
자식노드가 존재합니다

XML 문서 해석

XML.parseXML(source) 메소드
XML 문서를 지정된 XML 객체 트리로 파싱
※ source는 문자열이며 source안에는 Spacebar, Tab, Enter가 들어가면 안된다.
예) myXML = new XML();
source = "<주소록><이름>누군가"
myXML.parseXML(source);
trace(myXML);

※ 결과:<주소록><이름>누군가

외부 XML문서 불러오기

XML.load("URL") 메소드()
URL의 XML 문서 로드 후 XML 계층 구조로 변환
XML.onLoad 이벤트 핸들러
load 및 sendAndLoad에 대한 지정된 함수(콜백 함수) 호출
예1)function loadEnd(){
trace(this);
}
myXML = new XML();
myXML.onLoad = loadEnd;
myXML.load("주소록.xml");

예2)myXML = new XML();
myXML.onLoad = function loadEnd() {
trace(this);
}
myXML.load("주소록.xml");


 XML 문서의 특정 노드 접근

XML.firstChild 속성
지정된 노드의 목록에서 첫번째 자식 노드 참조(읽기)
XML.lastChild 속성
지정된 노드의 목록에서 마지막 자식 노드 참조(읽기)
XML.nextSibling 속성
부모 노드의 자식 목록에서 다음 형제 노드 참조(읽기)
XML.previousSibling 속성
부모 노드의 자식 목록에서 이전 형제 노드 참조(읽기)
XML.parentNode 속성
지정된 노드의 부모 노드 참조(읽기)

XML.nodeName 속성
XML객체의 노드 이름을 가져오거나 반환(읽기/쓰기)
XML.nodeValue 속성
XML 객체의 노드 값(Value) 반환(읽기/쓰기)

XML.nodeType 속성
노드 값을 가져오거나 반환. 형태가 '노드'면 1, '텍스트'면 3 반환(읽기/쓰기)

XML 문서 속성 사용

XML.attributes 컬렉션
지정된 노드의 모든 속성을 포함하는 관련 배열 반환(읽기/쓰기)
예)myXML = new XML();
source = "<주소록 이름= '누군가' 전화번호='어딘가'>";
myXML.parseXML(source);

myXML.firstChild.attributes.이름 //참조
myXML.firstChild.attributes.전화번호="054-000-0000" //수정

XML.getBytesLoaded() 메소드
지정된 XML 문서용으로 로드된 바이트 수 반환

XML.getBytesTotal() 메소드
XML 문서의 크기를 바이트 수로 반환

XML.insertBefore() 메소드
지정된 노드의 자식 목록에서 기존 노드 앞에 노드 삽입

XML.removeNode() 메소드
지정된 노드를 부모에서 제거

XML.send() 메소드
지정된 XML 객체를 URL로 전송

XML.sendAndLoad() 메소드
지정된 XML 객체를 URL로 보내고
서버 응답을 다른 XML객체에 로드

XML.toString() 메소드
지정된 로드와 자식을 XML 텍스트로 변환
XML.contentType 속성
서버에 전송된 Mime 유형 표현(읽기/쓰기)

XML.docTypeDecl 속성
XML 문서의 Doctype 선언에 대한 정보 설정 및 반환(읽기/쓰기)

XML.ignoreWhite 속성
true로 설정되면
공백만 포함한 텍스트 노드는 파싱 과정에서 삭제(읽기/쓰기)

XML.loaded 속성
지정된 XML 객체가 로드되었는지 확인(읽기)

XML.status 속성
XML 문서 파싱 작업의 성공 또는 실패를 나타내는 숫자 상태 코드 반환(읽기)

XML.xmlDecl 속성
XML 문서의 문서 선언에 대한 정보 설정 및 반환(읽기/쓰기)
XML.childNodes 컬렉션
지정된 노드의 자식 노드를 배열 형식으로 참조 가능하게 만들어 줌(읽기)

XML.onData 이벤트 핸들러
서버에서 XML 텍스트를 완전히 로드한 경우 또는 다운로드할 때 오류가 발생한 경우 호출되는 콜백 함수

'Publisher > XML/XHTML' 카테고리의 다른 글

XPATH 가이드  (0) 2008.04.15
Post by 넥스트리소프트 데꾸벅(techbug)
, |
XHTML 1.0 에서 쿽스모드가 아닌 일반 Strict나 trasitional 모드에서 Height 100%를 CSS만으로 구현하기가 상당히 까다롭다.
그래서 구글신에게 물어봤다.

아는 분들은 알겠지만... 아래 방법들을 사용하면 되나 #body영역에 iframe이 들어간다면 iframe의 높이가 100%일때 처리되지 않는 단점이 있다.

[sample1]


<!DOCTYPE html PUBLIC "-//W3C//DTD XHTML 1.0 Strict//EN"
"http://www.w3.org/TR/xhtml1/DTD/xhtml1-strict.dtd">
<html xmlns="http://www.w3.org/1999/xhtml">
<head>
<meta http-equiv="Content-Type" content="text/html; charset=utf-8" />
<title>Untitled Document</title>
<style type="text/css">
html,
body {
    height: 100%;
    margin: 0;
    padding: 0;
}
#head {
    height: 100px;
    background: #ddd;
    position: relative;
    z-index: 1;
}
#body {
    min-height: 100%;
    margin: -100px 0 -50px;
}
* html #body {
    height: 100%;
}
#content-area {
    padding: 100px 0 50px;
}
#foot {
    height: 50px;
    background: #ddd;
}
</style>
</head>

<body>
<div id="head">
    요건 100px 높이 헤드
</div>
<div id="body">
    <div id="content-area">
        <p>컨텐츠 영역 1</p>
        <p>컨텐츠 영역 2</p>
        <p>컨텐츠 영역 3</p>
        <p>(계속 추가해서 테스트 가능)</p>
    </div>
</div>
<div id="foot">
    요건 50px 높이 풋
</div>
</body>
</html>


[sample2]
<!DOCTYPE html PUBLIC "-//W3C//DTD XHTML 1.0 Transitional//EN" "http://www.w3.org/TR/xhtml1/DTD/xhtml1-transitional.dtd">
<html xmlns="http://www.w3.org/1999/xhtml" xml:lang="ko">
<head>
<meta http-equiv="Content-Type" content="text/html; charset=utf-8" />
<title>CSS Layout - 100% height</title>
<style type="text/css">
html,body {
    margin:0;
    padding:0;
    height:100%; /* needed for container min-height */
    background:gray;
    font-family:arial,sans-serif;
    font-size:small;
    color:#666;
}

div#container {
    position:relative; /* needed for footer positioning*/
    margin:0 auto; /* center, not in IE5 */
    width:100%;
    background:#f0f0f0;
    height:auto !important; /* real browsers */
    height:100%; /* IE6: treaded as min-height*/
    min-height:100%; /* real browsers */
}

div#header {
    padding:1em;
    background:#ddd url("../csslayout.gif") 98% 10px no-repeat;
    border-bottom:6px double gray;

div#content {
    padding:1em 1em 5em; /* bottom padding for footer */
}

div#footer {
    position:absolute;
    width:100%;
    bottom:0; /* stick to bottom */
    background:#ddd;
    border-top:6px double gray;
    height:50px;
}
</style>
</head>
<body>
    <div id="container">
        <div id="header">
            헤더
        </div>

        <div id="content">
            컨텐츠
        </div>

        <div id="footer">
            푸터
        </div>
    </div>
</body>
</html>


[sample3]

  1. html,
  2. body {
  3. margin:0;
  4. padding:0;
  5. height:100%; /* 100 % height */
  6. }
  7. html>body #wrap {height:100%;} /* 100 % height */
  8. #header {
  9. width:100%;
  10. height:5em;
  11. }
  12. html>body #header {
  13. position:fixed;
  14. z-index:10; /* Prevent certain problems with form controls */
  15. }
  16. html>body #content-wrap {height:100%;} /* 100 % height */
  17. html>body #content {padding:6em 1em;} /* 6em = height of #header and #footer + 1em, 1em = give the content some breathing space */
  18. #footer {
  19. width:100%;
  20. height:5em;
  21. }
  22. html>body #footer {
  23. position:fixed;
  24. bottom:0;
  25. z-index:10; /* Prevent certain problems with form controls */
  26. }

[sample4]


  1. html,
  2. body {
  3. margin:0;
  4. padding:0;
  5. height:100%; /* 100 % height */
  6. }
  7. html>body #wrap {height:100%;} /* 100 % height */
  8. #wrap {
  9. width:40em;
  10. margin:0 auto;
  11. }
  12. #header {
  13. width:40em;
  14. height:5em;
  15. }
  16. html>body #header {
  17. position:fixed;
  18. z-index:10; /* Prevent certain problems with form controls */
  19. }
  20. html>body #content-wrap {height:100%;} /* 100 % height */
  21. html>body #content {padding:6em 1em;} /* 6em = height of #header and #footer + 1em, 1em = give the content some breathing space */
  22. #footer {
  23. width:40em;
  24. height:5em;
  25. }
  26. html>body #footer {
  27. position:fixed;
  28. bottom:0;
  29. z-index:10; /* Prevent certain problems with form controls */
  30. }


Post by 넥스트리소프트 데꾸벅(techbug)
, |
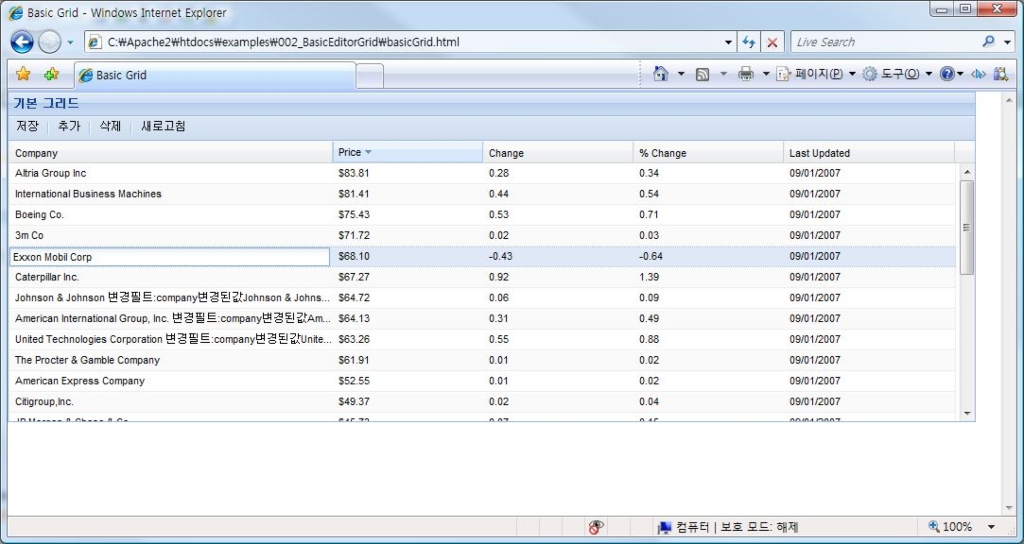
사내(넥스트리)위키에 올렸던 자료를 다시 정리하여 포스팅한다.

일반그리드와 달리 에디터그리드의 경우 해당 Cell에 해당하는 값을 변경할수 있다. 각각의 선택된 셀값과 추가하는 방법 및 해당 값들을 셋팅하는 방법, ActionComplete후 dirtyFlag를 삭제하는 방법등에 대해서 알아보자! 에디터 그리드는 이미 이전장에서 사용되었던 기본그리드를 사용하였으므로 반드시 이전장을 참조하도록 한다. 추가적으로 FormPanel에 대하여 미리 알아 보도록 한다.

최종소스 :

사용자 삽입 이미지


basicGrid.html

<html>
<head>
<title>Basic Grid</title>
<link rel="stylesheet" type="text/css" href="http://techbug.tistory.com/resources/css/ext-all.css" />
<script type="text/javascript" src="../../adapter/ext/ext-base.js"></script>
<script type="text/javascript" src="../../ext-all.js"></script>
<script type="text/javascript" src="basicGrid.js"></script>
</head>
<body id="basicGridBody">
<div id="DIV_GRID_HERE"></div>
</body>
</html>

basicGrid.js

BasicGridClass = function() {
    return {
        init : function() {
            // 데이타 스토어 정의
            this.store = new Ext.data.Store( {
                proxy : new Ext.data.HttpProxy( {
                    url : 'basicGrid.json'
                }),
                sortInfo : {
                    field : 'price',
                    direction : "DESC"
                },
                reader : new Ext.data.JsonReader( {
                    root : 'testData'
                }, this.myRecordObj = Ext.data.Record.create([ {
                    name : 'company',
                    type : 'string',
                    mapping : 'company'
                }, {
                    name : 'price',
                    type : 'float',
                    mapping : 'price'
                }, {
                    name : 'change',
                    type : 'float',
                    mapping : 'change'
                }, {
                    name : 'pctChange',
                    type : 'float',
                    mapping : 'pctChange'
                }, {
                    name : 'lastChange',
                    type : 'date',
                    dateFormat : 'n/j h:ia',
                    mapping : 'lastChange'
                }]))
            });
            this.grid = new Ext.grid.EditorGridPanel( {
                store : this.store,
                columns : [ {
                    id : 'company',
                    header : "Company",
                    width : 160,
                    sortable : true,
                    dataIndex : 'company',
                    editor : new Ext.form.TextField( {
                        allowBlank : true
                    })
                }, {
                    header : "Price",
                    width : 75,
                    sortable : true,
                    renderer : 'usMoney',
                    dataIndex : 'price',
                    editor : new Ext.form.NumberField( {
                        allowBlank : false,
                        allowNegative : false
                    })
                }, {
                    header : "Change",
                    width : 75,
                    sortable : true,
                    dataIndex : 'change'
                }, {
                    header : "% Change",
                    width : 75,
                    sortable : true,
                    dataIndex : 'pctChange'
                }, {
                    header : "Last Updated",
                    width : 85,
                    sortable : true,
                    renderer : Ext.util.Format.dateRenderer('m/d/Y'),
                    dataIndex : 'lastChange',
                    editor : new Ext.form.DateField( {
                        allowBlank : false,
                        minValue : '08/21/00',
                        disabledDays : [0, 2, 6],
                        disabledDaysText : '이날짜는 선택안되요'
                    })
                }

                ],
                stripeRows : true,
                autoExpandColumn : 'company',
                loadMask : {
                    msg : '데이타 로드중'
                },
                clicksToEdit : 1, // Edit하기 위해 Cell을 클릭해야 하는 횟수 (최대2, 최소1)
                sm : new Ext.grid.RowSelectionModel( {
                    singleSelect : true
                }),
                view : new Ext.grid.GridView( {
                    forceFit : true,
                    enableRowBody : true,
                    emptyText : 'No Record found'
                }),
                height : 350,
                width : 1024,
                title : '기본 그리드',
                tbar : [
                        {
                            text : '저장',
                            scope : this,
                            handler : this.saveAllChanges
                        },
                        '-',
                        {
                            text : '추가',
                            scope : this,
                            handler : this.addRecord
                        },
                        '-',
                        {
                            text : '삭제',
                            scope : this,
                            handler : function() {
                                var selectedKeys = this.grid.selModel.selections.keys;
                                if (selectedKeys.length > 0) {
                                    Ext.MessageBox.confirm('확인',
                                            '정말 삭제할래요? 삭제하면 복구안돼요..',
                                            this.deleteRecord, this);
                                } else {
                                    alert('삭제할 Row를 선택하세요');
                                }

                            }
                        }, '-', {
                            text : '새로고침',
                            scope : this,
                            handler : function() {
                                this.store.reload()
                            }
                        }]
            });

            this.grid.render('DIV_GRID_HERE');
            this.store.load();
            this.grid.on('afteredit', this.afterCellEditEventHandler, this); // Cell을
            // 변경후
            // 일어나는
            // 이벤트
        },

        // CEll변경후 일어나는 이벤트
        afterCellEditEventHandler : function(editEvent) { // Cell을 변경후 일어나는
            // 이벤트
            var gridField = editEvent.field;
            var gridValue = editEvent.value;
            editEvent.record.set('company', editEvent.record.get('company')
                    + '변경필트:' + gridField + '변경된값' + gridValue);
            this.updateCell(editEvent);
        },

        // 삭제하는 루틴
        deleteRecord : function(btn) {
            if (btn == 'yes') {
                var selectedRows = this.grid.selModel.selections.items;
                var selectedKeys = this.grid.selModel.selections.keys;
                var selectedRecord = this.grid.selModel.getSelected();
                alert(selectedRecord.get('company') + '\n' + selectedRows
                        + '\n' + selectedKeys + '\n지우는 Ajax Call 후에 다시 리로드한다.');
                this.store.reload();
            }
        },

        // 새로운 Row를 추가하기
        addRecord : function(btn) {
            var r = new this.myRecordObj( {
                // this.myRecordObj는
                // this.store.reader의 Record Field를
                // 말함.
                company : '새 회사명',
                price : 0.00,
                change : 0.00,
                pctChange : 0.00,
                lastChange : new Date(),
                newRecord : 'yes', // Update할때 트리거로 이용하기 위해서
                id : 0
            });
            this.grid.stopEditing();
            this.store.insert(0, r);
            this.grid.startEditing(0, 0); // 추가할 rowIndex, colIndex 위치
        },

        // 수정된 Cell만 저장하기
        updateCell : function(editEvent) {
            var isNewRecord = editEvent.record.data.newRecord;
            // 업데이트할때 사용될
            // 트리거('yes'면 새로운 레코드)
            /** ** AJAX 통신 모듈 들어가는곳 ***** */

            // DB를 성공적으로 업데이트 후 처리할 루틴
            if (isNewRecord == 'yes') {
                // 저장한후 새로운 레코드가 아님을 표시
                editEvent.record.set('newRecord', 'no');
                // isDirty Flag 없애기
                this.store.commitChanges();
            } else {
                this.store.commitChanges();
            }

            // 잘못됐을경우는 this.sotre.rejectChanges(); 로 리복한다.
            this.store.rejectChanges();

        },

        //변경된것들 모두 저장하기
        saveAllChanges : function() {
            var modifyRecords = this.store.getModifiedRecords(); //수정된 레코드 모두 찾기
            var modifyLen = modifyRecords.length;
            if (modifyLen > 0) {
                for (var i = 0;i < modifyLen; i++) {
                    /* 각 Row마다 AJAX Call을 하거나 배열로 모두 넘기는 Ajax Call Method가 들어간다.*/
                    var modifyCompany = modifyRecords[i].get('company')
                }
            }

        }

    }
}();
Ext.EventManager.onDocumentReady(BasicGridClass.init, BasicGridClass, true);


'Scripter > EXTJS' 카테고리의 다른 글

Extjs Qtips 사용하기  (2) 2008.04.16
Extjs 기본레이아웃에 각종 패널붙이기  (12) 2008.04.16
ExtJS 로드맵  (0) 2008.04.01
ExtJS를 이용한 Password Meter  (0) 2008.04.01
Ext JS Ext.ux.YoutubePlayer  (0) 2008.03.29
Post by 넥스트리소프트 데꾸벅(techbug)
, |


데꾸벅 플래쉬 때문에 난관에 봉착하다 (쉿~ 댐~..)

같은 페이지내 파일다운로드 링크를 클릭후 플래쉬의 링크를 클릭하면 다음과 같이
"을(를) 다운로드 할 수 없습니다 지정되지 않은 오류입니다"라는 메세지(IE7)를 만났다.
이런 황당한 경우는 처음이라..


그냥 일반 링크를 getURL("URL주소");를 직접사용하면 상관이 없으나 getURL("javascript:자바스크립트함수()"); 로 호출하면 다음과 같은 에러를 만나게 된다.
문제는 flash player9 로 업데이트 되면서 보안이 강화됐기 때문이란다.. ㅡ.,ㅡ;
adobe가 flash를 framework로 밀기로 작정을 하면서 부터 player업그레이들 하기 싫더라니...
살재 getURL("javascript:alert(1111);");은 브라우저의 주소표시줄에 javascript:alert(1111); 을 친것과 마찬가지 효과를 가진다. 그러나 보안이 강화되면서 이것 또한 막히면서 호출이 되지 않는다.
아래에서 자세히 설명하겠지만 ExternalInterface.call은 actionscript2.0 부터 지원하게 되므로 publishing할때 반드시 actionscript2 를 선택해줘야 한다.


[IE7 에러메세지]
사용자 삽입 이미지


[IE6 에러메세지]
사용자 삽입 이미지
IE6에서는 "보안을 위해 Internet Explorer가 이 사이트에서 사용자의 컴퓨터로 파일을 다운로드하는 것을 차단했습니다. 옵션을 보려면 여기를 클릭하십시오."라는 메세지를 뱉어내네.. ㅡ.,ㅡ; 써글것들...

그레이트김 차장님의 블로그에 처음 포스팅된 글을 볼때만 해도 단순 다운로드 서블릿의 문제일거라 생각했는데 일반 파일을 다운로드후 테스트해도 동일한 결과가 나왔다.
각각 버전별 플래쉬로 다시 퍼블리싱하여 테스트한 결과 Flash8로 퍼블리싱한 것/Flash Player9 만 문제를 일으킨다는것도..


getURL을 이용해서 그런것 같은데...
ExternalInterface.call("외부스크립트메쏘드명","파라미터명");
를 권장한단다.. AS3에서는 getURL을 지원하지 않는다는데..
Adobe에서 플래쉬 플레이어9로 업그레이드 하면서 보안정책상 몇개의 함수를 실행하지 않도록 한것이다.

[레퍼런스참조1, 레퍼런스참조2]


해결책1 :
다운로드 받을때 타겟을 _blank로 잡으면 된다는것...

_top, _self, 다 해봤지만 _blank가 가장 낫다는거..  다만 IE7 이전 버전의 경우 새창이 떠서 문제가 되지만... ㅡ.,ㅡ; 근본적인 문제해결법은 아닌것 같다.

해결책 2 :
아래와 같이 ExternalInterface.call("외부스크립트메쏘드명","파라미터명");을 쓴다. 단 아래 빨간색으로 표시된 부분만 주의해주시길...


HTML소스
<html xmlns="http://www.w3.org/1999/xhtml" xml:lang="en" lang="en">
<head>
<meta http-equiv="Content-Type" content="text/html; charset=euc-kr" />
<title>lodging_menu</title>
<script type="text/javascript">
function techbugJSFunc(codeStr){
 alert(codeStr);
}
</script>
</head>
<body bgcolor="#ffffff">
<object classid="clsid:d27cdb6e-ae6d-11cf-96b8-444553540000" codebase="http://fpdownload.macromedia.com/pub/shockwave/cabs/flash/swflash.cab#version=8,0,0,0"
 width="213" height="592" id="lodging_menu" align="middle">
<param name="allowScriptAccess" value="always" /> 반드시 always로 해주세요.. sameDomain도 안되네요
<param name="movie" value="techbug.swf" />
<param name="quality" value="high" />
<param name="bgcolor" value="#ffffff" />
<embed src="techbug.swf" quality="high" bgcolor="#ffffff" width="213" height="592" name="techbug" align="middle"
 allowScriptAccess="always" type="application/x-shockwave-flash" pluginspage="http://www.macromedia.com/go/getflashplayer" />
</object>
</body>
</html>


ActionScript

link = new Array();
link[1] = "LDG_A00000";
link[2] = "LDG_A01000";
link[3] = "LDG_A02000";
link[4] = "LDG_B00000";
link[5] = "LDG_E00000";
link[6] = "LDG_F00000";
link[7] = "LDG_I00000";
link[8] = "GDE_G00000";
link[9] = "LDG_H00000";
frame = new Array();
frame[1] = "_self";
frame[2] = "_self";
frame[3] = "_self";
frame[4] = "_self";
frame[5] = "_self";
frame[6] = "_self";
frame[7] = "_self";
frame[8] = "_self";
frame[9] = "_self";

numOfMenu = 12 ;
defaultY = 17 ;

max = new Array(0,0,0,0,0,0, 0) ;

_global.active = pageNum ;
_global.subActive = subNum ;
_global.over = active ;

for(i=1 ; i<= numOfMenu ; i++ ) {
 this["menu"+i].defaultY = this["menu"+i]._y ;
 this["menu"+i].bg.onRollOver = function() {
  _global.over = this._parent._name.substring(4) ;
 };
 this["menu"+i].bg.onRollOut = this["menu"+i].bg.onDragOut = function() {
  _global.over = active ;
 };
 if(i != numOfMenu) {
  this["menu"+i].bg.onRelease = function() {
   import flash.external.*;
   ExternalInterface.call("techbugJSFunc",link[this._parent._name.substring(4)]);

   //getURL(link[this._parent._name.substring(4)], frame[this._parent._name.substring(4)]);
  };
 }
 this["menu"+i].bg._height = defaultY ;
 if(i != 1) {
  this["menu"+i]._y = this["menu"+i-1].bg._height + this["menu"+i-1]._y ;
 }
 this["menu"+i].onEnterFrame = function() {
  if(over == this._name.substring(4)) {
   this.direction = "next" ;
   this.nextFrame() ;
  } else {
   this.direction = "prev" ;
   this.prevFrame() ;
  }
  if(Number(this._name.substring(4)) > over) {
   this._y += (this.defaultY + max[over -1] - this._y) / 4 ;
  } else {
   this._y += (this.defaultY - this._y) / 4 ;
  }
  if(this._name.substring(4) != numOfMenu) {
   this.bg._height = this._parent[Number(this._name.substring(4)) + 1]._y - this._y + 10;
  } else {
   this.bg._height = 400;
  }
 };
}
this[numOfMenu].bg.useHandCursor = false;


또한 FlashPlayer9에서 <form>태그내에서 쓸때 버그를 해결하기 위해서는 다음과 같이 작성한다.


 function Flash(id, url, width, height) {    
  var str;    
  str = '<object classid="clsid:d27cdb6e-ae6d-11cf-96b8-444553540000" codebase="http://fpdownload.macromedia.com/pub/shockwave/cabs/flash/swflash.cab#version=8,0,0,0" width="' + width + '" height="' + height + '" id="' + id + '" align="middle">';    
  str += '<param name="allowScriptAccess" value="sameDomain" />';    
  str += '<param name="movie" value="' + url + '" /><param name="quality" value="high" /><param name="bgcolor" value="#ffffff" />';    
  str += '<embed src="' + url + '" quality="high" bgcolor="#ffffff" width="' + width + '" height="' + height + '" id="'+ id +'" name="' + id + '" align="middle" allowScriptAccess="sameDomain" type="application/x-shockwave-flash" pluginspage="http://www.macromedia.com/go/getflashplayer" />';    
  str += '</object>';      
  document.write(str);      
 
  //Flash의 ExternalInterface가 Form Tag내에서 오류나는 버그를 해결하는 코드    
  eval("window." + id + " = document.getElementById('" + id + "');");

 }


 이달(2008.4월말)에 다시 보안 업뎃 된다는데 어케 바뀔지는 두고봐야 게따.. 다시 바꿀일이 없길 바라믄서...

[스크립트에서 Flash9 에러방지 ]

// 새로고침시 Flash9 ocx 에러 방지
window.onbeforeunload= function() {
 deconcept.SWFObjectUtil.prepUnload();
}

/*ExternalInterface 관련 함수 시작*/
function cleanup() {
 __flash_unloadHandler = function() {
  externalProbSet = true;
  obj = document.getElementsByTagName('OBJECT');
  for (i=0;i<obj.length;i++) {
   var theObj = eval(obj[i]);
   theObj.style.display = "none";
   for (var prop in theObj) {
    if (typeof(theObj[prop]) == "function") {
     theObj[prop]=null
    }
   }
  }
 }
 if (window.onunload != __flash_unloadHandler) {
  __flash_savedUnloadHandler = window.onunload;
  window.onunload = __flash_unloadHandler;
 }
}
window.onbeforeunload=cleanup;
/*ExternalInterface 관련 함수 끝*/

Post by 넥스트리소프트 데꾸벅(techbug)
, |
제목은 그럴듯 하지만 CSS의 hover속성을 이용한 mouseover, click 이벤트에 따른 이미지로드이다.

원본출처 : http://www.sitepen.com/blog/2008/03/28/svg-css-animations-fisheye-fun/
데모 : http://sitepen.com/labs/code/cssDock/

.dock img {
   width:50px;
   padding:10px;
   float:left;
   position:relative;
   display:block;
   -webkit-transition:width 0.5s ease-out, top 0.2s ease-out;
}
 
.dock img:hover {
   width:100px;
}
 
.dock img:active {
   top:-40px;
}
 
.dock img:hover + img {
   width:70px;
}
 

Post by 넥스트리소프트 데꾸벅(techbug)
, |
COMET관련 사이트를 정리해 봅니다.
뇌입어 블로그(블로그.뇌입어.컴/데꾸벅)에 있던 내용을 다시 옮깁니다.
2008년 후반기 부터는 COMET이 수면위로 올라올것 같네.. ㅡ.,ㅡ;

사용자 삽입 이미지


Post by 넥스트리소프트 데꾸벅(techbug)
, |

ExtJS 로드맵

Scripter/EXTJS / 2008. 4. 1. 22:58
매일 프로젝트를 수행하면서 Ext의 새로운 버전이 나올때마다 현재 작업버전과 호환이 될까 노심초사하면서 테스팅하던 때가 있었는데 이번에 Extjs의 Roadmap이 공개가 되었다.

올 겨울에 나올 Ext3.0은 chart기능과 Comet기능까지 추가 된다니 기대가 되긴하는데 프레임웍 자체가 너무 방대해지는건 아닐까 걱정해 본다... (스크립트언어인데..방대해지면.. 문제가... ㅡ.,ㅡ;)


ExtJS의 로드맵 --------------------------------------------
2008년의 목표는 2.x 버전의 새로운 컴포넌트 추가와 현재 몇몇 기능을 향상하는 선이다.
앞으로 3.0에서 보는봐와 같이  챠트와, Comet(실시간 통신-Ajax는 Reqeust에 의한 Response방식인데 비해 Coment은 일반 어플리케이션처럼 릴레이션을 물고 있다 :데꾸벅 주) 을 추가하여 큰그림을 그리고 있다.... 이하 생략...원문참조


2.1 (2008 봄)

  • RESTFul 지원 (그리 RESTFul 하지 않던데.. ㅡ.,ㅡ;)
  • 원격컴포넌트 로딩
  • 전통적인 비Ajax적인 Submit 지원클래스
  • 다른 JS라이브러리 Adapter 업그레이드
  • AIR 플랫폼 지원추가
  • 그리드 필터링
  • 체크박스/라이오 그룹
  • 상태바

2.2 (2008 여름)

  • Ext.Ajax 기능향상
  • Ext컴포넌트만의 초점을 맞춘(scoped) reset style지원
  • XML을 포함한 추가적인 TreeLoader 데이타로딩
  • 슬라이더 컴포넌트
  • 파일업로드 필드

3.0 (2008 겨울/2009 초)

  • Ext 이벤트 등록모델 업데이트
  • 플래쉬 챠트 API ( Gwt-Ext에는 구글 챠트를 이용하던데..)
  • Comet/Bayeux 지원
  • 통합된 client-server 데이타 바인딩/marshaling for Ext components
  • Browser history support (흠.. window.event.hash값을 이용한걸까? 기대되네..)
  • ListView
  • Section 508(장애자 지원정책:웹접근성) 기능향상


여튼 3.0이 기대되는건 사실이자나...  ^^ 


Post by 넥스트리소프트 데꾸벅(techbug)
, |
Ajax 관련 프로젝트를 진행하다 보면 HTTP Request/Response 및 헤더정보를 읽어오는 경우가 종종 발생한다. 그러나 Firefox의 경우 Firebug가 있어서 개발하기 상당히 편한데....
여튼... Fiddler를 Firefox에 붙여보기나 하자

넥스트리 사내 위키에 포스팅했던걸 다시 정리해서 올려본다
(어차피 데꾸벅이 쓴글이라.. ㅡ.,ㅡ;)


[Fiddler에 Json Formatter붙이기 ]

XML은 기존의 훌륭한 Formatter와 개발툴들이 많이 있으나(가량, XMLSpy와 같이..) JSON에서는 해당하는 포맷터를 찾기 힘들었다.
Visualizer같은것이 있다면 좋을텐데 라는 생각에 검색을 보니 아래와 같이 좋은놈(?)이 있었다.. Search is life ㅡ.,ㅡ;

Formatter
http://curiousconcept.com/jsonformatter

Visualizer
http://www.codeplex.com/JsonViewer/Project/ProjectRss.aspx (이넘은 Fiddler Plugin까지 있다.)
http://www.epocalipse.com/blog/2007/06/03/json-viewer/


이놈은 StandAlone형태, Visual Studio Plug-in, Fiddler에서 Plug-in형식으로 볼수 있게 해준다 
Fiddler에서 사용하는 방법은 아래와 같다.

Fiddler2 (http://www.fiddler2.com) 를 설치하고 해당 디렉토리의 fiddler.exe.config파일을 열어서 아래와 같이 추가한다.

<configuration>
  <runtime>
    <legacyUnhandledExceptionPolicy enabled="1" />
 <assemblyBinding xmlns="urn:schemas-microsoft-com:asm.v1">
     <probing privatePath="Inspectors" />
 </assemblyBinding>
  </runtime>
</configuration>

과 같이 설정후 Inspectors  디렉토리에 다운로드 받은 dll파일을 추가한다. 

FireFox에서의 사용
FireFox에서 Fiddler를 사용하려면 설정의 고급->네트워크->연결->프록시설정에서 아래의 프록시 자동설정주소에서
file:///C:/사용자문서위치/Documents/Fiddler2/Scripts/BrowserPAC.js 을 입력후 새로고침한후 실행하면 된다. (아래 다시 설명.. ㅡ.,ㅡ;)

참고적으로 IE7 에서 실행이 안되거나 Fiddler2에서 폰트가 깨져나올때
Tools > Fiddler Options 에서 Enable IPv6 항목을 uncheck 해주면 된다.

 만일 localhost가 잡히지 않는다면 Rules > Customize Rules(Ctrl+R)에서  다음과 같이 추가한다.
    static function OnBeforeRequest(oSession: Session)
    {
        if (oSession.host.toLowerCase() == "localhost") { oSession.host = "127.0.0.1"; }
       if (!(oSession.host == "127.0.0.1" || oSession.host == "127.0.0.1:8080" || oSession.host.toLowerCase() == "localhost" || oSession.host.toLowerCase() == "localhost:8080")) { oSession["ui-hide"] = "true"; }

을 추가한다.  첫번째 줄은  로컬호스트를 캡쳐할수 있게 하는것이고 두번째줄은 로컬호스트를 제외한 건에 대해서는 보여주지 말라는 얘기이다.


[FireFox에서 Fiddler사용하기]

Fiddler는 브라우저와 서버와의 HTTP 통신 상태를 보여주는 HTTP Debugging proxy이다. Fiddler에 대해서는 다음을 참조한다. (http://www.fiddlertool.com)
Fiddler를 사용할 경우 IE나 Opera 또는 그 외의 HTTP 통신은 모두 잡는다. 그런데 유독 firefox의 HTTP 통신은 잡지 못한다.

다음과 같은 방법으로 firefox에서도 fiddler를 사용할 수 있다.

1. Fiddler를 설치하고 실행한다.

2. "내 문서" 폴더 밑에 보면 "Fiddler2"라는 폴더가 있다. 그 하위 폴더에 Scripts라는 폴더가 있으며 이 디렉토리 경로를 복사한다.

3. Firefox를 열어 "도구 > 설정" 메뉴에서 "고급"을 선택한다.

4. 고급메뉴에서 "네트워크" 탭의 연결의 "설정" 버튼을 선택하여 "프록시 자동 설정 주소"를 선택하고 위에서 디렉토리 경로를 붙여넣고 마지막에 "BrowserPAC.js" 파일을 추가한다.
    예)  C:\Documents and Settings\stan\My Documents\Fiddler2\Scripts\BrowserPAC.js

사용자 삽입 이미지

5. "새로고침"을 클릭하고 "확인" 버튼을 클릭한다.

6. Firefox를 restart하면 firefox의 HTTP 통신이 fiddler에 잡힌다.


[HTTP Tracing Tools]
참고적으로 Fiddler 말고 다른 형태의 HTTP Hooking을 하려면 다음과 같은 도구들이 있다. 참조하시길..
받기 귀찮은 분들은 여기서.. 쿨럭~


'Scripter > JAVASCRIPT' 카테고리의 다른 글

JSON에 대한 작은 단상 : JSON Diet  (1) 2008.04.16
HTML include하기  (0) 2008.04.15
Javascript and jQuery Talk  (0) 2008.03.29
XHTML1일때 스크롤링시 문제점  (0) 2008.03.28
자바스크립트로 루비프로그래밍을?  (2) 2008.03.28
Post by 넥스트리소프트 데꾸벅(techbug)
, |
PHP스쿨의 질문내용중에 패스워드 미터에 대해 물어보던 내용이 있어서 일전에 꼬불쳐 두었던 URL을 정리하여 올린다.
사용자 삽입 이미지


아래 소스는 ExtJS의 User extension Plugin 이다


[HTML]
<!DOCTYPE HTML PUBLIC "-//W3C//DTD HTML 4.01//EN" "http://www.w3.org/TR/html4/strict.dtd">
<html>
<head>
<meta http-equiv="Content-Type" content="text/html; charset=iso-8859-1">
<title>Ext.ux.PasswordMeter</title>
<link rel="stylesheet" type="text/css" href="../ext-1.1.1/resources/css/ext-all.css" />

<script type="text/javascript" src="../ext-1.1.1/adapter/ext/ext-base.js"></script>
<script type="text/javascript" src="../ext-1.1.1/ext-all.js"></script>
		<script type="text/javascript" src="Ext.ux.PasswordMeter.js"></script>
<script type="text/javascript" src="passwordmeter.js"></script>
<link rel="stylesheet" type="text/css" href="passwordmeter.css" />

<!-- Common Styles for the examples -->
<link rel="stylesheet" type="text/css" href="../ext-1.1.1/examples/examples.css" />
</head>
<body>


<div style="width:300px;">
<div class="x-box-tl"><div class="x-box-tr"><div class="x-box-tc"></div></div></div>
    <div class="x-box-ml"><div class="x-box-mr"><div class="x-box-mc">
<h3 style="margin-bottom:5px;">Simple Form</h3>
<div id="form-ct">

</div>
</div></div></div>
<div class="x-box-bl"><div class="x-box-br"><div class="x-box-bc"></div></div></div>
</div>
<div class="x-form-clear"></div>
</body>
</html>


[Javascript]

Ext.onReady(function(){

Ext.QuickTips.init();

// turn on validation errors beside the field globally
Ext.form.Field.prototype.msgTarget = 'side';

/*
* ================ Simple form =======================
*/
var simple = new Ext.form.Form({
labelWidth: 75, // label settings here cascade unless overridden
url:'save-form.php'
});
simple.add(
new Ext.form.TextField({
fieldLabel: 'First Name',
name: 'first',
width:175,
allowBlank:false
}),

new Ext.form.TextField({
fieldLabel: 'Last Name',
name: 'last',
width:175
}),

new Ext.form.TextField({
fieldLabel: 'Company',
name: 'company',
width:175
}),

new Ext.form.TextField({
fieldLabel: 'Email',
name: 'email',
vtype:'email',
width:175
}),
new Ext.ux.PasswordMeter({
fieldLabel: 'Password',
name: 'password',
width:175
})
);

simple.addButton('Save');
simple.addButton('Cancel');

simple.render('form-ct');
});


[JQuery로 만든 Password Meter ]

<html>
<head>
<title>Jquery</title>
<style type="text/css">
<!--
.password {
font-size : 12px;
border : 1px solid #cc9933;
width : 200px;
font-family : arial, sans-serif;
}
.pstrength-minchar {
font-size : 10px;
}
-->
</style>
</head>
<script type="text/javascript" src="jquery.js"></script>
<script type="text/javascript" src="jquery.pstrength-min.1.2.js"></script>
<script type="text/javascript">
$(function() {
$('.password').pstrength();
});
</script>
<body>
<INPUT class="password" type=password name="Password">
</body>
<html>


[참고 사이트]
http://justwild.us/examples/password/
http://www.codeandcoffee.com/2007/07/16/how-to-make-a-password-strength-meter-like-google-v20/
http://testcases.pagebakers.com/PasswordMeter/
http://www.passwordmeter.com/
http://ajaxorized.com/?p=14
http://simplythebest.net/scripts/ajax/ajax_password_strength.html
http://phiras.wordpress.com/2007/04/08/password-strength-meter-a-jquery-plugin/


'Scripter > EXTJS' 카테고리의 다른 글

ExtJS를 이용한 EditorGrid 붙이기  (2) 2008.04.07
ExtJS 로드맵  (0) 2008.04.01
Ext JS Ext.ux.YoutubePlayer  (0) 2008.03.29
Extjs를 이용한 간단한 form submit  (0) 2008.03.14
Extjs를 이용한 ExtPHP, PHP-Ext 프로젝트 오픈  (0) 2008.03.07
Post by 넥스트리소프트 데꾸벅(techbug)
, |
출처 : http://www.linuxalt.com/


Windows Software Linux Equivalent/Alternative
3D Studio Max
K-3D ( http://www.k-3d.org/ )
Wings 3D ( http://www.wings3d.com/ )
Art of Illusion ( http://www.artofillusion.org/ )
Blender ( http://www.blender.org/ )
ACDSee
KuickShow ( http://kuickshow.sourceforge.net/ )
ShowImg ( http://www.jalix.org/projects/showimg/ )
Gwenview ( http://gwenview.sourceforge.net/ )
GQview ( http://gqview.sourceforge.net/ )
Eye of GNOME ( http://www.gnome.org/projects/eog/ )
Adobe Acrobat Reader
okular ( http://kpdf.kde.org/okular/ )
Xpdf ( http://www.foolabs.com/xpdf/ )
Evince ( http://www.gnome.org/projects/evince/ )
ePDFView ( http://trac.emma-soft.com/epdfview/ )
KPDF ( http://kpdf.kde.org/ )
Adobe Audition
Audacity ( http://audacity.sourceforge.net/ )
Adobe Illustrator
Skencil ( http://www.skencil.org/ )
Inkscape ( http://www.inkscape.org/ )
Karbon14 ( http://www.koffice.org/karbon/ )
Xara Xtreme for Linux ( http://www.xaraxtreme.org/ )
Adobe PageMaker
Scribus ( http://www.scribus.net/ )
Adobe PhotoAlbum
F-Spot ( http://f-spot.org/Main_Page )
KPhotoAlbum ( http://www.kphotoalbum.org/ )
digiKam ( http://www.digikam.org/ )
Adobe Photoshop
CinePaint ( http://www.cinepaint.org/ )
Krita ( http://www.koffice.org/krita/ )
GIMP ( http://www.gimp.org/ )
Adobe Premier
PiTiVi ( http://www.pitivi.org/wiki/Main_Page )
LiVES ( http://lives.sourceforge.net/ )
Kino ( http://www.kinodv.org/ )
Cinelerra ( http://cvs.cinelerra.org/ )
kdenlive ( http://kdenlive.sourceforge.net/ )
Jahshaka ( http://www.jahshaka.org/ )
Ant Movie Catalog
Moviefly ( https://savannah.nongnu.org/projects/lmc/ )
AOL Instant Messenger (AIM)
Kopete ( http://kopete.kde.org/ )
Pidgin ( http://pidgin.im )
APC PowerChute
Network UPS Tools ( http://www.networkupstools.org/ )
Apcupsd ( http://www.apcupsd.com/ )
PowerD ( http://power.sourceforge.net/ )
CDex
Sound Juicer ( http://www.burtonini.com/blog/computers/sound-juicer )
Rubyripper ( http://wiki.hydrogenaudio.org/index.php?title=Rubyripper )
ripperX ( http://ripperx.sourceforge.net/ )
Grip ( http://nostatic.org/grip/ )
KAudioCreator ( http://www.icefox.net/programs/?program=KAudioCreator )
Collectorz
aviManager ( http://avimanager.sourceforge.net/ )
GCstar ( http://www.gcstar.org/ )
Tellico ( http://periapsis.org/tellico/ )
Alexandria ( http://alexandria.rubyforge.org/ )
Griffith ( http://griffith.vasconunes.net/ )
vMovieDB ( http://vmoviedb.sourceforge.net/ )
Katalog ( http://salvaste.altervista.org/ )
Dreamweaver
Quanta Plus ( http://quanta.kdewebdev.org/ )
Geany ( http://geany.uvena.de )
Nvu ( http://www.nvu.com/index.php )
Screem ( http://www.screem.org/ )
KompoZer ( http://www.kompozer.net/ )
Bluefish ( http://bluefish.openoffice.nl/index.html )
DVDShrink
k9copy ( http://k9copy.sourceforge.net/ )
OGMRip ( http://ogmrip.sourceforge.net/ )
Thoggen ( http://thoggen.net/ )
xdvdshrink ( http://dvdshrink.sourceforge.net/ )
DVD Rip-O-Matic ( http://dvdripomatic.sourceforge.net )
qVamps ( http://vamps.sourceforge.net/ )
dvd::rip ( http://www.exit1.org/dvdrip/ )
AcidRip ( http://untrepid.com/acidrip/ )
Everest
HardInfo ( http://hardinfo.berlios.de/web/HomePage )
Finale
Lilypond ( http://www.lilypond.org )
Denemo ( http://denemo.sourceforge.net/index.html )
Rosegarden ( http://www.rosegardenmusic.com/ )
NoteEdit ( http://noteedit.berlios.de/ )
Brahms ( http://brahms.sourceforge.net/ )
Flash
F4L ( http://f4l.sourceforge.net/ )
Forte Agent
Pan ( http://pan.rebelbase.com/ )
FruityLoops
LMMS ( http://lmms.sourceforge.net/ )
Hydrogen ( http://www.hydrogen-music.org/ )
Google Desktop Search
Google Desktop ( http://desktop.google.com/linux/index.html )
Beagle ( http://beagle-project.org/ )
Guitar Pro
TuxGuitar ( http://www.tuxguitar.com.ar/home.html )
iTunes
Banshee ( http://banshee-project.org/Main_Page )
aTunes ( http://www.atunes.org/ )
Quod Libet ( http://www.sacredchao.net/quodlibet )
SongBird ( http://www.songbirdnest.com )
Exaile ( http://www.exaile.org/ )
Amarok ( http://amarok.kde.org/ )
Listen ( http://listengnome.free.fr/ )
Rhythmbox ( http://www.gnome.org/projects/rhythmbox/ )
gtkpod ( http://www.gtkpod.org/ )
Legacy Family Tree
GRAMPS ( http://gramps-project.org/ )
LimeWire
FrostWire ( http://www.frostwire.com/ )
Meal Master
krecipe ( http://krecipes.sourceforge.net/ )
Gourmet Recipe Manager ( http://grecipe-manager.sourceforge.net/ )
Microsoft Access
Kexi ( http://www.koffice.org/kexi/ )
knoda ( http://www.knoda.org )
GNOME-DB ( http://www.gnome-db.org/ )
Microsoft Excel
KSpread ( http://www.koffice.org/kspread/ )
Open Calc ( http://www.openoffice.org/product/calc.html )
Gnumeric ( http://www.gnome.org/projects/gnumeric/ )
Microsoft Frontpage
Quanta Plus ( http://quanta.kdewebdev.org/ )
Nvu ( http://www.nvu.com/index.php )
KompoZer ( http://www.kompozer.net/ )
Bluefish ( http://bluefish.openoffice.nl/index.html )
Microsoft HyperTerminal
minicom ( http://alioth.debian.org/projects/minicom/ )
GtkTerm ( http://freshmeat.net/projects/gtkterm/ )
Microsoft Internet Explorer
Epiphany ( http://www.gnome.org/projects/epiphany/ )
Opera ( http://www.opera.com/download/ )
Firefox ( http://www.mozilla.com/firefox/ )
Konqueror ( http://www.konqueror.org/ )
Microsoft Money
KMyMoney ( http://kmymoney2.sourceforge.net/ )
GNUcash ( http://www.gnucash.org/ )
Gnofin ( http://gnofin.sourceforge.net/ )
Grisbi ( http://www.grisbi.org/ )
Microsoft Office
GNOME Office ( http://www.gnome.org/gnome-office/ )
KOffice ( http://www.koffice.org/ )
OpenOffice ( http://www.openoffice.org/ )
Microsoft OneNote
BasKet ( http://basket.kde.org/ )
Microsoft Outlook (Express)
Thunderbird ( http://www.mozilla.com/thunderbird/ )
Evolution ( http://www.gnome.org/projects/evolution/ )
Microsoft Powerpoint
Open Office Impress ( http://www.openoffice.org/product/impress.html )
KPresenter ( http://www.koffice.org/kpresenter/ )
Microsoft Project
KPlato ( http://www.koffice.org/kplato/ )
OpenProj ( http://openproj.org/openproj )
GanttProject ( http://ganttproject.sourceforge.net/ )
Planner ( http://live.gnome.org/Planner )
TaskJuggler ( http://www.taskjuggler.org/ )
Microsoft Visio
Dia ( http://www.gnome.org/projects/dia/ )
Kivio ( http://www.koffice.org/kivio/ )
Microsoft Windows Media Center
Freevo ( http://freevo.sourceforge.net/ )
Elisa Media Center ( http://www.fluendo.com/elisa/ )
MythTV ( http://www.mythtv.org )
LinuxMCE ( http://www.linuxmce.com/ )
Microsoft Word
Open Office Writer ( http://www.openoffice.org/product/writer.html )
AbiWord ( http://www.abisource.com/ )
Kword ( http://www.koffice.org/kword/ )
mIRC
Konversation ( http://konversation.kde.org/ )
KVIrc ( http://www.kvirc.net/ )
BitchX ( http://www.bitchx.org/ )
Xchat ( http://www.xchat.org/ )
ChatZilla! ( http://chatzilla.hacksrus.com/ )
irssi ( http://www.irssi.org/ )
Pidgin ( http://pidgin.im )
Mp3tag
Kid3 ( http://kid3.sourceforge.net/ )
Pinkytagger ( http://pinkytagger.sourceforge.net/ )
EasyTAG ( http://easytag.sourceforge.net/ )
Cowbell ( http://more-cowbell.org/ )
Audio Tag Tool ( http://pwp.netcabo.pt/paol/tagtool/ )
MSN messenger
Mercury Messenger ( http://www.mercury.to/ )
Kopete ( http://kopete.kde.org/ )
aMSN ( http://amsn-project.net/ )
Pidgin ( http://pidgin.im )
Mudbox
SharpConstruct ( http://sharp3d.sourceforge.net )
Nero Burning Rom
X-CD-Roast ( http://www.xcdroast.org/ )
Brasero ( http://perso.orange.fr/bonfire/index.htm )
GnomeBaker ( http://gnomebaker.sourceforge.net/ )
Graveman! ( http://graveman.tuxfamily.org/ )
K3b ( http://www.k3b.org/ )
NetMeeting
Ekiga ( http://www.gnomemeeting.org/ )
NetStumbler
Kismet ( http://www.kismetwireless.net/ )
SWScanner ( http://www.swscanner.org/ )
NewzCrawler
RSSOwl ( http://www.rssowl.org/ )
Liferea ( http://liferea.sourceforge.net/ )
BasKet ( http://basket.kde.org/ )
Akregator ( http://akregator.kde.org/ )
Blam ( http://www.cmartin.tk/blam.html )
Straw ( http://www.gnome.org/projects/straw/ )
Notepad
leafpad ( http://tarot.freeshell.org/leafpad/ )
NEdit ( http://www.nedit.org/ )
jEdit ( http://www.jedit.org/ )
Kate ( http://kate-editor.org/ )
gedit ( http://www.gnome.org/projects/gedit/ )
Scribes ( http://scribes.sourceforge.net/ )
tpad ( http://tclpad.sourceforge.net/ )
OrangeCD Catalog
GWhere ( http://www.gwhere.org )
Origin
SciGraphica ( http://scigraphica.sourceforge.net/ )
Partition Magic
Partimage ( http://www.partimage.org/Main_Page )
GParted ( http://gparted.sourceforge.net/ )
QtParted ( http://qtparted.sourceforge.net )
Picasa
F-Spot ( http://f-spot.org/Main_Page )
KPhotoAlbum ( http://www.kphotoalbum.org/ )
digiKam ( http://www.digikam.org/ )
Pro Tools
Ardour ( http://www.ardour.org )
Quicken
KMyMoney ( http://kmymoney2.sourceforge.net/ )
GNUcash ( http://www.gnucash.org/ )
Gnofin ( http://gnofin.sourceforge.net/ )
Grisbi ( http://www.grisbi.org/ )
SoulSeek
Nicotine ( http://nicotine.thegraveyard.org/ )
Nicotine-Plus ( http://nicotine-plus.sourceforge.net/ )
SoundForge
ReZound ( http://rezound.sourceforge.net/ )
TexnicCenter
Total Commander
GNOME Commander ( http://www.nongnu.org/gcmd/ )
xfe ( http://roland65.free.fr/xfe/ )
Tux Commander ( http://tuxcmd.sourceforge.net/ )
Midnight Commander ( http://www.ibiblio.org/mc/ )
Krusader ( http://krusader.sourceforge.net/ )
Traktor DJ
Mixxx ( http://mixxx.sourceforge.net/ )
Videora
thin liquid film ( http://thinliquidfilm.org/ )
Winamp
Audacious ( http://audacious-media-player.org/Main_Page )
Amarok ( http://amarok.kde.org/ )
XMMS ( http://www.xmms.org/ )
Windows Media Player
KPlayer ( http://kplayer.sourceforge.net/ )
VideoLAN ( http://www.videolan.org/ )
xine ( http://xinehq.de/ )
mplayer ( http://www.mplayerhq.hu/design7/news.html )
Windows Movie Maker
PiTiVi ( http://www.pitivi.org/wiki/Main_Page )
LiVES ( http://lives.sourceforge.net/ )
Open Movie Editor ( http://openmovieeditor.sourceforge.net/HomePage )
Avidemux ( http://fixounet.free.fr/avidemux/ )
Cinelerra ( http://cvs.cinelerra.org/ )
kdenlive ( http://kdenlive.sourceforge.net/ )
WinIso
ISO Master ( http://littlesvr.ca/isomaster/ )
KIso ( http://kiso.sourceforge.net/ )
WinMerge
KDiff3 ( http://kdiff3.sourceforge.net/ )
Meld ( http://meld.sourceforge.net/ )
xxdiff ( http://furius.ca/xxdiff/ )
Kile ( http://kile.sourceforge.net/ )
WinTV
XdTV ( http://xawdecode.sourceforge.net/ )
tvtime ( http://tvtime.sourceforge.net/ )
WS_FTP
gFTP ( http://gftp.seul.org/ )
FireFTP ( http://fireftp.mozdev.org/ )
Zbrush
SharpConstruct ( http://sharp3d.sourceforge.net )
ZoneAlarm
Guarddog ( http://www.simonzone.com/software/guarddog/ )
Firestarter ( http://www.fs-security.com/ )

Post by 넥스트리소프트 데꾸벅(techbug)
, |


jQuery의 창시자 John Resig의 자바스크립트 강의 동영상이 있어 포스팅한다.

Javascript2 에 대한 내용도 있어 상당히 유용한 동영상이다.

John의 동영상은 구글비디오에서 볼수 있다.

Post by 넥스트리소프트 데꾸벅(techbug)
, |
YouTube API 와 Extjs를 이용한 Youtube player extension이 공개되었다.

데모페이지 : http://www.siteartwork.de/youtubeplayer_demo/
공식페이지 : http://www.siteartwork.de/youtubeplayer/
사용자 삽입 이미지

일전에 LiveGrid를 공개했던 Thorsten Suckow-Homberg가 공개한 YouTube Player는 개발자들이 쉽게 Youtube API를 이용하여 Ext application에 embed하도록 하였다.
간단한 기능으로는
  • 버퍼링 상태
  • 플레이백 슬라이더
  • 음소거
  • 볼륨컨트롤
등 기존 미디어플레이어의 기능을 많이 내포하고 있다.
당연히 오픈소스이므로 꽁짜다.. ^^

다운로드 :


'Scripter > EXTJS' 카테고리의 다른 글

ExtJS 로드맵  (0) 2008.04.01
ExtJS를 이용한 Password Meter  (0) 2008.04.01
Extjs를 이용한 간단한 form submit  (0) 2008.03.14
Extjs를 이용한 ExtPHP, PHP-Ext 프로젝트 오픈  (0) 2008.03.07
Extjs Grouping Header Grid Plugins  (13) 2008.03.06
Post by 넥스트리소프트 데꾸벅(techbug)
, |
제목은 거창하게 달았지만 데꾸벅만 몰랐던 것일수도 있다.
대부분 SI관련 프로젝트는 quirks mode(스펠링이 맞나? 흠..)에서만 작업을 하기 때문에
XHTML transitional이나 strict모드에서는 잘 작업을 하지 않아서 잘못된것임에도 인지못하였던것일 수도 있다.

DOCTYPE이 아래와 같이 XHTML transitional 모드일때
<!DOCTYPE html PUBLIC "-//W3C//DTD XHTML 1.0 Transitional//EN" "http://www.w3.org/TR/xhtml1/DTD/xhtml1-transitional.dtd">

[ 슬라이딩 메뉴 소스 ]
function slidingBars(objid,starttop,bottommargin){
    var obj=document.getElementById(objid);
    if(obj !=null && obj !=undefined){
        var ntop;
        var maxtop;
        var speed=10;
        var move=function(){
            ntop=starttop+document.body.scrollTop;
            maxtop=document.body.scrollHeight-(bottommargin+obj.offsetHeight);

            if(maxtop < ntop) ntop=maxtop;
            movevalue = Math.floor((ntop-obj.offsetTop)/speed);
            obj.style.top=(obj.offsetTop+movevalue)+'px';
            setTimeout(move,10);
        }
        move();
    }
}
window.onload=function(){
    slidingBars('slidingbar',35,100);
}

<div id="slidingbar">포지션:엡솔루트;지-인덱스:1인 레이어</div>


와 같이 늘쌍 써오던것이 Opera를 제외한 IE6,7,8 및 FF2.0에서 적용이 되질 않았다.
혹, XHTML같은 경우 테이블의 height가 100%가 지정되지 않기때문에 이런 문제일수도 있을것 같아 검색하다 보니 다음과 같은 글을 발견하였다.

http://forums.digitalpoint.com/archive/index.php/documentbodyscrolltop-in-ie/t-11965.html
http://forums.mozilla.or.kr/viewtopic.php?t=2382&sid=442d133080a29e669f7ca4357cdf3415

참조들 하심 되겠고....
말하고자 하는 바는 사실 우리가 늘쌍 써 왔던 document.body.가 아니라 document.html.scrollTop해도 적용이 되긴 하나 정확한 표현은 document.documentElement 라는 사실이다.
(위 소스에서 수정해줘야 해요~~ ^^)

documentElement 속성값은 문서의 최상위노드(root) 참조를 나타내는 개체이다.
이 속성은 읽기전용이며 디폴트값은 없다.
가장 전형적인 최상위 노느는 html 개체이다.


Post by 넥스트리소프트 데꾸벅(techbug)
, |
웹어서 포토샵의 기능을 쓸수 있게 해주는 서비스가 생겨 포스팅한다.

사실 이러한 간단한 이미지편집기능을 웹에서 해주는 Picnik 서비스가 있으나 왠지 모르게 조금 허술하다는 생각을 했었는데 포토샵 익스프레스는 포토샵의 모든기능을 웹에서 쓸수 있게 해준다. 단 회원가입해야지만 사용할수 있는데 test Drive에서 테스트 해볼수 있다.
플래쉬 베이스라 그런지 느린것이 단점이다..

사용자 삽입 이미지


'Designer > UX' 카테고리의 다른 글

2009년 유행할 웹디자인 트렌드  (14) 2009.01.19
IE8을 미리 대비하기  (0) 2008.06.13
칼라에 대한 고찰  (0) 2008.02.21
IE6 PNG background없애기  (0) 2008.02.21
favicon 생성기  (0) 2008.02.21
Post by 넥스트리소프트 데꾸벅(techbug)
, |
스크립트로 루비프로그래밍을 만든다?? 기발한 생각보다는 별놈이 다 있다는 생각이..

원본사이트 : HotRuby

아래그림은 루비로 실행된 FlashAS3 이다.

사용자 삽입 이미지

아래 파일을 다운로드 받아 다음과 같이 사용한다.


<html>
<head>
    <title>Block - HotRuby - Ruby on JavaScript</title>
    <link href="../css/prettify.css" type="text/css" rel="stylesheet" />
    <script type="text/javascript" src="../js/prettify.js"></script>
    <script type="text/javascript" src="../js/ext-base.js"></script>
    <script type="text/javascript" src="../js/HotRuby.js"></script>
   
    <script type="text/ruby">
class Hoge
    def add_msg &block
        block.yield "is"
    end
end
   
class Foo
    NAME = ' - William Shakespeare'
    def main
        pre = "Action"
        @space = " "
        Hoge.new.add_msg do |msg|
            fuga = "eloquence"
            puts pre + @space + msg + @space + fuga + NAME
        end
    end
end
   
Foo.new.main
    </script>
</head>
<body onload="prettyPrint(); new HotRuby().runFromScriptTag('/compileRuby.cgi')">
    <h1>Block - HotRuby(Ruby on JavaScript)</h1>
    <div>Result:</div>
    <div id="debug" class="result"></div>
    <br />


[compileRuby.cgi 내용]
require 'json'
require 'cgi'

OutputCompileOption = {
  :peephole_optimization    =>true,
  :inline_const_cache       =>false,
  :specialized_instruction  =>false,
  :operands_unification     =>false,
  :instructions_unification =>false,
  :stack_caching            =>false,
}

cgi = CGI.new

puts "Content-type: text/plain\n\n"
puts VM::InstructionSequence.compile(cgi['src'], "src", 1, OutputCompileOption).to_a.to_json


Post by 넥스트리소프트 데꾸벅(techbug)
, |

원본출처 : John Resig's Blog


사용자 삽입 이미지

IE8이 출시된지 2주일이 지난 지금 이전 브라우저에서 정상적으로 동작되던 스크립트들이 IE8에서는 안되는 경우가 있다. 예를 들면 XMLHttpRequest를 통한 전송부분이나 <object>.getElementsByTagName("*")부분일 것이다.


브라우저 특징에 대한 John Resig(이 사람 누군지 알죠?? jQuery)의 생각들을 집어본다.

W3C: querySelector

CSS 선택자(id,class선택자들..)를 쉽게 찾을수 있게 해주는 querySelector가 표준이다. IE8의 경우 CSS2.1을 지원하며 CSS3는 아직 지원하지 않는다.. 아직 표준확정이 되지 않은 CSS3를 지원한다는건...


HTML 5 부분!

HTML5 호환은 환상적인 스펙의 향상이다.

HTML 5: window.location.hash

이미 대부분의 브라우저에서는 지원하고 있지만 ajax에서 뒤로가기 버튼문제에 대해 해결하기 위해 window.loaction.hash를 지원한다. 또한 hashchanged란 이벤트도 지원한다.
window.location.hash는 페이지 URL에 대해 변경된 내용을 저장하는것이다.

HTML 5: postMessage

postMessage는 서로다른 프레임간 통신하는 방법인데 IE8, Opera9, Firefox3,Webkit등에서 앞으로 지원할 예정이라 한다. IE8같은 경우 postMessage를 쓰면 화면자체의 Section부분만 바로 통신하여 가져올수 있으니... 점점 간단해 지겠군효~~


HTML 5: Offline Events

IE8과 Firefox3만 지원하는 기능으로써 자바스크립트를 통해 커넥션을 감지할수 있는 쉬운방법이다.

XDomainRequest

아주 재미있는 기능으로 이기능에 대해선 MS에서 작성한 문서를 참조하기 바란다. 데꾸벅도 설명하기 힘들다.. ㅠ.,ㅠ;

이후 글은 원문에서 찾아보시길...
Post by 넥스트리소프트 데꾸벅(techbug)
, |